Saturday 29 April 2017

Here Comes Trouble

Inevitably, I've bought the Walking Dead: All Out War game box - along with numbers of other boosters and expansions which are all now in the painting queue. I'm going to aim to get them done in the order I need them for the scenarios I'm planning to play for my comic book campaign. I've got my eyes on doing my first custom scenario following the Governor on his road to Woodbury, and for it I will need some henchmen for him to lead.

Enter the Scavengers...


This group of ruffians are actually from much later in the storyline than the Governor (they are replaced by the 'Wolves' in the TV show), and really only feature in a single issue, but seem to have been included in the main box as opposition for Rick's group that won't have much appeal as the subject of an expansion (especially when you compare them to the Prisoners, Woodbury, the Hunters and the Saviours). In terms of my games, you can expect to see them lining up alongside numerous villains.

A nice touch is that Mantic have provided alternative cards for all but Liam in different expansions which increases the amount of choice that a person not playing as Rick's group has until more notable villains are released. Their numbers can be further increased by adding Reggie and Craig (although they aren't associated in the comics), that I've already painted up.

Derek - the Leader
Sandra - the Runner


Patrick - the Bruiser
Liam - the Cannon Fodder

In addition, I've painted another four Walkers. I'm going to try to paint as many Walkers as I paint Survivors to try to get through them and not get distracted by the more interesting characters.


Finally, I've almost finished my Mars Attacks street furniture: two mailboxes, two sections of picket fence, a street sign and a bus stop bench. The streets sign still needs road names adding, which I'll probably do with the printer, and I still have a bin to finish off. Then I might move on to the ruined buildings.


That's it for now, but you can expect to see at least some of the Scavengers in a scenario soon.


Tuesday 18 April 2017

The Walking Dead - Issue #2

Time for more of the solo adventures of Brian 'The Not-Yet-Governor' Blake. I should point out to my legion of overseas readers, that I'm not setting out to make any kind of political point with this, but given that the scenario is supposed to be about learning how the firearms rules work in the game, the title and subsequent flippant jokes turned out to be too hard to resist.

Prelude to Woodbury, Part 2 - Gun Control

Brian lives in the shadow of of his brother, Philip, who has led their group of survivors to Wiltshire Estates, an upper-class gated community. Philip sends Brian out to explore the streets and come back with something they can use to survive.


Monday 17 April 2017

Happy Easter!

Easter Monday seems an appropriate day for Calendar Man, the date obsessed villain for the Batman Miniature Game.


Not my best work by a long way, but good enough, given that the actual model is fairly dull. I've tried to get the dates he has tattooed around his head done, but they are a bit wonky.

In game terms Calendar Man is a slow moving assassin, who is quite durable, and has abilities that allow him to mess with your opponent. Amusingly, he has a variable trait that is different depending on which month you are playing the game in. This not only makes him interesting to use, but also means that your opponent will probably never be fully aware of his capabilities.

I'm going to a tournament in May, and there's a very good chance that Calendar Man will feature in my crew. For reference, his bonus trait in May is Disarray, allowing to mess with enemy counters.

Thursday 13 April 2017

Panic in the Streets!


Keeping up with my frankly blistering pace of blogging at the moment, I've done some more models and terrain for The Walking Dead: All Out War. This time I've done the Lori and Andrea booster packs and some more scenery from Mars Attacks.


Beginning with Andrea; she comes with her little sister Amy, and these two are amongst my favourite in the range. The contrast in pose and outfit between the two sisters sums up their differing personalities perfectly: Andrea is read for action and determined to survive, whilst Amy's best bet is to run away. I've tried to capture this in the colour schemes too, with Andrea in darker, more practical clothing, whilst Andrea is in naive, innocent white and stands out like a McDonalds Drive Thru at night. However, I've used the same pink and hair colour to still tie the two together.

In game, Andrea is a marksman and a capable survivor. This is important to me, not only because I liked the character in the TV show, but also because the rest of the female characters available for TWD at the moment are so damn feeble. Amy typifies this, and is only marginally better if she stays close to her sister. I expect, as in the TV show and comic book, Andrea will appear much more than Amy...


Lori Grimes is Rick's wife and Shane's erstwhile lover and at the apex of a very eventful love triangle...something which seems odd, if Mantic are to be believed in their sculpting, because she apparently looks a bit like Noel Fielding.

Manly jawline aside, I like the fact that this model, like others, is unarmed, as it captures the idea that not everybody is a gun-toting maniac. I've kept the colour scheme simple, but tried to reflect her costume from the TV show (although I'm not painting checks on her shirt).

In game, she's marginally better than Amy and Carol in that she has medium rather than low nerve. However, she's not brilliant in a fight, has no special rules and is only a support character. She's definitely a thematic, rather than a tactical choice.


Craig is a generic bad guy (apparently based on a character who's gang attacks and attempts to assault Carl before Rick bites his throat out) who comes in the Lori booster. I've given him a very simple paint job (which isn't helped by the poor photo) as he's never really going to be massively important to the games I play.

I like the fact that Mantic are including generic bad guys, as it means that they can be used to create player vs player games that are more thematic than continuous civil wars within Rick's gang.


As ever, there was a Walker in each  booster pack. Actually, Lori came with a Crawler rather than a Walker, and I got to slap blood effect about liberally as it drags itself along.

The Walker from the Andrea box may look familiar as it appears to be a zombified version of Reggie from the Shane booster...


Apparently, in the comics the Walker that (SPOILER ALERT!) kills Amy looks a bit like the criminal that shoots Rick in the first issue (which Reggie is based on), and Mantic has decided to link the two. This is a nice touch as is means that there are a few character for whom there is the option of properly zombifying them if they get killed in game.


The Mars Attacks scenery is proving really easy to paint quickly and seems just as appropriate for a zombie apocalypse as an alien invasion. I'm pleased to be getting some use out of this as largely I found the miniatures in Mars Attacks a bit disappointing as they were a bit too small to scale with other ranges. I'll get round to painting the Martians some day (as scale accuracy isn't really a massive issue for aliens), but for now, the barricades will see good service in games of the The Walking Dead.

I've only got a handful of scatter terrain pieces to do now, and I'm still undecided whether I'm going to use the ruined buildings that come in the Mars Attacks box. However, there's still a steady flow of miniatures and game to come over the coming days.


Wednesday 12 April 2017

The Walking Dead - Issue #1

Another day, another blog post...

As regular readers will know, I've recently been painting up miniatures for The Walking Dead: All Out War. Not only is this a really good game, based on a popular brand with excellent miniatures; but it also has dedicated solo rules which actually work. All this means that this game is ideal for me to set off on another of my solo flights of fancy, and begin a (sort of) campaign.

Thus I present the first of (hopefully) three adventures featuring the soon-to-be Governor of Woodbury, Brian Blake. The scenarios I'm playing are the solo tutorial scenarios from the Prelude to Woodbury starter set. I'm playing them as written as I thought I'd get to grips with the game properly before I start tinkering with rules. Also, subsequent expansions, such as the Days Gone Bye set contain a whole raft of scenarios based on the action from the comics, so there's plenty to be going on with. The only changes I intend to make are if characters die or survive when they aren't supposed to, in which case I'll alter later scenarios to make things work.

Oh, and I'm doing these battle reports in Comic Life because it suits the source material, I've done it before and liked it, and I've been inspired by 'The True Adventures of Rick and Glenn', which you can read on the Pimp My Board Game blog (see the sidebar), in which you'll find that whilst I've only made my photos black and white, he's actually painted all his models and terrain that way; it's awesome, I highly recommend having a look.

So, without further ado, I present:

Prelude to Woodbury, Part 1 - A Hard Lesson

The dead have begun to rise, and Brian Blake needs a place to hide. He decides to make his way to his parents' empty townhouse to wait for rescue. He stops to scavenge for food on the way, but he's not the only one who's hungry!


The game was really close; much closer than when I tried the rules out the first time. Brian was bitten on the first turn and it was then a race against time to see if I could complete the scenario before he died. Much as he griped, Brian would not have made it if his first two searches had not provided him with bandages and the ability to heal damage.

What I like about this game is that even in solo mode the event cards and supply deck make sure that each game plays out very differently, offering a really good degree of replay value. Hopefully it won't be too long before issue two, and there are more Walking Dead miniatures that have been completed which should be appearing tomorrow.

Tuesday 11 April 2017

Little League

It's been a while since I've painted some BMG stuff, so I thought I'd ease in with something fairly straightforward Talia Al Ghul (comics version) and the ninjas Shadow and Seeker.


Talia provides an alternative to my tournament version. She's not as good in close combat, but has a more effective ranged attack with her Mauser and the Master Marksman trait. She's also more of a command model, bringing additional funding to the crew (effectively making her own cost $0) and having the, somewhat situational ability to allow henchmen to attack out of their own activation.

In terms of painting, I went back to the method I used for Catwoman, and used an ink for her catsuit to let light do the highlighting work for me. It's only something I do on characters that suit shiny skin-tight numbers, but I like it.


Shadow is a ninja who is determined to face down super humans and vigilantes, armed only with a stick. Sensibly, his Stealth, Undercover and Sneak Attack allow him to pick his fights to some degree. However, I can't see him doing much damage. Of more use is his potential ability to protect other, more important members of the League; his smoke bomb can provide cover from enemy snipers and he's a suitable recipient of Loyalty Tattoos which would allow him to act at a bodyguard given that he's clearly not as effective as the other ninjas.

In terms of painting, my ninjas push the three colour minimum tournament rules to the limit. Technically, if you count washes, there are actually six colours being used on Shadow. A really simple job.


Shadow is slightly more sensibly armed. His bow brings additional ranged capability tot he League without having to turn to expensive Free Agents or theme-breaking Bane Mercenaries. In fact, with night vision goggles and extra ammo, Shadow is able to keep enemy heads down; especially those who are able to bypass the League's stealth.


Overall, these three make my League of Shadows crew (currently my most unsuccessful crew - Played 4, Won 1, Drawn 1, Lost 2), a bit more effective and less vulnerable to to enemy shooting. I'm not sure when I'll get a chance to use them as other crews are still waiting for their first games, but the chance to actually shoot back does mean that using the League is now at least a possibility.

You may notice that my posting frequency has increased over the last couple of days. This is due to me not only being on holiday, but also being in the mood to paint and play. So you can expect more over the coming days.

Monday 10 April 2017

The Battle of Vicksburg


As discussed in my last post, our American Civil War campaign had reached a crucial point, and potentially and decisive battle. Major General Ulysses S. Grant, leading the XIII and XV Corps of the Federal army, has brought the Army of the Mississippi, under Lieutenant General John C. Pemberton, to battle just south of Vicksburg. Steele's Division, of Sherman's XV Corps has advanced to engage the enemy, drawing them out of the defences surrounding Vicksburg, and now awaits reinforcement.

The Union army  has a slight advantage in numbers, but is arriving piecemeal to face a concentrated enemy. Victory for Grant would allow him to place Vicksburg under siege, and open the way to achieving his campaign objectives. Defeat would force the Union away from Vicksburg and possibly buy enough time for Confederate reinforcements to arrive from Jackson.


The terrain around Vicksburg has the fortified city in in north, by the Mississippi River. The railroad from Jackson heads off east, but no help is arriving from that direction. To the south, towards Warrenton, are the woods from which the Union army will slowly emerge.

With 6 Union Divisions facing off against 5 Confederate Divisions, both sides would have to break three enemy divisions to seal victory.


The Confederate forces are massed around Vicksburg: Forney's Division are in the city itself; Smith's Division facing off against the advancing Federals; Loring's Division are positioned along the railroad; and Stevenson's large division is holding the left, aware of the dangers of a Union flanking movement. 


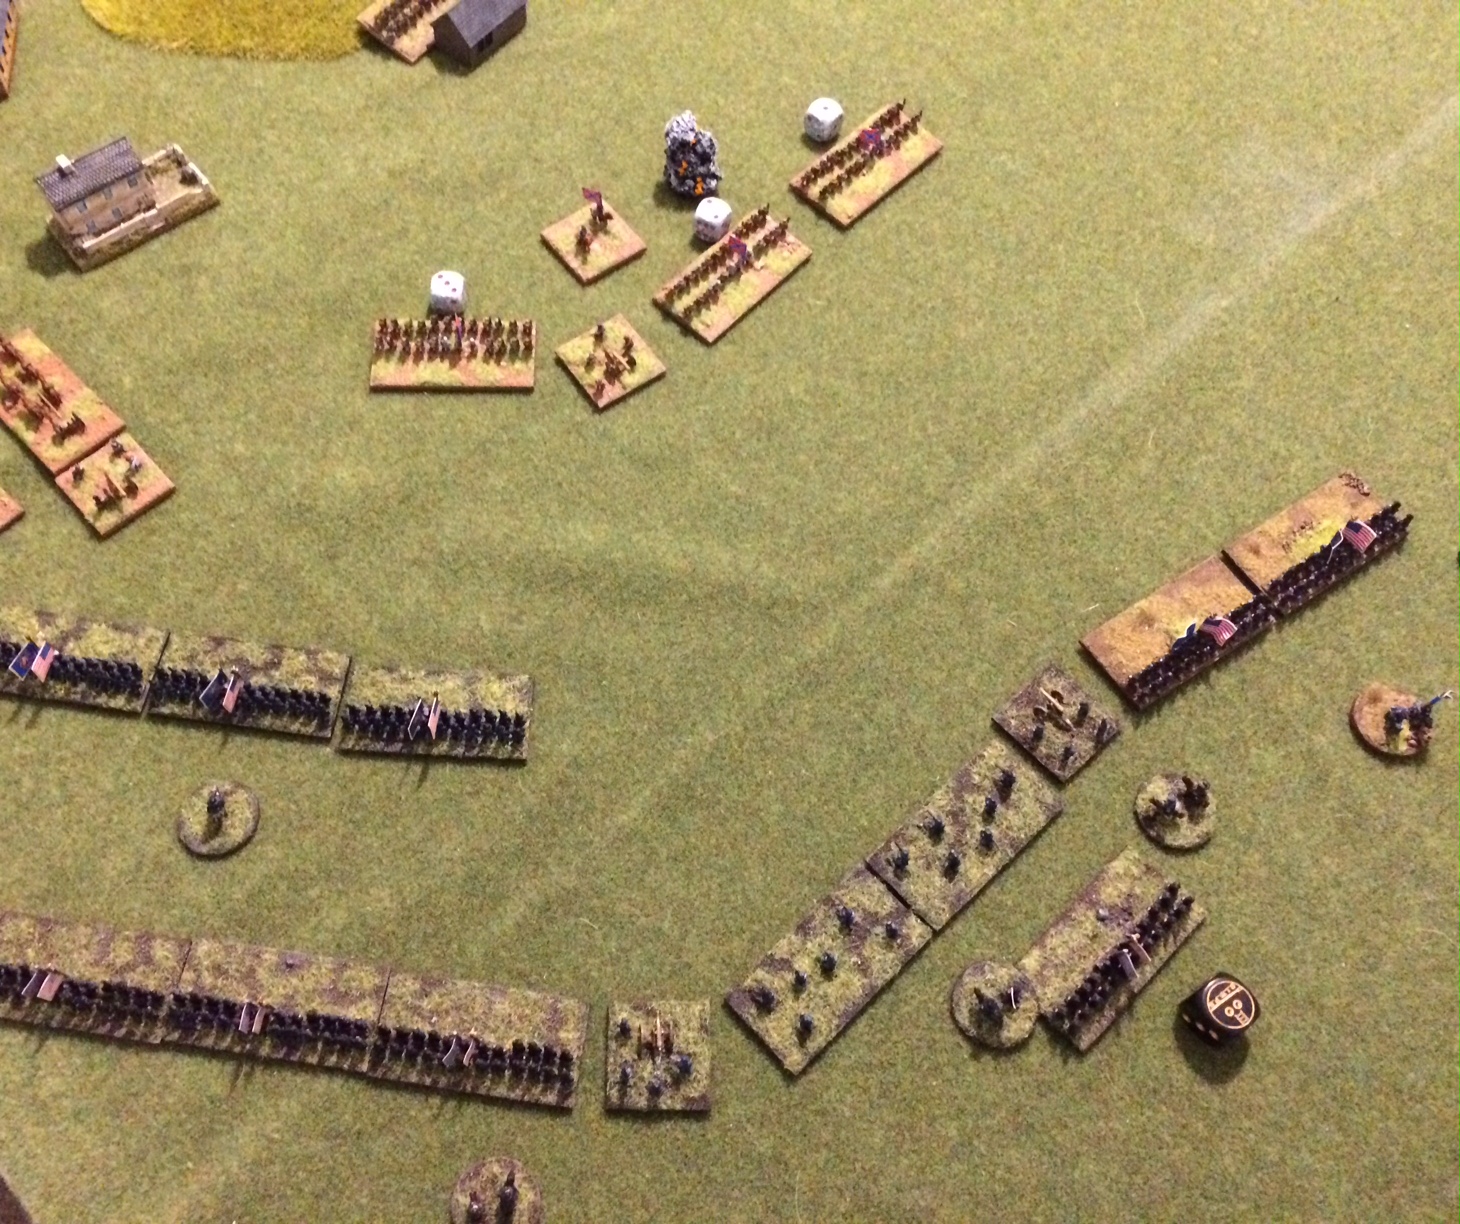
Steele's Division, of Sherman's Corps, are the only Federal troops in the field and emerge cautiously from the woods to engage the enemy.


Federal reinforcements begin to arrive in the form of Smith's Division, of McClernand's Corps, threading their way along the road (yes, I know you can't see it, but it's there) towards the ford.


The Rebels also receive support from Bowen's Division, arriving from the west. However, they arrive in march column worryingly close to the enemy and take fire from Steele's artillery.


More of McClernand's Corps, Hovey and Carr's Divisions, arrive and split their forces. The artillery is sent along the road to support Steele, whilst the infantry break into skirmish formation and begin to thread their way through the woods, aiming to keep Stevenson from moving to where the battle is developing.


Tuttle's Division arrives on the western flank and engages Bowen, breaking one of his brigades with the shock of their arrival.


With two divisions apiece engaged, the battle is now fully engaged, but the Confederates seem unable to stem the Federal tide (a series of terrible rolls from Pete fails to inflict any damage on the Union line).


Meanwhile, in the east, Osterhaus's flanking force arrives, but finds Stevenson's Division ready for them. Not only are they unable to get around the Rebel flank, but they are heavily outnumbered and the rest of McClernand's Corps are still slowly picking their way through the woods (Matt was repeatedly failing orders tests for the divisions in the woods).


Taking full advantage of the Rebel inaccuracy, Tuttle advances into close range and breaks Bowen's Division with a powerful volley. (Union 1 - Confederacy 0)


With this, the Rebel flank was exposed. Smith's (Confederate) Division was now significantly outnumbered. To make matters worse Smith's (Union) Division finally reached the end of the woodland road, and the final Union reinforcements arrived from the West in the form of Blair's Division of Sherman's Corps. Thinks looked bleak for the defenders of Vicksburg.


Major General William T. Sherman took full advantage, and began to pour fire into the exposed secessionists, hoping to completely turn the Rebel flank.


Despite the successes in the west, Osterhaus's Division finds itself completely outmatched by Stevenson, and begin a holding action designed simply to keep Stevenson's large division from moving to support the Rebel's collapsing right flank.


Smith (Confederate) holds his ground as Loring's Division (which so far had remained in reserve) moves up to stem the Federal advance. The artillery of Forney's Division also moves out of the fort in support. Worryingly accurate cannon fire allows the Confederates to inflict damage on Smith's (Union) Division, and disorders Tuttle's Division and stopping the flank being fully turned.


Stevenson's Division continued to inflict massive damage on Osterhaus's Division, but the beleaguered Federals hold on in grim defiance, despite their cavalry breaking.


However, any hope of respite is removed with the rest of McClernand's Corps lost in the woods, despite being joined by Grant himself.


With Tuttle's Division halted, Blair's Division is moved up to take over the assault at close range...


...breaking Smith's (Confederate) Division and completely collapsing the Rebel right flank. Only Forney's small division, occupying the city itself, stand between Sherman and victory. (Union 2 - Confederacy 0)


A new, hastily assembled line is put together amidst the wreckage of the Confederate right flank. Could Loring's fresh division invoke the spirit of Stonewall Jackson at Bull Run and rescue the Confederacy?


Hope comes for the secessionists as Osterhaus's Division is finally broken, potentially freeing up Stevenson. (Union 2 - Confederacy 1) 


Sherman masses his forces for what will hopefully be the final assault, whilst Tuttle's Division gets moving again and enters the outskirts of Vicksburg.


Loring's Division unleashes accurate fire which pushes Smith's (Union) Division close to breaking. It won't take much to make them go. Perhaps there's a chance that the tide could turn? 


Grant finally gets the divisions in the woods moving, just enough to keep Stevenson's Division torn between helping against Sherman and protecting their own flank, and potentially being able to quickly break the weaker divisions in skirmish formation.


The strong Confederate defensive position allows them to inflict damage across the lines of Union soldiers, threatening to break them in numerous places.


With his line wavering at various points, Sherman orders a general advance into Vicksburg to drive the Rebels out of their positions. Tuttle is repulsed from the fort, but Blair sweeps one of Forney's brigades away with some vicious hand to hand fighting.


Despite taking casualties, Loring's Divsion grimly holds on and manages to fianlly break Steele's Division, which has been engaged since the very beginning of the battle. With all of the Federal divisions on the right flank wavering, could the battered Rebels snatch victory from the jaws of defeat? (Union 2 - Confederacy 2)


Aware of the need to decisive, Sherman risks exposing the flank of Blair's Division to enfilading fire to inflict as much punishment on Loring's Division as he can.


At the same time, the bloody remnants of Tuttle's Division pout fire into the fort in the vain hope of somehow breakings Forney's artillery.


Despite the volume of fire they are subjected to, Loring's Division somehow holds their ground.


The desperate situation to the west finally causes Pemberton to order Stevenson's Division to ignore McClernand's Corps, who have finally emerged from the woods, and move as quickly as they can to engaged the battered Union forces on the right.


With the battle hanging in the balance, the Confederate resistance is enough to drive back Blair's Division, but not break them. The Union are still able to unleash devastating fire at Loring's Division...


And this time it's enough to break the stalwart Rebels. (Union 3 - Confederacy 2)


Battered and bruised, Sherman's command had managed to drive off three of the four Confederate divisions they had faced. Stevenson had numbers and was still relatively fresh, and Forney still, just about, held the centre of Vicksburg, however the eventual arrival of two fresh divisions under McClernand was enough to drive Stevenson away from Vicksburg and split the Army of the Mississippi in two. Victory belonged to Grant.


The campaign isn't over, but the Confederate army is in disarray. A handful of units remain to hold Vicksburg, whilst Stevenson's Division and Loring's artillery have been driven north. This has allowed Grant to begin the encirclement of Vicksburg and made it incredibly doubtful that Pemberton can do anything about it.

Meanwhile, over in the east, McPherson's scattered divisions are closing in on Jackson. Unless reinforcements arrive, the Rebels look unable to prevent the city's fall. However, should reinforcements arrive, McPherson's isolated units look ripe for being picked off and pushed back. All is not lost.

Overall, this was a brilliant game. The campaign rules gave us a really interesting scenario with genuine consequences to consider. The desperate, and sometimes foolhardy actions of the Confederates almost snatched victory, but ultimately have left their divisions unable to function (I'm going to suggest merging divisions which currently have less than three units, as otherwise, they are just too fragile in game). Had they succeeded, however, victory would almost certainly have won the campaign for Pete and Wes.

The key events for me were as follows:
  • The lamentable performance of Bowen's Division: being caught in march column, failing to inflict any damage on Tuttle's Division and then being driven off so quickly meant the Confederates were on the back foot almost immediately.
  • Diverting Stevenson's Division. Keeping the largest Rebel division away from the main fight for so long was crucial. Matt and I deliberately threw Osterhaus's Division at them for that putpose.
  • Piecemeal defence. The Confederates were perhaps a bit slow in bringing up their reserves, which allowed to combined weight of Sherman's Corps to engage a single division at a time. When they did manage to combine their defending units on the outskirts of Vicksburg, the battle was almost won.
  • The long march through the woods. Initially we thought that repeatedly failing orders checks on the divisions on the woods was a bad thing as it left Osterhaus unsupported. However, Stevenson's Division would have had the opportunity to break either Carr or Hovey, potentially winning them the game.
  • Blair's Division. Arriving late, Blair took over from Tuttle and broke Smith's Division, then charged in to drive Forney's troops out of their defences, and finally was instrumental in breaking Loring's Division. All without losing a single unit.

A great game.

There are still four more turns to play, however, it may be that there isn't another major battle in the campaign, and if there is, it probably won't be as big as both sides took damage. We've each lost a complete division and two of the remaining Confederate divisions have been reduced to a single battery of artillery. There might need to be a bit of re organising to make things make sense.

A battle in the east is possible, but the Confederates need a couple of turns of reinforcements before this can happen. However a few more skirmishes are possible in the interim.

It's definitely not over.