Showing posts with label Kings of War. Show all posts

Saturday, 30 December 2023

The Elephant In The Room

I finished last year with a post featuring elephants too. 

Then, it was due to event that had happened leading to me gaining some frankly massive armies for the Punic Wars.

This year it's because our big Christmas game actually used those those armies in a massive clash using the rather excellent (especially if you only play a certain period very infrequently) Kings of War Historical rules.


I split the forces available into two roughly 3300 point armies. Unfortunately, Wes was unable to join us this year, so I took control of the Carthaginians and their Numidian and Iberian Mercenaries, whilst Matt and Pete became the bickering Consuls leading the Republican Roman legions and their Italian and Gallic Auxiliaries.

I'm not going to go into the exact forces, but broadly the Roman force had bigger and better blocks of infantry, whilst the Carthaginians enjoyed a significant advantage in cavalry and had the aforementioned elephants.


The Roman deployment was fairly conventional, with the legions in the centre and their cavalry and auxiliaries out on the flanks.

The Carthaginians also concentrated their infantry in the middle, but massed their cavalry on their left flank, and left the right flank to the elephants supported by light infantry.


Opening moves saw both lines advance. The Carthaginians took up an oblique line as the elephants pushed forwards on one flank and only the Numidian Cavalry sallied forwards on the other.


The Romans issued a more general advance as the legions moved up at the double, keen to bring their weight to bear. 


Somewhat surprisingly, the Gallic Light Cavalry charged into the elephants, which went about as well as you might expect.

This appeared to happen because one of the two Consuls (obviously they both blamed each other) couldn't tell the difference between his allied units - which felt fairly historically accurate.

This began an ongoing process of the Romans throwing Gauls at the elephants in an attempt to slow their advance, safe in the knowledge that they wouldn't have to pay their auxiliaries the following day.


Over on the other flank, Numidians harried the Italian Auxiliaries, driving off cavalry and peppering the infantry with javelins.


More Gauls were hurled at the elephants and to their doom. However this strategy was keeping the elephants penned in and starting to whittle down their nerve.


All the while, the legions advanced.


The lines finally clashed as Roman Legionaries fought Iberian Scutarii at the base of the hill, whilst the last of the Italian Cavalry was destroyed by the Numidians.


After Light Cavalry, Noble Cavalry and Fanatics had all failed, it was the turn of the massed horde of Gaulish Warriors to take a crack at the elephants.

These two would end up trampled beneath the feet of fate, but by the time they were gone, the elephants would be in a much worse condition.


Another legion crashed into the Iberians in the centre of the Carthaginian line. The Romans had weight of numbers, but the Scutarii were bolstered by the reassuring presence of the Army Standard and the Sacred Band.


The Roman Commander could only watch in horror as his flank seemed to collapse under the feet of the elephants.

Triarii were hastily brought forward to hold the line.


With most of the Numidians finally driven off, the Carthaginian Cavalry crashed into the Italian Auxiliaries inflicting significant damage.


However, Gauls roared in to drive off the last of the Numidians, whilst Roman Cavalry launch a daring attempt to assassinate the enemy general by taking their horses through the trees to assault him.

The attack failed but did create issues in the Carthaginian lines 


Huge bodies of men pushed and shoved along the line, but no breakthrough was achieved by either side...


...until the Carthaginian Cavalry finally broke the Italian Auxiliaries whilst the Iberian Cavalry that had been held in reserve were brought forward to stem the tide of Gauls and Roman Cavalry that were threatening to break through.


Only a lone regiment of Triarii remained to hold back the Carthaginian Cavalry. Fortunately, holding back cavalry is what the spear-armed elites do best.


Meanwhile, on the other flank, the final Roman Legion rushed forwards hoping to reach the action before the last of the Gauls were destroyed by the Numidian infantry.


They managed to make it into the Africans' flank before they could sweep the Gauls away, just as the long spears of the Triarii finally drove off the rampaging elephants, securing the Roman left flank.


Meanwhile, at the other end of the battlefield, the charge of the Iberian Cavalry had failed to have the desired impact and the Gauls now began to look like they might turn the Carthaginian flank.


However, in the centre, one of the Roman Legions finally broke, but the Scutarii were in no stat to pursue and were surprised to find themselves charged by the Roman Signifier, who somehow held them in place.


This gave the Triarii the freedom to concentrate on the cavalry and a full on collapse of the Carthaginian flank was underway.


A similar collapse was underway on the other flank. Although the last of the Gauls had fallen, so had the African infantry, and only a solitary Iberian regiment and some Balearic Slingers stood in the way of an entire legion.


The fight finally came down to the centre, where following the rout of one of the Scutarii units, the Sacred Band faced a very tired Roman Legion.

Both sides took heavy casualties, but both sides held thanks to the presence of their Army Standards strengthening their resolve.

At the final count, the Romans came away with a victory which would have been overturned had the battered legion in the centre not stood their ground. 

The battle had initially seemed to be going massively in the Carthaginians favour, but the stalwart nature of the Legions, combined with some nick-of-time action from the Triarii and some frankly ridiculous behaviours from the Roman Signifier blocking the Carthaginian advance won the day.

Overall it was a lot of fun to play and proved that Kings of War is a versatile system that's really easy to use and excellent for people who play certain eras extremely infrequently. I'm sure experts could find fault with the historical accuracy, but given that we're unlikely to play ancients again any time soon, it felt right.


In other news, I was 'kindly' given the Battletech Beginner Box by Pete as a Secret Santa present. He's been on at me to get into this for some time and now I've got no excuse.

It has two models and the quick start rules but he knows me well enough to know I'll by at least a couple more mechs to be able to play the smaller scale version of the game.

In return I gave him some Morannon Orcs so we can play the Gondor At War campaign for Lord of the Rings, which I've been on at him about (,you get a sense of how we use Secret Santa here), and the Stay Puft Marshmallow Man I received recently as he's a big Ghostbusters fan.

So that's it for gaming this year. I'll be back tomorrow with my review of last year's resolutions and you find out just how badly I've done.

Yes, I have counted up how many miniatures I've gained.

No. I'm not telling you until tomorrow.

Yes. It's bad...very very bad.

Acquired: 291
Painted: 323
Lead Mountain: 589

Thursday, 29 December 2016

The Battle of Four Armies

It's Christmas, and that means one thing in our little world of wargaming...Christmas Wargaming Fun Day! It's one of the few times in the year that we get to do big games, and this year was no exception.

Originally, we were going to use the day for learning about Dropfleet Commander, which we all backed as part of a Kickstarter campaign over a year ago. Wes received his PHR fleet back in October in the first wave of posting, however Matt finally got his Shaltari on Christmas Eve, and both Pete and I are still waiting.

Therefore, we needed something else, and into the breach stepped Kings of War. I broke out the Wood Elves I re-based earlier in the year, Pete supplied his Dwarfs, and Matt brought both Bretonnians and Empire, as Wes has never been a WFB player, and so doesn't have an army.

We arranged the game at 3000 points per side (we could/should have gone higher, but I underestimated how many points I could do with my Elves), with the Elves and Bretonnians fighting some kind of border skirmish with the Empire and Dwarfs somewhere at the foot of the Grey Mountains. (No, we haven't abandoned the WFB background - screw you GW!)


The initial deployment saw the Elves face off against the Dwarfs, and the Bretonnians line up against the Empire. One of the downsides of KoW, is that the allies rules really discourage intermingling armies, as you can only gain inspiring re-rolls from your own sides. However, Wes and I did concentrate our archers at the far end beyond the castle, because everything else in our armies was built to charge.


Matt's Empire force was built using the very versatile Kingdoms of Men list, and featured two hordes of infantry, two cannons, a steam tank (beast of war with ballista), a griffon riding general and sundry smaller units.


Matt had created both human lists before he flipped a coin to decide which side he'd be on, to keep things fair. He'd given Wes a very aggressive force, using the Brotherhood list in Uncharted Empires, featuring four blocks of knights, Pegasus knights and a few peasants. The tactical advice we gave Wes was, "get stuck in!"


Pete's stalwart Dwarfs added a flame cannon, a cannon, an organ gun and a block of crossbows, backed up by several blocks (including one horde) of Dwarf warriors and a couple of berserker characters on giant badgers (he was suitably chided by Matt and I for including stuff that wasn't 'warhammery' enough for our tastes).


My friendly and fluffy Elf list had managed to squeeze in a Dragon, a Treeman, a unit of Eagles (Drakon Riders), a unit of cavalry and a couple of fast moving forest spirit units. It wasn't exactly subtle.

And so the stage was set for Wes and I to charge hell for leather across the board, hoping to weather the storm of lead enough to deliver a hammer blow. Techincally, the scenario was loot and kill (I think), but we all knew that this was going to be about who smashed whose face most effectively.

The first two turns went rather predictably, with Wes and I advancing, whilst Pete and Matt braced for impact. I managed to get both of my forest spirit units killed, one with a failed surge into the Dwarf general, and the other by standing in front of the massed firepower of a Flame Cannon, Cannon, and Organ Gun that had been combined in the centre of the enemy line.

In return, we managed to silence the Dwarf Cannon with arrow fire, and one of the Empire Cannons with peasant cavalry.


Turn three was when the inevitable impact came. My Elves smashed into the Dwarf line, with my cavalry ans Eagles breaking the Dwarf horde, but the Dragon and Treeman faltering on their respective targets. It looked like the Elves would get caught in an evelopment as the Dwarfs proved difficult to budge.


Matt did his best to disrupt Wes' charging knights, and the Bretonnians initially failed to shift the hordes of infanty, despite the support offered by flank charging knights. The Empire Handgunners were negated, but with their charge spent, the battery in the centre still dishing out horrendous damage and the Steam Tank and Griffon poised to charge, the Bretonnian position also looked precarious.


However, Pete also struggled with nerve rolls when he piled damage on my expensive units and although the cavalry were eventually broken, the Eagles, Dragon and Treeman held on against the odds, managing to take out the crossbows and Dwarf General, despite taking massive amounts of damage.


Meanwhile, Wes lost all but one of his Knight blocks to Matt's combined artillery, and fierce charging Griffon and Steam Tank. However, the Grail Knights held out long enough to delay the Empire forces, allowing his Knights Errant to win the shoving match with one of the infantry hordes, and turn the flank, eventually finishing by charging all but one of his remaining units into the Empire General.

At the end of the game, Wes and I were delighted that we didn't gain an additional turn, as even a single point of damage would likely have seen the Dragon, Treeman, Eagles, and Knights all run delivering defeat.

As it was, we managed to win by a fair margin due to the hordes and characters we'd killed being worth a significant amount of points, and gaining the additional bonus of securing a couple of objectives to add to our tally.

Pete and Matt pointed out that winning isn't everything and that these games are meant to be for fun anyway, however, we have decided that Pete shall hereafter be known as 'Snake Eyes' and Wes and I have bragging rights for the next twelve months, due to the fact that winning a game of toy soldiers confirms us as all round superior human beings...

Wednesday, 16 March 2016

The Perils of Trying Something New

Sorry for the hiatus, life's been a bit busy.

The most recent games I've played were over a week ago and Matt, Pete and I gathered for a round robin of 750 point games of Kings of War.

Having just received my copy of the Uncharted Empires expansion for Kings of War, I decided to give my Bretonnians a spin as the Order of the Brotherhood, rather than the Kingdoms of Men that I'd used previously. The list is a better reflection of the Bretonnians in WFB with more variations of Knights, Pegasus Knights and lots of Peasants that gain a nerve bonus from nearby Knights. The goal was to find out if my current collection of models worked better as Brotherhood, rather than the more generic Kingdoms of Men. I decided using any of the Order of the Forsaken (Pegasus Knights) as I'd used flyers in all my recent games and knew how they'd work. I was more interested in finding out about the other units.

Pete had brought an aggressive version of his trusty Dwarves and Matt was giving his Empire troops a run out using the League of Rhordia list instead of Kingdoms of Men for similar reasons to me.


The Brotherhood
The Dwarves
The League of Rhordia
Order of the Brotherhood Regiment (with Potion of the Caterpillar)
Villein Spearmen Regiment
Villein Martyrs Regiment
Villein Bowmen Troop
Villein Siege Artillery
Exemplar Adjutant (mounted)
Devoted (with Lightning Bolt)
Ironclad Horde (with Blessing of the Gods)
Ironguard Regiment (with Throwing Mastiff)
Shieldbreaker Regiment (with Throwing Mastiff)
Berserker Lord (mounted)
Army Standard Bearer (with Healing Charm)
Household Knights Regiment
Household Knights Troop
City Militia Horde
Halfling Volley Gun
Wizard (with Heal)
Army Standard Bearer
Halfling Master Engineer

Game 1 - Dwarves vs League of Rhordia - Loot


Matt advanced both units of Knights and they proved effective in charging and breaking the Dwarf regiments. The Ironclad horde weathered a storm of shooting and outmatched the City Militia (which Matt discovered are not the equals of the Foot Guard he has run previously). The MVP was Pete's Berserker Lord which flanked the woods on the right and destroyed the Volley Gun before loughing into the flanks and rear of Matt's units, winning Pete the game.

Game 2 - Brotherhood vs League of Rhordia - Pillage


Matt came forward with his Knights, and I matched them with my infantry, although they were worn out and broken when the City Militia advanced. My Knights charged through the woods to first hit the troop of Knights opposite before turning on the Volley Gun. My Bowmen spent the game advancing up the left flank and throwing damage into the Militia. The game ended as a draw, but I later discovered that I shouldn't have been able to move and shoot my Bowmen, which might actually have meant Matt would have won.

Game 3 - Dwarves vs Brotherhood - Pillage


At the start of this game I looked across the table and fully understood the failings of my army. My regiments of Peasants were no match for Dwarves, and even though my Knights pack a punch, failure to break their target would see them flanked and ground down. What's more, I had no real answer for the Berserker Lord. I did exactly the wrong thing and went all defensive, trying and failing to mitigate the threat of the Berserker, allowing the Dwarves to dictate where fights would happen and relying on frankly inadequate shooting. One by one my units were caught and destroyed in a calamitous defeat. My Knights did break the Shieldbreakers, but as expected were flanked and routed too.

So, what did I learn?


  • I don't think the Brotherhood list works for my Bretonnians. I don't have enough Knights to make full use of the strengths of the list. What's more, the Villeins/Peasants are really weak, so even with hordes and a unit of Pegasus Knights, my army will lack punch and durability. Also, the low nerve of the Peasants needs nearby Knights, but the moment they charge, the Peasants become easier to break. I'll be returning to Kingdoms of Men, as the ability to field Foot Guard with Crushing Strength makes a big difference in terms of combat power.
  • I shouldn't feel awkward/guilty about using flying units, as essentially I handed a mobility advantage to Pete's Berserker Lord (as did Matt) and a single, mobile, powerful hero really caused havoc.
  • I shouldn't rely on shooting to do more that weaken the enemy unless I bring significantly more.
  • I need to be more willing to seize the initiative and be more aggressive. I actually froze in the game against Pete, and was picked apart piecemeal.
So in the spirit of being more aggressive, let me introduce my crew for my next Batman tournament at Titan Games in Lichfield on Saturday:


Titan Joker, Victor Zsasz and the Titan Clown makes this a full on attacking crew. I'll probably get gunned down in short order, but hey...it's different!


Monday, 22 February 2016

If you go down to the woods today...

The Kings of War frenzy continued apace and it was time to get some games in. So, Matt, Pete and I got together to throw some fantasy armies at each other. I played Matt first, who has only had one, maybe two games, of Kings of War a few months ago and could barely remember the rules.

Matt was fielding a fairly standard looking Empire (he's not calling them Kingdoms of Men as he's still dealing with his bereavement over WFB) army:
  • General with Flying Hammer
  • Swordsmen (Foot Guard) Horde
  • Handgunners (Arquebusiers) Troop
  • Handgunners (Arquebusiers) Troop
  • Reiksguard (Knights) Regiment
  • Flagellants (Berserkers) Regiment
  • Cannon


It's all smiles now...
I decided to give my newly based Wood Elves a run out and fielded:
  • Treeman (Treeherder) - 260
  • Kindred Archers Troop - 115
  • Kindred Archers Troop - 115
  • Dryads (Hunters of the Wild) Regiment - 190
  • Treekin (Forest Shamblers) Regiment - 125
  • Eagles (Drakon Riders) Regiment with Potion of the Caterpillar - 195


Deployment


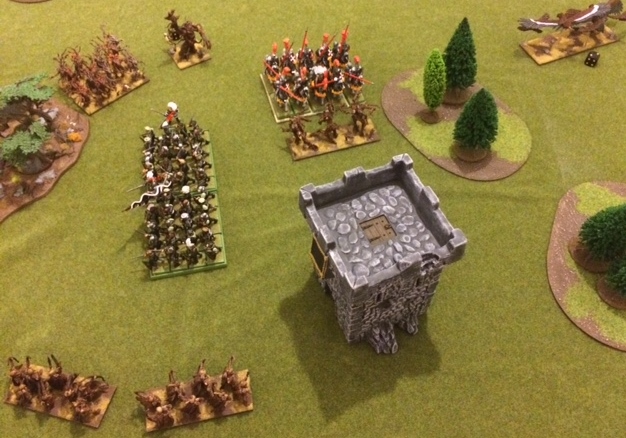
We rolled up the Dominate scenario, so we'd be heading for the centre of the battlefield, which was pretty much in front of the tower. Matt deployed with his combat troops aiming directly at the centre, avoiding the difficult terrain, whilst his missile troops guarded the flanks.

Meanwhile, with so much Pathfinder in my force, I set up heading directly into the woods, partly to screen my army from potentially devastating missile fire, but also to allow me to get round the flanks of Matt's army, as I wasn't sure that I could withstand a protracted brawl with his whole force.


Prior to my first turn, my Vanguard moves allowed my Dryads, Treekin and Treeman to advance quickly up the flanks. I kept the Treekin back far enough to prevent Matt from charging them if he got the first turn. As it turned out, I needn't have worried as I got the first turn.

Turns 1&2


I advanced on both flanks, largely keeping out of charge range, but setting a fairly obvious trap for the Reiksguard with my Treekin and Treeman. The Eagles made straight for the missile troops; if they survived the inevitable hail of fire, they'd be able to put the Cannon out of commission quickly.


The Kindred Archers advanced to within range and in a surprisingly effective volley, took out the Handgunners on Matt's right flank.


In the face of such devastating fire, the Empire advanced. Matt failed to take the bait with his Knights, as he would have lost his Thunderous Charge and found himself flanked in the following turn. The Cannon fired at the Eagles and missed, but the Handgunners found their mark, and despite causing only one wound, they managed to waver the winged beasts, keeping them at arms length for at least another turn.

Turns 3&4


Unable to charge, the Eagles on my right flank backed off to the safety of the woods, offering them at least some cover from the Cannon and Handgunners. Assuming they were able to charge in the following turn, the Potion of the Catterpillar would prevent their attack from being hindered.


On the left, the Dryads moved round to threaten the flank of the Swordsmen, whilst the Archers appeared to have fired all their arrows in the previous turn and inflicted no damage.


In the centre, I realised that if the Reiksguard weren't going to charge me, I'd have to charge them. The combined impact of the Treeman and Treekin caused significant damage, but failed to rout the brave knights.


On Matt's turn, another volley of shots flew towards the Eagles, but, although another point of damage was done, they weren't wavered again and so were free to charge in the following turn.

The Reiksguard hit back at the Treeman (this was probably the wring choice as he's significantly tougher than the Treekin), causing only a single point of damage. Meanwhile, the Flagellants and the Swordsmen advanced on the Dryads, dismissively ignoring the inept Archers.

Turns 5&6


With the Empire infantry closing in, the Dryads sprang a trap of their own, and leapt out to attack the Flagellants, who were simultaneously hit in the flank by the Treeman who'd spotted a route through. Their combined attacks saw the crazed zealots routed, despite the Very Inspiring presence of the General. Both units then reformed to trap the Swordsmen, between them and the Archers, who failed yet again to cause damage.


The Treekin waded into the Reiksguard again, but once more failed to break them, whilst the Eagles finally swooped in to attack the Handgunners, routing them in short order, and bearing down on the Cannon which had initially been out of range.


Caught between the wood and a sharp place, the Swordsmen turned to face the greater threat of the Treeman and Dryads. This left the Archers in position for a rear charge, but the alternative would be significantly worse. The General heroically charged the Dryads in a bid to keep them out of the inevitable fight with the Swordsmen.


The Reiksguard went into the Treekin again, causing minimal damage. Over on the flank, in a startling display of inaccuracy, the Cannon missed the Eagles again and essentially sealed its own fate.

Turn 7&8


With the Swordsmen surrounded, the Wood Elves charged in across the board. The Eagles destroyed the Cannon and turned towards the centre. The Treekin again failed to break the Reiksguard, and the Dryads couldn't shift the General. The Treeman and Archers waded in to the front and rear of the Swordsmen, causing significant damage, but again failing to waver them.


In return the Empire pushed back, trying to force their way out of the encirclement. The stalwart Knights almost broke the Treekin, but the Treeman's Inspiring presence kept them in the fight. Again, however, the Treeman proved too tough, even for a horde of Swordsmen to cause significant damage, whilst the brave General was fighting a losing battle with the Dryads.

Turn 9&10


With the flank clear, the Eagles were able to swoop into the flank of the Reiksguard, who were finally routed. The heroic General fell beneath the rain of blows from the Dryads.

Although the Treeman and Archers again failed to break the Swordsmen, the writing was on the wall as they were surrounded, with at least another turn to go. Matt surrendered in the spirit of getting another game in.

Victory!

However, before I get too gloaty, I need to clarify a couple of things in Matt's defence:

  • Firstly, lack of familiarity with the rules meant that the few things I'd picked up in my previous two games (such as the importance of Pathfinder, and the significance of robbing Knights of their Thunderous Charge) proved crucial.
  • Neither of us had any idea how tough the Treeman would prove to be; his Nerve is immense.
  • The combination of Vanguard, getting first turn and the obliteration of the Handgunners allowed me to threaten Matt's flank quickly and put him on the back foot before he'd rolled a dice.
  • The amount of difficult terrain on the board was a major advantage to me given how much Pathfinder I had in my army.
  • It turned out that Matt was 50 points short, which although not massive, might have allowed him to add a few magic items or increase a Handgunner troop to a regiment, which might have had an effect.
  • Matt later went on to beat Pete's Dwarfs, even though he was short on points and still learning the rules.

Anyway, some things I've learned about the Wood Elves:


  1. The Archers aren't great against tougher targets, or in combat (even with a rear charge), but they should probably focus on lighter targets such as enemy shooters.
  2. The Treeman has the durability of a horde and is really good against high defence targets.
  3. Vanguard can really allow you to get in your opponent's face early on, especially if you can avoid first turn charges or mitigate shooting.
  4. The Eagles and Treekin are powerful but don't have the durability or impact to take things on frontally for long.
  5. I need to remember my Elite rule.


The main thing though is that not only to these Wood Elves not suck, it's clear that this army is going to play the way I always wanted it to play. I will need to use speed and guile to get into the flanks of my opponent in order to break units quickly as I won't have the staying power for a protracted slog. Just the way I like it.

On the subject of speed, the cavalry have arrived...too late to join the battle.


First up, my Glade Riders/Silverbreeze Cavalry. I've based these on two bases as I'd bought the wrong sized bases for cavalry, and so had to make do with what I had. However, this does make packing the army away a little easier and has allowed my light cavalry to look a little less ranked up.

These chaps will add to my shooting, but their main job will be annoying the enemy, getting in the way and screening this lot...


...my Wild Riders/Stormwind Cavalry, which were originally made from the plastic Glade Rider sprues as I was too cheap to buy the ridiculously expensive metal models (Surely you know I'm cheap? It's in the title!).

Like the Glade Riders, my basing options have been dictated by my mistake, but I'm actually glad that I've gone for a single regiment base as it's allowed me to go for what I feel is a more dynamic arrangement of them surging forwards. In my head it looks like Lady Butler's famous painting of the charge of the Scots Greys at Waterloo...


...obviously, I don't really want my Wild Riders to perform like the Scots Greys at Waterloo, as after breaking a French column, they were counter-charged and skewered by Lancers.

I digress.

I don't think it will come as any surprise that these guys will likely be the regular recipients of the Potion of the Caterpillar to enable them move quickly across the board and keep their Thunderous Charge bonus in terrain. I'm looking forwards to using them as I've been surprised at how resilient Knights have turned out to be, and this unit will be faster and slightly better (thanks to Elite) than the Kingdoms of M...sorry Matt...Empire and Bretonnian Knights I've seen in the game so far.

My Wood Elves are now fully re-based. I still have a few models to play around with, so I will see what I can come up with in terms of how to use them, but I'm in no rush, as I have more than enough to use for now.