Sunday, 6 October 2013

Zomtober 1: Outbreak Worse Than Predicted!

Far from the small isolated incidents at locations around the city: the hospital, the park and an inner city diner, reports are coming in of the living dead gathering into packs and hunting down unsuspecting citizens, thus adding to their numbers.


So the first deadline for Zomtober is here and I've exceeded my own expectations. I've done the three Zombie Vixens I planned for, quick and dirty paint jobs, but effective enough for my purposes.


I've also completed a couple of Wargames Factory male zombies. I traded a handful of these for a sprue of the Vixens but I have to say, the quality is unbearably poor. I will paint up the eight miniatures I have, but I'm not sure I'm good enough with a brush to make them even look like something that was once human.


I'm fairly happy with my first batch. I probably need to be a bit braver with the blood and gore, and do a bit of research on how to get the right effect. Looking at the pictures, I'm disappointed with how I posed the jogger as you can't see the bone protruding from her stump, which is my most effective bit of gore.

I've also not done anything too fancy with the bases yet. I need to work or what I'm going to do.


As a final note, you may have noticed the hapless civilians in the first shot. These are some O-Gauge railway models I picked up. 


I've not done eyes yet, and I'm not sure I'm going to. One of the issues I've found this week is that I tend to paint with washes and dry brushing to pick out details, the Zombie Vixens respond fairly well to my style (although the waitress' face caused me headaches), but the details on the male Zombies and the Civilians is so shallow that I'm struggling.

Overall, nowhere near the best painting I've ever done, but they're not offensive to the eye and at this rate, I'll certainly have enough to begin an All Things Zombie campaign by the end of Zomtober, which is the goal.

Monday, 30 September 2013

Zomtober...

So, in amongst my many other projects (two FOW armies, VBCW, Gotham City, war of 1812 and now Bolt Action Russians - more on that soon), I've signed up to be part of Zomtober, a project for bloggers to get zombies painted during October.

The rules are simple: paint at least one Zombie or Survivor per week during October and post a picture of them each Sunday.

Seeing as I've had some WF Zombie Vixens sitting in a box for ages, and bought the All Things Zombie rules some time ago, I figured I'd join in.

First up are three rather decayed ladies. A waitress who got a little more than a tip from a customer, a nurse who proves that hospitals really are unsafe, and a jogger who has literally run her legs off.


The aim is to get all three done by Sunday. Whether that happens, or I just manage one remains to be seen. I've not painted a zombie in about ten years, and those were quick jobs on a WFB horde. I want to do a better job on these.

Hopefully I'll have a picture for Sunday. More details on Zomtober can be found here: http://eclecticgentlemantabletopgamer.blogspot.co.uk/2013/09/zomtober-2013-is-coming.html?m=1

Monday, 23 September 2013

History Be Damned!

If you would describe yourself as a historical wargamer, look away now. Seriously. You're not going to like this.

Pete has been trying to get me into Bolt Action and I've recently relented, scooping up an eBay deal of 40 Soviet Infantry, an Anti-Tank gun and a T-34 for £30. Cheaphammer lives!

Anyway, I've obviously not got them painted yet and so when asked for a game of Bolt Action, I was forced to either play with unpainted figures (shudder) or, more satisfyingly, my almost historically appropriate for WWII VBCW force.

What follows is a report of a battle that can't even be described as a what if:

Late War Germans vs VBCW B.U.F. (500 points)

Pete's Germans (all regular)
Officer + 1 man
Medic
Squad 1: NCO, SMG, LMG, Assault Rifle, 4 Rifles
Squad 2: NCO, SMG, LMG, Assault Rifle, 4 Rifles
Squad 3: NCO, SMG, LMG, 5 Rifles
Sniper Team
Kubelwagon with MMG

My B.U.F. (all regular)
Officer + 2 Men (Banner)
Medic + 1 Man
B.U.F. Rifle Section: NCO (SMG), 8 Rifles, LMG
B.U.F. Assault Section: NCO (Pistol), 4 SMG
Wortley Militia: NCO (Pistol), 6 Rifles, LMG, Pistol, Shotgun
Staff Car
Truck
Steam Tank (Turret, HMG, Very Light Armour, Slow, Unreliable)

There's a very good fan made VBCW list for Bolt Action knocking about the net. A quick Google should turn it up. It allows for Heath-Robinson contraptions, cavalry and flags; all the key components of VBCW.

The scenario we rolled up was 'Maximum Attrition,' which is essentially a pitched battle in any other rule set. The varying activations make it tricky to describe the action as it happened, so I'll simply go for turn summaries.

Turn 1


With a screech of brakes and the banging of car doors, the vile fascists of the B.U.F. advanced into the crop fields to take advantage of the cover whilst on the other side of the farm the somewhat less fascist men of the Wehrmacht advanced stealthily through the woods. Desultory fire was exchanged to no effect.


Out by the old barn a Kubelwagon motored up and the Medic in the back seat tore up the Geneva convention by using the vehicle's MMG to shoot up a B.U.F. Truck, forcing the Assault Section inside to take cover behind the hill. (We played this wrong and the Assault Section should have taken hits.)


In response, the improvised Steam Tank, the Wortley Dragon, returned fire with its HMG, tearing apart the German vehicle and sending the Medic scurrying for cover in the ruins of the old barn.


Turn 2

The Germans continued their cautious advance, firing sporadically, succeeding only in pinning some of their British opponents.


The B.U.F. Cohort commander advanced to meet the Germans, returning fire and taking up the best positions the can find.


The Wortley Dragon turned in toward the bulk of the enemy, whilst the Assault Section recovered their nerve.


However, in the old barn, a German sniper took up a threatening position (we played this wrong too, he should have begun on the table) from where...he would fail to kill anybody all game!


Turn 3


The German advance continued into the teeth of the enemy guns, which opened up, inflicting heavy casualties (despite the presence of the Medic) on the squads advancing through the woods.


Turn 4


Taking advantage of the inability of the B.U.F. Rifles to follow orders (partially due to poor placement of my Officer), the German squad that had taken up positions behind the crates poured fire into the Rifles, inflicting significant casualties.

In a daring move, the Assault Section finally got their act together and, using the cover of the Wortley Dragon, ran headlong towards the Germans in the woods, spraying SMG fire...to no real effect.


Turn 5

The Assault Section continued with their death or glory charge and were partially successful; in that they died.


The rest of the B.U.F. force again failed to make any real impact upon the enemy and even the imposin presence of the Wortley Dragin failed to deter the determined enemy, who again poured fire into the Rifles.


Turn 6

With time and guns running out, the B.U.F. were handed a slice of luck when the German Medic was the tragic victim of a friendly fire incident and riddled with MG42 rounds.

Seizing this opportunity, the entire British force opened up on a depleted German squad, forcing them to flee.

To protect the now lone LMG gunner from the Rifles, the brave Officer strode into the line of fire.


Turn 7

With the B.U.F. once again unable to motivate themselves to attack, the Germans massed for an assault and leapt upon the isolated Officer and Banner Bearer. With that both forces withdrew, licking their wounds.


A draw. I got a bit lucky with the friendly fire incident and foolishly wasted the Assault Section, however, these factors were balanced by the fact that Pete was cheating by firing with his MG loaders. I also forgot the B.U.F. special rule halfway through the game, which would have meant passing some of those failed morale tests.

So, what did I learn about Bolt Action?
- The game is fast and fun
- Tanks are imposing, but can't really do much about lots of infantry
- Soft skin vehicles are extremely vulnerable and should be used with caution
- Snipers have the potential to be devastating
- Generals need a plan, otherwise the battle bogs down into something akin to the early days of WWI
- Officers need to stay close to their troops to keep them moving
- Cover is important and we probably needed more terrain on the table
- Matt and I will be likely to use Bolt Action for VBCW
- I need to start painting Russians

Saturday, 14 September 2013

Firestorm Lorraine: The Turning Of The Tide?

Wednesday saw me playing my first game in my new house. I still haven't got a full-sized board so Bill, my opponent for the evening, and I reduced our armies accordingly to play on my roughly 4'x3' table. Bill had expressed an interest in joining our Firestorm: Lorraine campaign and so he willingly joined the Axis against my Americans and was given orders by Pete von Trickpony to: "Grind him into the floor."

Bill's a canny opponent; far more experienced with Flames of War than I am. He was all smiles but I knew that secretly he was thirsting for revenge for what I did to his Matilda swarm a couple of months ago.

We rolled for initiative and, as is now traditional, I lost, meaning that the Germans would be attacking. Given that Bill had to attack with unsupported Panzers, that meant that he would add three Reluctant Trained Panthers, whilst I would be joined by an additional Rifle Platoon and a battery of 155mm Howitzers. Given that he'd also be attacking my Armoured Company with his Infantry, the addition of heavy artillery to a narrow board made Bill physically sag. Our armies were as follows:

HEER GRENADIERS (V3 Forces Book) - Confident Veteran


HQ + Panzershrek Team
Grenadier Platoon + Panzerfaust
Machine Gun Platoon (4 HMG)
Mortar Platoon (4 8cm Mortars)
Infantry Gun Platoon (2 Guns)
Assault Gun Platoon (3 Stug G)
Panther Platoon (3 RT Panthers) - Firestorm Troops

7th ARMOURED DIVISION - Confident Trained


HQ (2 M4A1 Shermans with Improvised Armour)
Tank Platoon (5 M4A1 Shermans)
Tank Platoon (3 M4A1 Shermans)
Light Tank Platoon (4 M5A1 Stuarts)
Combat Engineer Platoon (Bazooka, 2 HMG, Supply Truck)
Rifle Platoon (CV with Bazooka) - Firestorm Troops
Field Artillery Battery (4 CV 155mm Howitzers) - Firestorm Troops

You might notice that my additional Rifles and Howitzers look a bit, well, German. That's because I was having to proxy those units.

DEPLOYMENT

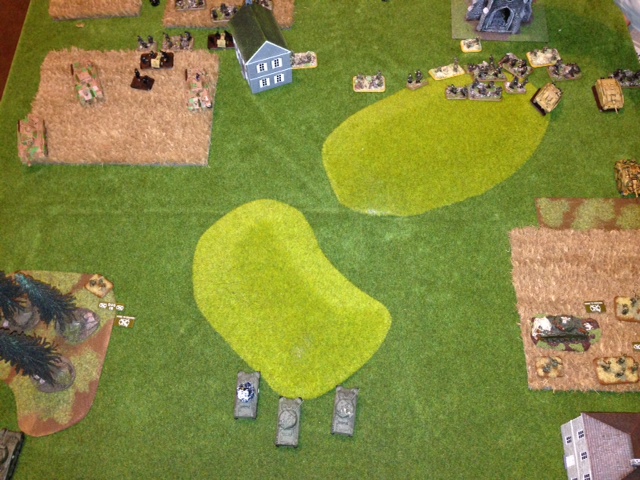
The scenario we rolled was Pincer so I immediately had to split my army in two and put half of it in delayed reserve. I chose to begin with the Combat Engineers dug in around the destroyed Sherman in the field, using the building to stiffen their resolve and a minefield in front of their position. Meanwhile the artillery was hidden in a cornfield at the rear of my position. I elected not to put the Shermans in ambush as I was worried about finding myself unable to spring the ambush on such a small table, so my tanks clustered behind the hill in the centre, keeping watch on the German Checkpoint (???) in the woods.


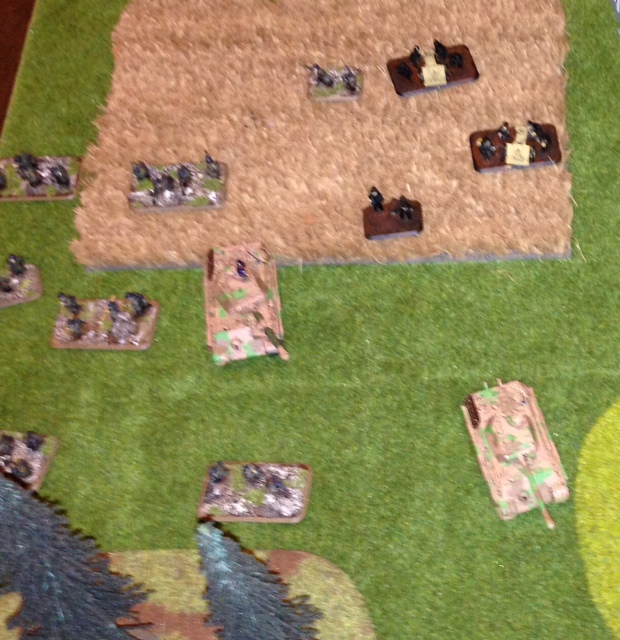
Able to deploy his whole army, Bill split his force into two wings. The Panthers and the Infantry Guns took to the cornfields, I suspect that he (rightly) thought, that they had enough fire-power to tackle the Shermans. Meanwhile, the Stugs and all of his Infantry clustered around the ruined church with their collective beady eyes fixed on the Engineers in the cornfield.

TURN 1

Hailing, as they do, from the land of the free and home of the brave, the Shermans, faced with Panthers, backed off to hide in the woods. Meanwhile, the artillery began what was to be a disturbing trend and failed to range in and did no damage.


Despite the display of American timidity and ineptitude, the German Infantry only cautiously moved forward and poured fire at the Engineers, doing no damage, but successfully pinning the platoon.


Meanwhile, the Panthers rolled forwards, took aim and managed to bag their first Sherman of the day. With no immediate opportunity to get around their flank, I prayed that the Field Artillery could inflict some hurt on the big cats or more Shermans would be burning before long.


TURN 2

In the face of the German advance, a bit of a Sherman-shuffle allowed them to fore at tanks they could actually hurt, however, the Stug's armour proved to be too tough. Another bombardment was called, and with the Panther's hidden from the observer's view, the Engineer platoon command failed to direct the guns to properly damage the Germans on the hill.


The Panther's rolled forwards again but couldn't quite find more targets yet. The Stugs however, not only rolled up to the edge of the minefield, but also managed to take out the American command tank lurking behind the Engineer occupied building. German ranged superiority was beginning to tell.


TURN 3

The reserves they'd called for were now due and the Americans looked nervously over their collective shoulders, but no help was forthcoming. What's more, even though the Observer managed to pick out the a Panther at the edge of a field, and the Artillery successfully ranged in, somehow the big tank's top armour manage to withstand the bombardment.


Realising that their numerical advantage could disappear at any time, the German Infantry began to pick up speed and they moved quickly over the hill towards their objective. Meanwhile, the Panthers, with nothing better to shoot at, went after the Observer who posed such a threat to them. Embarrassingly, they failed to destroy the two man team who broke off to hide in the woods. The Panthers redeployed to avoid his deadly gaze.


TURN 4

Still no reserves and the Shermans lurked impotently behind the hill and in the woods. They had no hope of taking on the Panthers frontally, and they could not move to help the Engineers without exposing themselves to the deadly predators.


Despite their cautious movements, the Stugs managed to spot and destroy another Sherman (the death toll was steadily rising) whilst the Infantry swarmed forwards. Mortars pinned the Engineers who were unable to hold back the advancing tide and were driven from their positions and the objective fell to the enemy.


TURN 5

The Germans were swarming down my left flank and had not only captured the objective on my right, but the Engineers failed to unpin and so could not even contest the objective, let alone recapture it.


Fortunately, the cavalry had arrived...the light cavalry. Needing to contest the captured objective I needed to bring on the Stuarts as only they had the speed to get far enough from the back of the board.

We'll take a break here to address the question that's probably running through your minds; "Don't reserves come on from the sides in Pincer missions?" Yes. Yes they do. I however, made a big mistake. Bill even asked me to check whether I was right, and I, being the numpty that I am, checked the wrong mission map. Sorry Matt.

Anyway, the Stuarts raced on (from the back!), poured MG fire into the Grenadiers on the objective, assaulted them and drove them back, contesting the objective for the cost of a single bailed tank. Meanwhile, in the prevailing spirit of desperation, the Sherman platoon commander spotted a chance to get around the side of the Panthers and raced around firing stabilised shots to destroy one of the big beasts (I was aiming for two as forcing a morale check would surely see off the last of the Reluctant tanks).


Having only partially achieved my goals of freeing up the objective and destroying the Panthers, I braced for the oncoming storm. The Panthers, predictably, finished off the Sherman commander and forced the remains of the battered platoon to retire. On the other flank, the Stugs opened up on the Stuarts destroying them completely. Things were looking grim.


TURN 6

All seemed lost, when suddenly, the rest of my army arrived. The Rifles came in on the left (from the rear again, my mistake wouldn't dawn on me for a couple of days yet) to protect the apparently unguarded objective. Meanwhile, the Engineers were able to unpin and advance to contest the objective again, freeing up the newly arrived Shermans to fire at the Stugs.


Combined with a (finally effective) bombardment, the Shermans took out the Stug platoon whilst the Artillery mauled several infantry platoons. Could the Americans hold?


With an influx of new enemies and the battle swinging against them, the Germans focused fire on the Shermans, destroying one and bailing another. Meanwhile, faced with the Rifles, the German infantry on the right backed off from their advance towards the objective and massed in the woods.

TURN 7

With my company morale hanging by a thread, I had to destroy enemy platoons. The 2iC sped round the flank of the Panthers and...nothing! Once again, Bill's unerring ability to roll sixes for his armour kept the Panthers in the game. What's more, the Artillery failed to range in and the combined fire of the Engineer HMG's and the last Sherman failed to take out the single stand I needed to force a morale check on the Grenadiers near the objective.


With the abject failure of the American attack, the Germans acted with clinical efficiency. The U.S. 2iC took a Panzershrek up the pipe; the Panthers finished off the remaining Sherman and the Americans broke.

I lost. Badly. Taking out the Stugs meant that it was 5-2, but it still meant that the Germans had advanced for the first time in the campaign. The small table really hindered the mobility of an Armoured Company and Shermans were always going to struggle fighting frontally against Stugs and Panthers. I wasn't helped by the slow reserves or adamantium Panthers, but moaning about dice isn't really my style.  I should have done something different with deployment as I knew the Shermans would be useless. I wasted my best unit.

However, forgetting where my reserves should come in was my real cock up. Had I remembered, I'd have brought the Rifles in on the right to reinforce the objective and then later unleashed my tanks on the unprotected flanks of the Panthers.

However, playing Bill was, as always, a pleasure. He adapted to the difficulties of attacking with infantry well and effectively prevented me from doing anything useful for at least half the game. His entrance into the campaign has had a significant effect and the hard pressed Germans have now crossed the Moselle and are now pushing towards the American supply lines.

Sunday, 8 September 2013

A Greek Tragedy

Given that I haven't played a wargame this week (we played the zombie boardgame 'Last Night on Earth' on Friday which is fun, but not really battle report material), and haven't painted enough for a decent post, I figured I'd treat you to the pictures from a game of Impetus Pete and I played a while back.

We're both new to the game so we used the Basic Impetus lists for Carthage and Syracuse. We're both also only beginning to build and paint 15mm armies for Impetus, but fortunately I happen to have 28mm armies for both (technically, my army is Athenian rather than Syracusan, but it's all Greek to me...).

Impetus allows for only a little terrain and so we played on a pretty open battlefield with a hill on one flank and a wood on the other.

My Syracusan army consisted of:
1 Mercenary Hoplites
3 Hoplites
2 Peltasts
3 Skirmishers (1 with Javelins, 2 with Bows)
1 Light Cavalry

I deployed my Hoplites as a line with Peltasts on each wing and the Skirmishers in front. The cavalry were on my far right where they would guard against a flanking manoeuvre by the superior Carthaginian cavalry.


I was facing Pete's Carthaginians:
1 Libyan Spearmen
1 Gauls (large unit)
1 Spanish Scutari
2 Skirmishers (Javelins)
1 Spanish Cavalry
2 Numidian Cavalry
1 Elephants

Pete deployed most of his infantry and Elephants opposite my Hoplites, some Numidians on his right and a flanking force of all his Spanish troops and another unit of Numidians on his left facing my cavalry. As I suspected, he was going to make a push to surround me.


Initially all went well, my Peltasts on the left destroyed the Numidians will a well placed volley of Javelins and my Skirmishers harassed the Elephants as they advanced. I held my cavalry back as I knew they'd lose when they eventually tangled with the Spanish horse.


Through a hail of missiles, the Elephants made it to my lines but were successfully repelled. The ease with which my Heavy Infantry did this made me realise that I'd been focusing my fire on the wrong target. I should have been softening up the Gauls, who crashed into my General's unit whilst the Spanish foot thundered into my Peltasts to keep them out of the fight and the Spanish horse charged the Greek cavalry who'd been harassed by the Numidians.


The Light Infantry fought grimly beneath the trees but as expected, the Greek Cavalry were scattered leaving the Syracusan flank wide open. However on the far flank the Hoplites, Peltasts and Skirmishers had mopped up the Libyans and Skirmishers and were slowly sweeping round to enclose the Punic rear.

Unfortunately, this happened too slowly as after much pushing and shoving, the Gauls broke the Syracusan Tyrant's bodyguard taking my army over it's break point and winning the game for Pete.


I'd only played a couple of games of Impetus prior to this game but I do like the system as it gives a game that feels like ancient warfare. The Syracusans and Carthaginians are historical enemies (although in the Sicillian Wars, Carthage didn't use elephants and had heavy chariots in their armies) which also helps these games.

My mauling taught my a couple of lessons which I should consider as I build the 15mm force:
1) my Hoplites can handle Elephants and Cavalry, missile fire should be focused on dangerous units of enemy infantry.
2) I should be more flexible in my deployment, butting my units against each other, actually restricts their movement.
3) Greek Cavalry can guard flanks, but don't expect them to do much other than die as slowly as possible. They're job is to keep the enemy out of the flanks of my army, not take the fight to the enemy.

That's all for now, however, I'd like to point out that I'm not being rude by not responding to comments, I'm still having PC issues and for some reason my phone won't let me make comments on blogs. I do appreciate the comments made, and thanks for reading.