Saturday, 14 May 2022

Unleash the Dragon...again...

When Matt and Pete started playing 6th edition Warhammer Fantasy Battle again, it was only a matter of time before I caught the nostalgia bug and, like Heinrich Kemmler,  went searching for something from the past to dig up  and bring to life.

Presenting Count Cisqo von Oldhammer.


This 4th Edition Zombie Dragon dates from 1994. I'm not sure if that's when I bought it, but I've definitely owned it for a very long time. The dragon itself has been painted at least three times but the rider had never got past being undercoated.

I'd never actually stripped the dragon before repainting in the past (I have so many bad habits to address), and so the first job was to get the layers of gunk off. The dragon spent a few days in the freezer (to deal with the superglue) allowing me to break the parts down (fortunately, I also never bothered with pinning), before it took a long dettol bath.


The whole model is a glorious example of Games Workshop's design aesthetic in the 90s. The iconic sword in the air pose; overwrought armour complete with massive hat; needless back banner mounted on a telegraph pole; etc.

The only bits that aren't from the original kit are the banner, which is Bretonnian (the thick plastic flag matches the thickness of the pole quite well), and the shield, although that is from one of the Black Knights from the same era.


Painting was a combination of contrast, drybrushing, washes and slopping Blood for the Blood God technical paint all over the place.

I took more a bit care with the rider and actually went to the effort of edge highlighting his armour. Overall I'm really quite pleased how it's all come out.

The finishing touch was using some ancient Dark Elf transfers on the banner. I was delighted that they still worked but amused that they are just an outline and I had to paint the colour of the skulls on first and tidy up the edges afterwards.


Despite being a chunky beast, which has the weight and sharp edges to actually be used as a weapon, this model still only counts as one.

However, in Hobby Bingo terms, I've crossed off another box as I've visited several FLGSs numerous times this year and I don't know why this box hasn't been crossed off previously.

Acquired: 77
Painted: 83

Sunday, 8 May 2022

Did somebody say Horus?

Lots of people online are getting fizzy about the big Horus Heresy event at Warhammer World. The levels of excitement and nostalgia are high.

Unfortunately, nostalgia, especially about the Horus Heresy, has an unfortunate effect on Blood Angels.


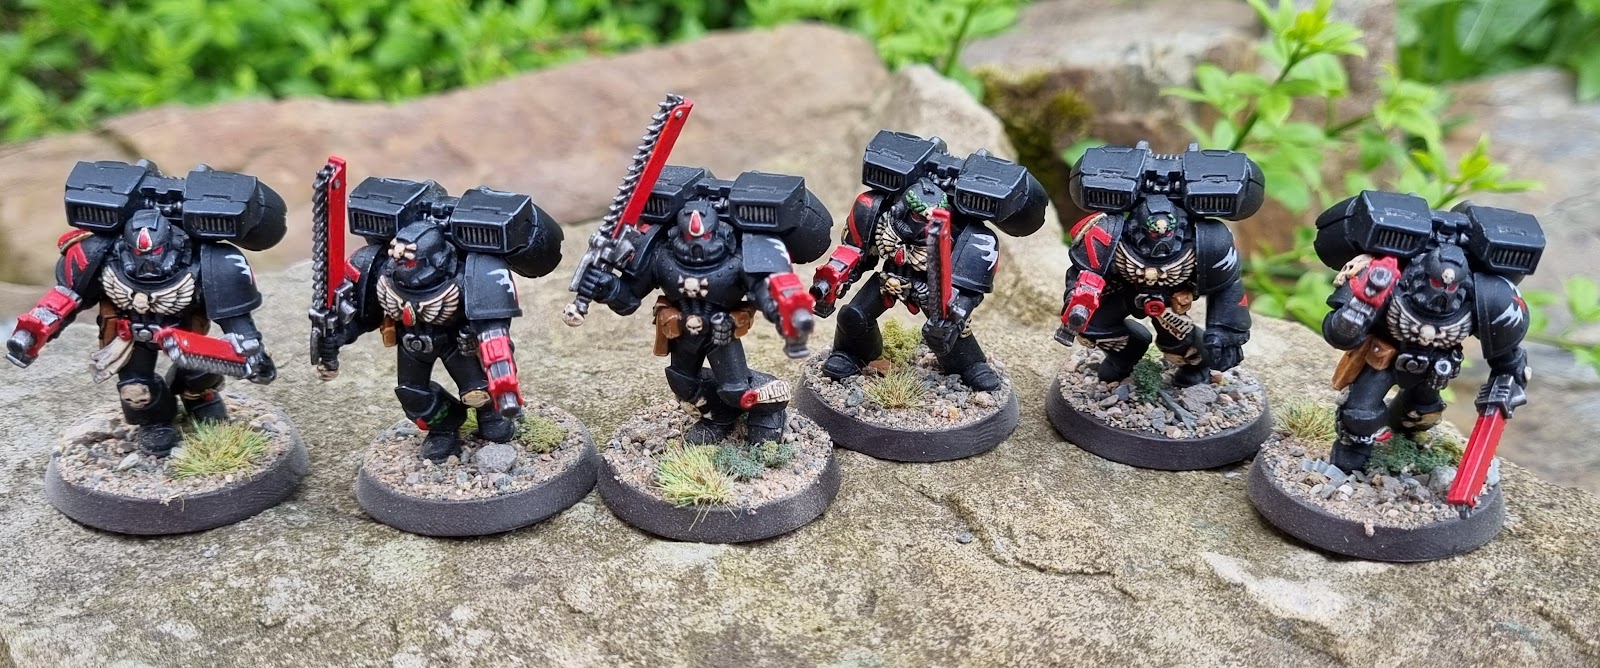
I picked up a batch of metal Blood Angels on eBay, including six almost completely painted Death Company Marines with the aim of adding to my existing unit of five.


I had planned to simply rebase the models, tidy up chips and damage and finish off the jump packs.

However, unfortunately the seller is a much better painter than I am, and massively better than I was when I originally painted the Death Company.


Therefore, I had to revisit the three metal Death Company in my unit and try to bring them closer to the standard of the new models.

This involved changing the colour of the chest plates, armour details and pouches to match what the seller had done.


It also meant scratching some transfers off and free-handing red crosses on the right shoulder pads (I also removed the crosses on the knee pads).


I also had to freehand the chapter symbols. I'm not great at freehanding. Simple geometric lines and patterns are okay, but the winged blood drop was a bit of a bugger.


Hopefully all of this has meant that the models now hang together as a cohesive unit.

I'm planning to put together another of the metal models as the final member of the squad, but this is going to involve a bit more work as I'll be building and painting it from scratch.


Despite not doing them from scratch, I'm counting all nine as painted for a few reasons. Firstly, I counted the new models as acquired. Secondly, the older models needed much more work than I originally envisaged. Thirdly, I make these rules up as I go along.

Acquired: 77
Painted: 82

Sunday, 1 May 2022

Some Say He's A Reptilian Alien

Matt and I once again found ourselves in the position to play a game, and he suggested 7TV: Apocalypse, taking advantage of a board set up that I don't think he's been able to fully use before

I took with me a cast that I'd also (I think) never used, my Visitors from 'V'.


My hastily thrown together 40 rating cast was as follows:

Diana - Next Gen (Star)
Steven - Bad Lieutenant (Co-Star)
John - Alien War Leader (Extra)
Lydia - Alien War Priest (Extra)
2 Visitors - Alien Troopers (Extras)
2 Visitor Shock Troopers (Extras)
Truck with Hood Machine Gun

Given that I was fielding an Alien invasion force from America in the early 1980s, Matt fielded a thoroughly fitting opposing cast: Stig from Top Gear and his post-apocalyptic cult:

Stig - Terminal Crazy (Star)
Lucy's Mum - Bad Lieutenant (Co-Star)
Lucy - Gunner (Extra)
Stig Backley - Petrolhead (Extra)
3 Stiglets - Joyriders (Extras)
Producer - VIP (Extra)
Racer with Tail Gun
Big Rig with Pneumatic Weapon


The scenario we rolled up was The Hit and so here's our attempt to make this encounter make some kind of sense...

In the wake of the Visitors' arrival on Earth (which was not in the eighties) they began their stigmatisation of humanity's scientific community.

Unfortunately for the producers of Top Gear, the hilarious idea of making them wear white coats resulted in them being targetted along with actual boffins.

In an attempt to protect the last producer, Clarkson had the idea of putting him in the safest place on the show: the Stig's passenger seat.

Accompanied only by a group of fans known as Stiglets and 10 year old super-fan Lucy (and her mum), Stig takes to the road trying to keep the Producer safe.


However, the Visitor high command becomes aware them when the Stig passes through Los Angeles, and, presuming that the hapless producer must be a threat to their plans, set out to ambush the convoy.


Scene 1


The Visitor ambush squad advanced through the slums of Los Angeles, under the command of John.

No one was entirely sure why the commander of the entire invasion had joined them, but, to be honest, it wasn't the strangest element of a mission to assassinate a scientist who was in the company of a tame racing driver and his convoy of fanatical followers.


Steven and Diana edged through the ruined buildings still arguing. Diana was certain that this so-called 'Producer' was a clear and present threat to their plans. Why else would these 'Top Gear' people go to such ridiculous lengths to protect him?

Steven, who had watched 15 minutes of one episode of Top Gear, disagreed.


Other Visitors secured the area, looking for potential threats.

Scene 2


The Stig's heightened senses spotted the figures in bright orange uniforms trying hide along the road, and dud the only thing he knew how to do: accelerate.

Behind his Lambo, the Stiglets piled out of the reaaonably priced lorry ready to prove their loyalty.


After making sure that Lucy had her sandwiches with her, Lucy's Mum had been dropped off and made her way to the top of a nearby building, with the aim of providing covering fire. 

Scene 3 (Steal the Scene)


Stig used his sudden acceptation to pull a complete 180 degree handbrake turn, allowing his tail-gunner Lucy to spray the jumpsuited aliens with machine gun fire.

However, with accuracy straight out of an 80's TV show, no aliens were harmed in the making of this scene.


Meanwhile, the Stiglets spread out, trying to secure good positions (and the objectives) to counter attack.

Scene 4


Having spun his car round, the Stig had unwittingly put the Producer sat in the passenger seat in Steven's sights.

Closing one eye, Steven took careful aim and fired, hitting the Producer in the chest and killing him outright.


The other Visitors opened fire at the Stiglets, but were foiled by the intervening walls. However, a Shock Trooper took a pot shot at Stig's Lambo and found its armour lacking.

John had an idea...


Lydia drove the Visitor transport round the corner and opened up on the Lambo as well. Although the car was unharmed, Lucy stopped firing.

If Stig could speak he'd have asked if she was okay, but he couldn't so he didn't.

Scene 5 (Steal the Scene)


"Mousie, oh mousie..."

In what can only be described as a continuity error, a Visitor emerged from a skip having been looking for a snack where two scenes earlier a Stiglet had been seen lurking.


John ordered his Troopers to open fire on Stig's Lambo and a hail of deadly laser blasts slammed into it, wrecking the vehicle.


Stig stumbled out of the car and fell to the ground momentarily stunned, but fortunately, the mouse-hunting Visitor couldn't managed to hit his prone form.


Lydia brought the transport slowly round to corner to add to the weight of fire but somehow lost control and sent the vehicle slamming into a nearby building, smashing the blaster clean off.


She calmly exited the vehicle and walked away as if that was exactly how she meant to park it, daring anybody to claim otherwise.

Scene 6


Shaking off his confusion, Stig got to his feet and launched himself at the nearest Visitor, but was unable to land a telling blow. However, he did toss a damaged fire extinguisher at Diana, throwing her off balance as the skip she had clambered into (possibly looking for a mouse too) was engulfed in smoke.


Have seen the damage inflicted on the Lambo and only Stig emerge from the wreckage, Lucy's panic-stricken mum opened fire at the back of Steven's head, but the tears in her eyes affected her aim and her shots went wide.


A confused Stiglet in a different part of the battlefield checked his script, trying to ascertain how his character had got there and what his motivation was for the scene.


In a desperate attempt to protect Stig from another deadly volley of laser fire, the Stigley driving the lorry moved it between his hero and the orange-clad invaders.

Scene 7


Laser blasts impacted harmlessly into the massive vehicle, but as the extinguisher smoke cleared it couldn't save Stig from taking a blast to the helmet from Diana, taking him out of the fight.

Turn 8


Having complained to the director that the script made no sense, the Stiglet from the skip was rewritten to be attacking the Visitors by surprise.

Failing to make the most of his big break, the Stiglet launched a Molotov cocktail at the group but managed to leave them all unscathed.


Meanwhile, the director also realised John being part of the ambush made no sense and rewrote him to be Commanding from the sidelines.

Needless to say, Richard Herd wasn't happy about this, but he remained in the episode as there wasn't the time or budget to reshoot earlier scenes.

The director hoped nobody would spot the error.


Filled with rage and grief, Lucy's Mum continued to fire down at Steven, managing eventually to hit him in the shoulder.

Scene 9


In a moment that would not be picked up on later in the series again (much like the Visitor's ability to spit acid), the director blew the prosthetics budget on a state of the art close up shot of Steven's wound healing itself; special effects that would definitely stand the test of time and not be rendered ridiculous by the development of CGI.

Steven smirked and then took a shot back at his would be Assassin, injuring her.


Diana also took careful aim and killed the Stiglet driving the lorry.


This caused the driverless vehicle to veer out of control and away from the action.


The Visitors then began the mopping up of the rest of the Stiglets.


Their deadly laser blasters making short work of the over-enthusiastic fanboys.

Scenes 10+


The writing was on the wall as the Stiglets were hunted down one by one, despite their desperate attempts to fight back.

Lucy's Mum surveyed the scene of destruction. The Stig was down (was it possible to kill him?), the Producer was dead and she had no idea what had happened to her daughter. She could only retreat and hope that Lucy still lived and hadn't been taken to the Alien mothership for lunch.

And on that bombshell...

Visitors 12 - Stig 2

Ouch! That was brutal.

Matt was cursed with an inability to roll successful strikes and this was compounded by me drawing really useful Countdown Cards at exactly the right time and having fearsome combination of weapon abilities (Deadly), star qualities (Gifted) and mutations (Cyclops, X-Ray Vision) allowing me to kill who I wanted when I wanted.

Still, fun was had and silliness ensued, as is the way with 7TV.

Tuesday, 26 April 2022

Let the Carnevale begin

After getting my starter set for Carnevale painted up, I took a few weeks to find a situation where I could convince someone to play.


Matt found himself in the hotseat and so we settled down to play through the introductory tutorial scenarios, with Matt taking charge of the shadowy Guild whilst I succumbed to the lure of the Rashaar.

Scenario 1 - Strangers in the Night

The Guild has ordered some unfortunate citizens out onto the streets to investigate rumours of strange creatures abroad.

Stumbling on a fearsome Ugdru and its slave escort, they hurry back to report on what they've seen.


This scenario was all about movement and getting off the opposite board edge so the Ugdru began on the canal, ready to take advantage of its Fast Swimmer trait, whilst the Slave was going to have a harder job running alongside a the canals.


The Citizens, however, started amongst the buildings and so set off at a run across the square.


The Ugdru glided effortlessly underwater, heading towards its goal quickly and scoring the Rashaar a victory point. 

The Slave attempted to vault onto some barrels and then across the canal, but fell short and splashed headfirst into the water.


The progress of the Citizens was interrupted by the inconvenient, and yet not unexpected (in Venice, at least), obstacle of a canal.


However, both Citizens were able to leap onto the prow of a Gondola to propel themselves across the water with acrobatic ease, securing the Guild two victory points and the lead.

Meanwhile, the bedraggled Slave heaved itself out of the canal and scurried off through the houses, escaping just in time to level the scores.

Guild 2 - Rashaar 2

Scenario 2 - Conflict

Informed that the monstrous Rashaar seem to be seeking an artefact of power, the Guild send their people out in force intent on driving the creatures and there devoted servants away from the object of their search.

This scenario was an out and out fight, with a victory points scored for each enemy defeated.


The Gondolier ferries Citizens to where they believe the monsters are searching for the artefact, but one of them slipped and fell into the canal, the loud splash alerting the Rashaar to their presence.


The searching Ugrdu order their Slaves to investigate the noises ahead and slide ominously into the canal. 


Deciding to stick together for safety in numbers, the Guild advance into the piazza.


Meanwhile, out of sight, the Ugdru disappear off through the murky canals, whilst the Slaves also headed directly for the same piazza as the Guild.


Arriving in the open space surrounding a statue of an ancient hero, the Citizens of the Guild are met by an ominous, large, scaly figure that appears to be waiting for them.


Refusing to take the somewhat obvious bait, the Guild spring the trap by rushing round the corner to surprise the Slave lying in wait, forcing the Ugdru to come to them.


However, they fail to see another Ugdru clambering up onto their Gondola, cutting off their escape.


A ferocious melee breaks out in the square, the Ugdru lashing out cruelly at to woman infront of it, but one of the Slave's is put out of its misery by a scything stroke from the Gondolier's bladed oar.


Citizens surround the Rashaar monster, but fail to prevent it ripping out the poor woman's throat. Her dying screams drawing attention away from the further danger that approached from above.


The enraged Citizens redouble their attacks upon the beleaguered beast, which looks about to fall when the dull wet slap of another of the monsters landing in their midst sends them running back to their boat, ending the encounter with blood lost on both sides.

Guild 1 - Rashaar 1

Scenario 3 - Take the Stone

The artefact the Rashaar have been searching for has been located near a statue. It's now a race to the prize!

This scenario introduced a mobile objective (worth 2 victory points) and each gang had three random agendas (worth 1 victory point each).


The Guild head out in force to claim the mysterious stone.


But danger lurks in the canals where the Ugdru dive deep.


And the Guild are aware that they are being watched.


One Guildwoman leaps over crates to succeed in reaching the stone first, but she is immediately set upon by an Ugdru erupting out if the water and hurling her towards its Slaves.


The Guild rush to her aid but are countered by Slaves emerging out of the darkness on the ground and along the rooftops.


The assault of the Slaves falls short (and off a roof), and the Guild counter by surrounding and cutting down one of the Slaves, allowing the woman with the stone to run off. 

An Ugdru lurches into the fray and hurls an unfortunate Citizen over its head and into the canal behind it, where another of its type lurks deep in the water (2 rounds of diving scored 1 victory point).


The creature coming up from the depths tries to take the struggling man down with him, but he somehow slips its grasp and clambers out of the water.


However, he is isolated and surroubded as the rest of the Guild have pulled back to protect the stone. The abandoned Citizen is once again hurled back into the water.


This time, grasping claws do not let go and he is pulled into the depths to a watery grave (killing by drowning scored another victory point).


The remaining Guild member leap around over boxes trying to keep the Rashaar from the stone (and eventually managing to chain four 4" jumps in a round to secure a victory point).

The Rashaar also succeed in chaining jumps (and crushing boxes of fruit) to get closer to their quarry.


However, the Citizen with the stone Chambers up onto a building where she is all but unreachable to the creatures below her.


A desperate assault by a Slave trying to get to her fails and the wretch is hurled of the roof by another Citizen.


Although the melee on the streets continue, the Citizens manage to make off with their prize, which they hope with satisfy their Capodecina of their loyalty.

Guild 3 - Rashaar 2

As the dust settles, the Guild are narrowly winning this exchange and we'd had three engaging games full of violence, action and unintended comedy from the somewhat inept Slaves.

They only thing that seemed a boy strange was how the agendas interact with then narrative of the final game. My Rashaar had generated two water-based agendas, and so that was at least thematic. 

However, the Guild found themselves leaping over obstacles like teenagers trying to do parkour as they attempted to score the winning victory point, somewhat oblivious to what was going on around them.

Despite this concern, I probably need to buy the Agenda cards before playing the next scenario, as it requires us to cycle through the deck which will be easier with physical cards and speed up play.


Using the Rashaar definitely constitutes playing a game with an 'army' I've never used before, and so I'm able to cross off another Hobby Bingo box.


However, further birthday purchases have arrived and put me back in a deficit in terms of how much I've painted against