The Kings of War frenzy continued apace and it was time to get some games in. So, Matt, Pete and I got together to throw some fantasy armies at each other. I played Matt first, who has only had one, maybe two games, of Kings of War a few months ago and could barely remember the rules.
Matt was fielding a fairly standard looking Empire (he's not calling them Kingdoms of Men as he's still dealing with his bereavement over WFB) army:
- General with Flying Hammer
- Swordsmen (Foot Guard) Horde
- Handgunners (Arquebusiers) Troop
- Handgunners (Arquebusiers) Troop
- Reiksguard (Knights) Regiment
- Flagellants (Berserkers) Regiment
- Cannon
 |
| It's all smiles now... |
I decided to give my newly based Wood Elves a run out and fielded:
- Treeman (Treeherder) - 260
- Kindred Archers Troop - 115
- Kindred Archers Troop - 115
- Dryads (Hunters of the Wild) Regiment - 190
- Treekin (Forest Shamblers) Regiment - 125
- Eagles (Drakon Riders) Regiment with Potion of the Caterpillar - 195
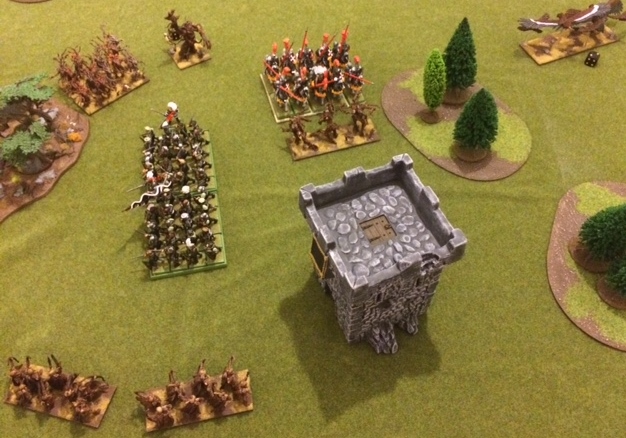
Deployment

We rolled up the Dominate scenario, so we'd be heading for the centre of the battlefield, which was pretty much in front of the tower. Matt deployed with his combat troops aiming directly at the centre, avoiding the difficult terrain, whilst his missile troops guarded the flanks.
Meanwhile, with so much Pathfinder in my force, I set up heading directly into the woods, partly to screen my army from potentially devastating missile fire, but also to allow me to get round the flanks of Matt's army, as I wasn't sure that I could withstand a protracted brawl with his whole force.

Prior to my first turn, my Vanguard moves allowed my Dryads, Treekin and Treeman to advance quickly up the flanks. I kept the Treekin back far enough to prevent Matt from charging them if he got the first turn. As it turned out, I needn't have worried as I got the first turn.
Turns 1&2

I advanced on both flanks, largely keeping out of charge range, but setting a fairly obvious trap for the Reiksguard with my Treekin and Treeman. The Eagles made straight for the missile troops; if they survived the inevitable hail of fire, they'd be able to put the Cannon out of commission quickly.

The Kindred Archers advanced to within range and in a surprisingly effective volley, took out the Handgunners on Matt's right flank.

In the face of such devastating fire, the Empire advanced. Matt failed to take the bait with his Knights, as he would have lost his Thunderous Charge and found himself flanked in the following turn. The Cannon fired at the Eagles and missed, but the Handgunners found their mark, and despite causing only one wound, they managed to waver the winged beasts, keeping them at arms length for at least another turn.
Turns 3&4

Unable to charge, the Eagles on my right flank backed off to the safety of the woods, offering them at least some cover from the Cannon and Handgunners. Assuming they were able to charge in the following turn, the Potion of the Catterpillar would prevent their attack from being hindered.

On the left, the Dryads moved round to threaten the flank of the Swordsmen, whilst the Archers appeared to have fired all their arrows in the previous turn and inflicted no damage.

In the centre, I realised that if the Reiksguard weren't going to charge me, I'd have to charge them. The combined impact of the Treeman and Treekin caused significant damage, but failed to rout the brave knights.

On Matt's turn, another volley of shots flew towards the Eagles, but, although another point of damage was done, they weren't wavered again and so were free to charge in the following turn.
The Reiksguard hit back at the Treeman (this was probably the wring choice as he's significantly tougher than the Treekin), causing only a single point of damage. Meanwhile, the Flagellants and the Swordsmen advanced on the Dryads, dismissively ignoring the inept Archers.
Turns 5&6

With the Empire infantry closing in, the Dryads sprang a trap of their own, and leapt out to attack the Flagellants, who were simultaneously hit in the flank by the Treeman who'd spotted a route through. Their combined attacks saw the crazed zealots routed, despite the Very Inspiring presence of the General. Both units then reformed to trap the Swordsmen, between them and the Archers, who failed yet again to cause damage.
The Treekin waded into the Reiksguard again, but once more failed to break them, whilst the Eagles finally swooped in to attack the Handgunners, routing them in short order, and bearing down on the Cannon which had initially been out of range.

Caught between the wood and a sharp place, the Swordsmen turned to face the greater threat of the Treeman and Dryads. This left the Archers in position for a rear charge, but the alternative would be significantly worse. The General heroically charged the Dryads in a bid to keep them out of the inevitable fight with the Swordsmen.

The Reiksguard went into the Treekin again, causing minimal damage. Over on the flank, in a startling display of inaccuracy, the Cannon missed the Eagles again and essentially sealed its own fate.
Turn 7&8

With the Swordsmen surrounded, the Wood Elves charged in across the board. The Eagles destroyed the Cannon and turned towards the centre. The Treekin again failed to break the Reiksguard, and the Dryads couldn't shift the General. The Treeman and Archers waded in to the front and rear of the Swordsmen, causing significant damage, but again failing to waver them.

In return the Empire pushed back, trying to force their way out of the encirclement. The stalwart Knights almost broke the Treekin, but the Treeman's Inspiring presence kept them in the fight. Again, however, the Treeman proved too tough, even for a horde of Swordsmen to cause significant damage, whilst the brave General was fighting a losing battle with the Dryads.
Turn 9&10

With the flank clear, the Eagles were able to swoop into the flank of the Reiksguard, who were finally routed. The heroic General fell beneath the rain of blows from the Dryads.
Although the Treeman and Archers again failed to break the Swordsmen, the writing was on the wall as they were surrounded, with at least another turn to go. Matt surrendered in the spirit of getting another game in.
Victory!
However, before I get too gloaty, I need to clarify a couple of things in Matt's defence:
- Firstly, lack of familiarity with the rules meant that the few things I'd picked up in my previous two games (such as the importance of Pathfinder, and the significance of robbing Knights of their Thunderous Charge) proved crucial.
- Neither of us had any idea how tough the Treeman would prove to be; his Nerve is immense.
- The combination of Vanguard, getting first turn and the obliteration of the Handgunners allowed me to threaten Matt's flank quickly and put him on the back foot before he'd rolled a dice.
- The amount of difficult terrain on the board was a major advantage to me given how much Pathfinder I had in my army.
- It turned out that Matt was 50 points short, which although not massive, might have allowed him to add a few magic items or increase a Handgunner troop to a regiment, which might have had an effect.
- Matt later went on to beat Pete's Dwarfs, even though he was short on points and still learning the rules.
Anyway, some things I've learned about the Wood Elves:
- The Archers aren't great against tougher targets, or in combat (even with a rear charge), but they should probably focus on lighter targets such as enemy shooters.
- The Treeman has the durability of a horde and is really good against high defence targets.
- Vanguard can really allow you to get in your opponent's face early on, especially if you can avoid first turn charges or mitigate shooting.
- The Eagles and Treekin are powerful but don't have the durability or impact to take things on frontally for long.
- I need to remember my Elite rule.
The main thing though is that not only to these Wood Elves not suck, it's clear that this army is going to play the way I always wanted it to play. I will need to use speed and guile to get into the flanks of my opponent in order to break units quickly as I won't have the staying power for a protracted slog. Just the way I like it.
On the subject of speed, the cavalry have arrived...too late to join the battle.

First up, my Glade Riders/Silverbreeze Cavalry. I've based these on two bases as I'd bought the wrong sized bases for cavalry, and so had to make do with what I had. However, this does make packing the army away a little easier and has allowed my light cavalry to look a little less ranked up.
These chaps will add to my shooting, but their main job will be annoying the enemy, getting in the way and screening this lot...

...my Wild Riders/Stormwind Cavalry, which were originally made from the plastic Glade Rider sprues as I was too cheap to buy the ridiculously expensive metal models (Surely you know I'm cheap? It's in the title!).
Like the Glade Riders, my basing options have been dictated by my mistake, but I'm actually glad that I've gone for a single regiment base as it's allowed me to go for what I feel is a more dynamic arrangement of them surging forwards. In my head it looks like Lady Butler's famous painting of the charge of the Scots Greys at Waterloo...

...obviously, I don't really want my Wild Riders to perform like the Scots Greys at Waterloo, as after breaking a French column, they were counter-charged and skewered by Lancers.
I digress.
I don't think it will come as any surprise that these guys will likely be the regular recipients of the Potion of the Caterpillar to enable them move quickly across the board and keep their Thunderous Charge bonus in terrain. I'm looking forwards to using them as I've been surprised at how resilient Knights have turned out to be, and this unit will be faster and slightly better (thanks to Elite) than the Kingdoms of M...sorry Matt...Empire and Bretonnian Knights I've seen in the game so far.
My Wood Elves are now fully re-based. I still have a few models to play around with, so I will see what I can come up with in terms of how to use them, but I'm in no rush, as I have more than enough to use for now.
Great report and a great game by the looks. cheers
ReplyDeleteThanks. The game plays really quickly as you're not fiddling with different attack amounts; which makes it fast and fun.
DeleteFantastic report. Thanks for sharing.
ReplyDeleteThanks. I aim to please. :)
DeleteEven with my lack of rules knowledge, I did blunder with the big swordsmen unit at one point - I had them turn to face the dryads in the wood, but it should have been obvious that they were going to charge away and the swordsmen would be stuck. I think I'd have been better rushing towards your archers in the hope of taking out a unit there before I was attacked by the treeman.
ReplyDeleteStill, I know what I need to look at next time now...
I think more than WFB (certainly more than the mindless drivel that was 8th), movement is key in KoW.
DeleteYou're probably right as you'd have broken some archers, and even in the rear, the Treeman might have struggled to break them in a single round.
You also should have attached the Treekin the first time with your knights, they would probably have broken early enough to escape the encirclement.
Nice report mate. I too am just dabbling into KOW. Iv started putting a Kingdoms of Men army together.
ReplyDeleteThanks. It's a great rule set with loads of modelling freedom. You can basically use whatever you like - Mantic actively encourage it!
DeleteCracking report and well done on the victory, looking forward to seeing more of this.
ReplyDeleteThanks. I think games like this lend themselves better to reports than more skirmish-type formation games like Bolt Action.
DeleteExcellent overview and seems like fun was had. :)
ReplyDelete