Showing posts with label Quest of the Ringbearer. Show all posts

Sunday, 5 January 2025

Howdah You Do?

Obviously, having painted a Mumakil with a massive howdah, I needed to paint up some guys to ride in it.

Enter the Haradrim.


The War Mumak of Harad kit comes with a sprue of Haradrim warriors to act as the crew, as well as an officer figure. Additionally I had a single Haradrim warrior knocking about my bits box (I was sure I had a few more) and one extra special addition to the force.

I was pleased to discover that I could fit all 15 of them in the Howdah, meaning that I don't have to find extra storage space for them and they can live in my display cabinet.


Mind you, they are not exactly models that I am massively proud of. The sculpts (and their moulds) are showing their age.

There was quite a lot of clean up to do on the mould lines and some of the archers have smudged blobs for hams where they are reaching back to their quivers.

Therefore I decided to not get too worried about the paint job and just aim for table ready - like I've done for the other old plastic sculpts in my Rohan and Mordor forces.


I used a red base coat and added the flesh tone, wood, leather and gold before giving the whole model a wash in Agrax Earthshade.

After this I used contrast black to add variation. I actually used images from the films and cosplayers to guide what to paint black on individual models, ensuring that I avoided being too uniform.

I didn't bother with adding any purple (which some paint guide go mad for) as from my research there's only a handful of warriors in the ambush scene from The Two Towers with any purple on them.


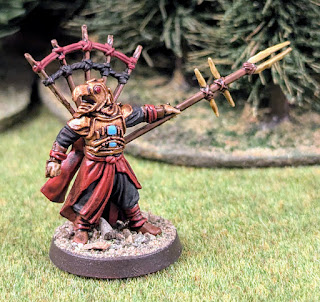
The captain model is a bit of an odd duck as he has a bird helm which I can find no reference for in the films. It's one of those designs which would feel more at home in Age of Sigmar and is indicative of what happens when the Games Workshop design team start inventing things - it all gets a bit over the top.

It also seems an odd choice to include in the kit when the Mahud, who are featured relatively heavily in The Return of the King is right there.


Mind you, Games Workshop did turn him into an individual model you can buy (currently at the bargain price of £16.50), so the omission is easily explained.

But why a bird helmet?


Anyway, whilst we're on the subject of models that don't fit in, I've also done this guy. He's the Saracen character from Talisman and was one of my favourite characters to play in the game because his artwork looked cool.

It being the eighties and me being very young meant that I didn't really think about his handy ability to sell people into slavery, something that was changed in the only later iteration of the game he appeared in.


Anyway, with the addition of an old plastic shield which handily features a snake (the emblem of Harad) I've added him to this force as another captain because he's a close enough fit I can't imagine what else I'd do with the model.

There is a bit of a scale issue, but I could argue that he's from Near Harad and the plastic warriors are from Far Harad...sorry.


I'm really pleased to have got this whole kit done so quickly and it's made for a strong start to the year, which has been added to as I've begun another round of selling off some old models.

This time it's some second edition Bloodbowl miniatures that I've decided I'll never get round to. I have kept a couple of teams in case the urge to play Bloodbowl ever returns, but I already have four other painted teams so I should be fine.

Acquired: -18
Painted: 16
Lead Mountain: 625

Thursday, 2 January 2025

That Still Only Counts As One!

First post of 2025.

Surely it needs to be something big.

I mean really big.

REALLY, REALLY BIG!


Oh yeah! That's the way to start off the new year.

A Mumakil, or Oliphaunt, from the Lord of the Rings. A war beast that the men of Harad ride into the Battle of the Pelennor Fields to drive back the charge of the Rohirrim.

It's taken me about a week to do, partly because there's a large model to build and a large surface area to paint, but also because it's a bit of a swine of a model kit.


The first step was assembly which appeared fairly straightforward, which was helpful because the instructions are from the 'vague grainy picture with arrows around it' period of Games Workshop instructions.

Two major problems appeared during this section, first were the four struts supporting the main howdah, which were not numbered, didn't have any defined keying and needed to be slotted in with the howdah above them to ensure they went into the right location. Most of the swearing in the whole build happened at this point.

The second issue were the massive straight join lined down the middle of each leg and across the body and head. This is where the age of this kit showed the most.


And so I took to doing the largest greenstuff application I've ever done on a model.

I don't usually bother with filling gaps as usually paint will cover most issues. However, the lines were so visible that I felt I'd need to do something more definite.

I actually have a surprisingly large amount of greenstuff for someone who doesn't use it and so go on with filling the gaps.


I looked at a few videos before trying this step and one guy had use his knife to cut lines to simulate the Mumak's skin into the greenstuff whilst it was still wet. I'm not sure how successful mine were, but it's better than just a smooth surface.

Looking at the joins now it's painted, I could definitely improve this process, but importantly the joins don't draw the eye, which was my goal, so I'm happy with how I did.


Meanwhile, I started on painting with the base, which is pretty much the equivalent of an entire unit's worth of painting: our dead Rohirrim, two dead Orcs and three dead horses, along with sundry weapons and shields.

I really like the base and decided to go with clumps of grass and flowers rather than using the basing material I usually put on my LotR models because of the level of detail involved, which include horseshoe prints, that I didn't want to cover up.


Next up was the howdah, which was a much simpler affair and done with just four contrast paints, although waiting for each stage to dry was a bit of a pain.

I will say that my top tip if you are going to paint one of these monsters is to keep the base and howdah separate for painting, because otherwise thing will get really awkward.


And finally we got to painting the Oliphaunt itself.

I again mainly used contrast paints, but added some dry brushing of the skin and the tusks to enhance the texture of the skin and deepen the shadows, whilst smoothing out the appearance of the tusks.

I suppose I could have done something to add spikes to the tusks or painted designs to the skin, and I may still do that, but for now my goal was to get it done and on the table.


And so there we have it.

I have to admit that this beast has been one of my white whales of gaming ever since I saw the first model. That's the reason I went for the somewhat frustrating plastic kit (that I had been warned about) rather than exploring 3d printed options.

Given that the scenarios that involve these creatures all included at least two, if and when I get another, I will look at alternatives as this was frustrating at times.

However, I'm really pleased to get it done and it's a great way to start the new year. I now just need to paint a regiment of troops to ride it.

Acquired: 0
Painted: 1
Lead Mountain: 640


Tuesday, 19 November 2024

It's all gone Sau-wrong

I fear the title of this post might have given the game away on what's about to happen, but let's pretend that it hasn't.

Anyway, after last week's Amon Hen debacle, Matt and I returned to the Quest of the Ringbearer, playing two scenarios following Frodo and Sam as they pass through the Emyn Muil, encountering  Gollum, and into the Dead Marshes.


The first scenario was a very simple affair of Gollum trying to sneak up on the sleeping Hobbits in a bid to regain the Ring.


Unfortunately, Gollum woke the Hobbits almost immediately, which led to a strange game of cat and mouse as he tried to get the drop on one of them with his slightly larger movement.

Meanwhile, the Hobbits chucked stones at him to minimal effect.


Ultimately, both of these strategies came to naught and the two sides closed and combat was joined.

Gollum was the superior combatant, but the Hobbits had a larger store of Might and Fate points to tip the balance.

Unfortunately for the Hobbits, a slight flaw in the game is that Might points can do nothing if your opponent keeps rolling sixes and has a higher Fight value, and Fate points run out quickly, even if you pass the roll.

Sam fell first, shortly followed by Frodo.

Technically, this should have ended the campaign there and then, but in desperate bid to keep things alive (quite literally) we decided that Gollum was 'tamed' despite winning the scenario, and would now lead the group into the Dead Marshes.


Unfortunately for them, the Dead Marshes were being patrolled by a Ringwraith on a Fell Beast, and numerous undead spirits of those killed in the War of the Last Alliance.


The only thing the Hobbits had going for them was the fact that they had control over their actions, whilst the forces of evil were utilising the sentries rules, meaning that they would only head in the right direction 50% of the time.


The Hobbits had a long way to travel on very little legs and made for the biggest gap in the enemy lines caused by random movement.


However, risks needed to be taken and soon some of the Dead Marsh Spectres were heading right for them.


Gollum and Sam both competed to prove themselves most loyal to the master, and ran interference for Frodo, driving off the spirits.


The Hobbits also found that through combining their efforts they could bring down the Spectres one at a time.


However, whilst Frodo and Sam were largely resistant to the lure of the Spectres' ghost lights, Gollum was less resolute and was drawn away from protecting Frodo, leaving the Hobbits in trouble.

As the Ringwraith finally located the Ring and closed in, Sam was brought down by a Spectre and Frodo succumbed to the Rings power and was drawn to his death in the marsh.

The Ring is either lost in the depths of the swamp, found by the Nazgul and returned to Sauron, or possibly, and this is my favourite outcome, Gollum managed to get away with it and takes it back beneath the Misty Mountains.

Either way, Middle Earth is screwed.

Thanks Matt!

What now for the Quest?

I think I have to declare the Quest over. There's only so far creative rewriting can take you.

However, I have enjoyed playing the scenarios and using them as an impetus to paint miniatures from the range. Therefore, as long as Matt is willing, I think I'd like to keep playing but no longer track points, also that each scenario is just played as written.

On top of this, we can still play Gondor at War and War in Rohan as standalone campaigns.

One day I'll return for another shot at the grand campaign, but not right now...

...it's too soon.

Sunday, 10 November 2024

If by my life or death I can save you...

The Uruk-Hai attack at Amon-Hen is one of my favourite scenes in The Lord of the Rings trilogy of films, possibly second only to the arrival of the Rohirrim at the Battle of the Pelennor Fields.

It has everything: heroic combat, noble sacrifice, desperate decisions and lasting impact for the characters in the film.

It would be interesting to see if my own clash upon the slopes of Amon Hen at part of the Quest of the Ringbearer would be able to match this level of drama.

We opted to play the single scenario rather than the two separate linked scenarios, which has the Fellowship of the Ring scattered and Uruk-Hai swarming the board in an attempt to "FIND THE HALFLINGS!"


The Fellowship player, me, needed to get Frodo to the boats, whilst the Uruk-Hai player, Saru-Matt, needed to grab him and leave the table. If Frodo escaped but two or more Hobbits had been captured, the game would be a draw.


This felt like a really difficult scenario to win for the Fellowship. Although individually Aragorn, Boromir, Gimli and Legolas outmatched the Uruk-Hai, they would be respawning, meaning that the heroes would eventually get worn down.


On top of this, the Hobbits are always a bit of a liability and can't really contribute without a lot of luck. Also, they are very slow, meaning that the Uruks would always have a chance to regroup if I broke through.

Let's see how this goes...

***
"Go Frodo. Run!"

Aragon leapt into combat with the Uruk-Hai which Frodo put the Ring on and dived out of the encircling servants of Saruman.


Meanwhile, Boromir ordered Merry and Pippin to stay behind him as they backed away from the encroaching hoard of enemies blowing the Horn of Gondor in a call for aid.


Arrows flew out of the trees, dropping Uruks where they stood, as a stout shape spitting curses in Khazalid barreled towards them.


Faced with what seemed to be an unending horde of enemies, despite cutting down many of them, Boromir could not stop the tide of Uruks flowing past him towards Merry and Pippin as their huge and ominous leader strode towards him.


Gimli yelled as he charged into combat, determined to kill more enemies than the pointy-eared Elf, who had already started to rack up a tally of kills. This relieved some of the pressure on Aragorn, who had been making heavy weather of his opponents.


Seeing a gap open up between Gimli and Aragorn, who had now decided to stop playing nice, the ethereal Frodo slipped through towards the boats.

He must go to Mordor, alone if need be.


Meanwhile, alone in the woods, Sam stumbled into a group of Uruk-Hai who quickly took him prisoner.


Boromir, determined to remove the stain on his honour that his attempt to steal the Ring had left, hacked through the Uruk-Hai, but could do nothing to stop them knocking both Merry and Pippin unconscious.


However, an arrow came impossibly snaking through the trees and felled the Uruks carrying Merry, who flopped to the ground whilst another two hauled Pippin off into the undergrowth.


Boromir faced off against the leader of this ambush, a great hulking Uruk-Hai with little in the way of character or emotion, and seemed to exist for only a single purpose: to provide a final boss fight for the first part of a trilogy.

Their blades met, steel range on steel and despite being built up the past three hours, the Uruk chieftain was cut down by Boromir's sharpe sword.

Now that's soldiering!


Things looked precarious as the camera swept across the battlefield. Pippin and Sam had fallen and the enemy were everywhere, but the Fellowship were beginning to link up and work together.

There was still hope.


Gimli helped a stunned Merry to his feet, but the brave Hobbit told him to go and save Frodo, and ran in in the opposite direction, trying to lure as many Uruks as possible to follow him.


Meanwhile, an invisible Frodo was following Aragorn, as the Ranger of the North hacked and slashed his way through his foes.


Seeing the bravery in the little Hobbit's actions, Boromir, Legolas and Gimli rushed off to where they could hear Aragorn fighting on his own, leaving the noble Brandybuck to his fate.

Calling and shouting, Merry drew several Uruks in his direction but was quickly overcome, his sacrifice buying valuable time.


With the Fellowships warriors finally gathered Frodo risked taking the Ring off. Surprised by his appearance, they formed up around him.

Boromir tried to form some form of apology for his actions, but the Hobbit looked at him with only fear in his eyes. The man of Gondor knew that he could accompany the Ringbearer no further.


Another wave of Uruk-Hai crashed through the woods towards them, and the Fellowship spread out to cut down as many as they could.

Legolas looked like he was about to say something to Frodo, but didn't and just gestured to him to follow the Elf towards the boats.


Forced apart by the sheer numbers of their assailants, the Fellowship began to struggle. Gimli was knocked flying by Uruks, which then surged past him without checking if he was dead.

Meanwhile, Legolas was surrounded and pulled down, desperately trying to cut a route free for Frodo.


As they neared to boats, Aragorn and Boromir continued to hack and slash in a desperate attempt to keep Frodo free.

Looking over his shoulder into the eyes of his little friend, Aragorn smiled and said, "there will come a day when the courage of men fails, but it is not this day."

Raising his sword he plunged into the mass of enemies and was listening from sight.


Frodo cried out in distress but was shook out his shock by Boromir.

"Forgive me Frodo, a madness took me. I have failed you. But I will not fail again. I will save the little ones and I will save my city. Go!"

With that he turned, blew the Horn of Gondor one more time and leapt into the thick of combat.


***

Well, that was...brutal.

This was a really tough scenario for the heroes, although I think I got it tactically wrong sending Legolas and Gimli to help Boromir and should have kept them with Aragon and Frodo.

The Hobbits' slow movement is a massive hindrance and although the heroes are individually better than their opponents, their store of Might and Fate points eventually get worn down by the randomness of dice. Aragorn took a while to stop rolling low and so burned through most of his points in the first few turns.

Although the game was technically a draw, it felt like a loss when I rolled for casualties and both Aragorn and Legolas had died.

Boromir was definitely the bravest companion, and I decided that for the sake of the campaign he wouldn't die here and narratively it makes sense for all his future actions in Aragorn's place to be driven by a desire for redemption. Boromir will now travel with Gimli into the War in Rohan scenarios. Legolas can't be replaced at this point, but if Haldir survives Helms Deep, he could step in.

Meanwhile, the Fool of a Took was Sam, who achieved nothing except getting captured at the first opportunity. However, without Sam, Frodo stands zero chance of getting to Mount Doom, so as he wasn't actually killed, we can at least write him back in to where he should be for the next stage of the Quest of the Ringbearer.


***

Frodo scurried to the water's edge and was surprised to see Sam already pushing a boat out into the water.

"Hullo Mr Frodo, I thought we should be off today," said Sam with a weary smile.

Frodo, tears streaming down his face, hugged Sam and clambered into the boat, "how are you here Sam, I thought for sure you must have been taken."

"Ah, well," said Sam as he paddled the boat out into the current, "so did I, but them Orcy fellas clearly don't know a lot about rope. They tied me up, no doubt intending to pick me up later, but their knots were less use than a carrot in a marrow growing contest. When they didn't come back, I was able to slip away my"

Frodo smiled, "I'm glad you're with me Sam. I don't suppose we'll see the others again."

"Yet we may, Mr Frodo, yet we may. But not if our dice-rolling doesn't improve."