Tuesday 28 February 2017

"They're the world's most fearsome fighting team..."

After a busy January, I've had a quieter February on the painting front, however, I have managed to get a couple of new models done for my Teenage Mutant Ninja Turtles project done, so that seemed like a decent excuse for a game of 7TV.

The game was played at just 25 ratings, and we used the Battle scenario. The basic outline of the plot is that the Turtles are attacking Baxter Stockman's secret lab, which is guarded by the Purple Dragon gang.


The heroic cast featured the four Turtles (from left to right: Raphael, Michelangelo, Leonardo and Donatello) and new addition, April O'Neil. She a Pulp City miniature called June Summers which I was kindly given by Pulp Citizen of the Ecclectic Gentleman Gamer blog (which you should read). I'll talk more about her on my next post.

In terms of the crew, all April really adds is the ability to activate both her and a Turtle at the same time with her Leader ability. However, she is also a bit of a liability, as her Most Wanted trait makes her worth a VP if taken out, despite being an Extra.


The villainous cast was led by the mad scientist Baxter Stockman, in his mutated-fly form. This model was made from one of the Crooked Dice Failed Experiments (which conveniently come with a fly head and claw arm amongst the options) with some wings taken from a Heroclix Queen Bee I picked up for 50p in York. I'm really pleased with this conversion as it really only needed a tiny bit of rough sculpting on his back to achieve. There are some clearer pictures later in the report.

With Baxter were two Scientists (who were there to provide gadget cards) and the Purple Dragon gang (a Minion Squad) featuring a commander, a thug with a flamethrower and five gang members, two with rifles, two with pistols and one with an SMG (well, a shotgun, but it sort of makes sense).


The table was set up with my usual 3'x3' crossroads layout. Baxter and the Dragons were defending the factory and warehouse on the left, whilst the Turtles would attack from the right.

The Purple Dragons take to the streets.

Scientists cower behind the sniper on the roof.

Stockman-Fly buzzes quietly to himself.

Leo and Donnie sneak through the builder's yard.

April follows Mikey up the road to the lab.

Raph immediately grabs a rooftop objective.

Climbing suckers allow Raph to grab a second objective.

Leo and Donnie pick up a third as the cross the street.

And Mikey grabs the third, but leaves himself exposed.

The Purple Dragons fire everything they have at Mikey...

...but he loses only a single wound (by burning through 9 Plot Points).

Stockman-Fly wounds Raph with his acid spit.

As a consolation, the Purple Dragons secure the final objective.

Mikey breaks out his skateboard....

...charges the flamethrower Dragon, takes him out, and...

...nips round the corner to meet up with the guys.

Isolated, Raph heads for cover.

April makes a dash for it and trips...

The Dragons attack...and miss everything!

Dodge editing sees April safe.

Mikey does a 'skate-by' on the Purple Dragons.

Injured; Raph tries to hide from Baxter.

The Turtles continue to clean house. Only a few to go now.

April stays safe in the warehouse.

Sleep spray followed by Acid Spit takes the fight out of Raph.

However, things look bad for the villains.

Also, Baxter is weakened by his exertions.

The last Dragon in the street falls, threatening to axe the villain cast.

Mikey rushes the factory, just to be sure.

With the game up, Baxter drops a gas grenade to cover his escape.

When the victory points were counted, it was 9-5 to the heroes...a scoreline that flattered the villains. Despite losing Raphael, and a single objective, the only points the villains scored were from the nerve-gas gadget Baxter used just before his cast was axed, leaving Leo and Donnie with statuses.

The Turtles proved just too tough for the Purple Dragons to reliably hurt, and Michelangelo's resilience on the first turn was just amazing. The failure of the shooting meant that the game was up fairly early one, as Minions are no match for the Turtles up close and personal.

Baxter Stockman was also in the wrong place, as even though he took out Raphael single handed, he would probably have been more use supporting the Purple Dragons with the other three. Hindsight is a wonderful thing.

This was my first proper TMNT game, and I thoroughly enjoyed it. The bad guys are currently struggling from a lack of stars and co-stars, however that's due to change soon, as somebody big, mean and spiky is on the way...

Tuesday 14 February 2017

Expanding the Fleet

Since the last time I discussed Dropfleet Commander on the blog I've managed to get in several games. After the narrow loss to Matt's Shaltari in my first game, I handily beat Mike's Scourge (it was his first game...people lose their first games, it seems), forged a decent win against Wes' tough PHR fleet, and received a comprehensive thrashing in my second run in with Matt's Shaltari.

This left just Pete's UCM to play using the starter fleets, but Pete, being Pete, has painted his entire pledge and wanted to up the ante a little to 750 points. This meant adding a battlegroup and painting a few more ships.


The ships I've added are two more Gargoyle Strike Carriers, as they increase my ability to drop troops, which is the actual point of the game, and a Hydra Fleet Carrier, which although lacking guns, does have the ability to dispatch bombers to wreak havoc on enemy ships or deploy fighters to protect my own. This is a nice ability as it give my fleet a little bit more of a ranged threat that I've been 'enjoying' so far.


Rather than messing about with the organisation of the fleet, I decided to simply add the new ships as a new battlegroup, meaning that my fleet for the game was as follows:

Vanguard Battlegroup - Strategy Rating 12
  • Shenlong Heavy Cruiser
  • 2 Gargoyle Strike Carriers


Pathfinder Battlegroup - Strategy Rating 7
  • Ifrit Attack Cruiser
  • 2 Harpy Frigates


Line Battlegroup - Strategy Rating 7

  • Hydra Fleet Carrier
  • 2 Gargoyle Strike Carriers


Line Battlegroup - Strategy Rating 5

  • Wyvern Cruiser


Pete, having more to choose from, decided to experiment with a different set up that relied more heavily on his light frigates:

Vanguard Battlegroup - Strategy Rating 10
  • Moscow Heavy Cruiser


Pathfinder Battlegroup - Strategy Rating 6
  • 4 Toulon Frigates
  • 2 New Orleans Strike Carriers


Line Battlegroup - Strategy Rating 7

  • Seattle Fleet Carrier
  • 2 New Orleans Strike Carriers


Line Battlegroup - Strategy Rating 7

  • Rio Cruiser
  • 2 Taipei Frigates
The game itself was a very even affair. We battled over three clusters, and played the scanning and critical location rules properly for the first time. Apologies for the lack of photos, I forgot to take any during the game.

At the cluster to my right, my Wyvern failed to make an impact on the two strike carriers that Pete dispatched to take it, but it did succeed in drawing the Rio away from the centre.No critical location was found, and although my Gargoyle survived to drop troops all the way through the game Pete grabbed the lion's share of the VP's from this cluster.

In the centre, things went my way. My two Gargoyles powered forward to grab the military sectors early and add their guns to my force. An active scan lit up Pete's Seattle for my Ifrit and Harpies to take out, giving my Hydra 'air' supremacy for the rest of the game, and the Taipei's were also brought down quickly. The Moscow fluffed it's big moment, and failed to make an impact, and was taken out by weight of fire over several turns. By the end of the game, Pete had no ships in the centre of the board and I picked up most of the VP's, of which there were more as I successfully scanned to find a critical location.

On my left, things began poorly. Pete's Toulon swarm blasted my Gargoyle out of the sky, preventing me from contesting the cluster at all. They then went on to almost obliterate my Shenlong in one attack, and then almost did the same to my Hydra. They suffered from attrition though and only the Hydra flew away from the fight (with only 2 hull points remaining), but it was able to find a critical location and at least pull some points away from the cluster.

By the end of the game, we tallied the score to 22-18 to the Scourge, but we think we were playing contesting clusters wrong, so it could easily have been 16-16, however, if we'd know that, we both might have done things differently, so I'm taking that as a win.

Overall, I think I'm beginning to get the hang of the game, but I picked up the following gems of wisdom from this encounter:
  1. Swarms of frigates are powerful, but are fragile and reduce your chance to scan for critical locations.
  2. It's better to send groups of Strike Carriers to fewer clusters, than send a single one to each.
  3. I still don't have the ability to threaten ships in atmosphere.
  4. The Shenlong Heavy Cruiser, just doesn't pull it's weight. It's firepower and special abilities seem to work against each other.
  5. The Hydra Fleet Carrier is a powerful threat in the centre of the board.
  6. The Ifrit and Harpies can combine to take out enemy cruisers in a single round.

Next up is Matt's Shaltari, again. Their combination of range, swarms of Voidgates in atmosphere and Motherships that can sit back away from the fight seem to play to Scourge weaknesses. Therefore, I might need to shake things up a little before the weekend...

Saturday 4 February 2017

Villains & Vigilantes

I've been motoring on the painting front over the past few weeks, so here's a fairly eclectic post full of the different stuff I've been churning through recently.

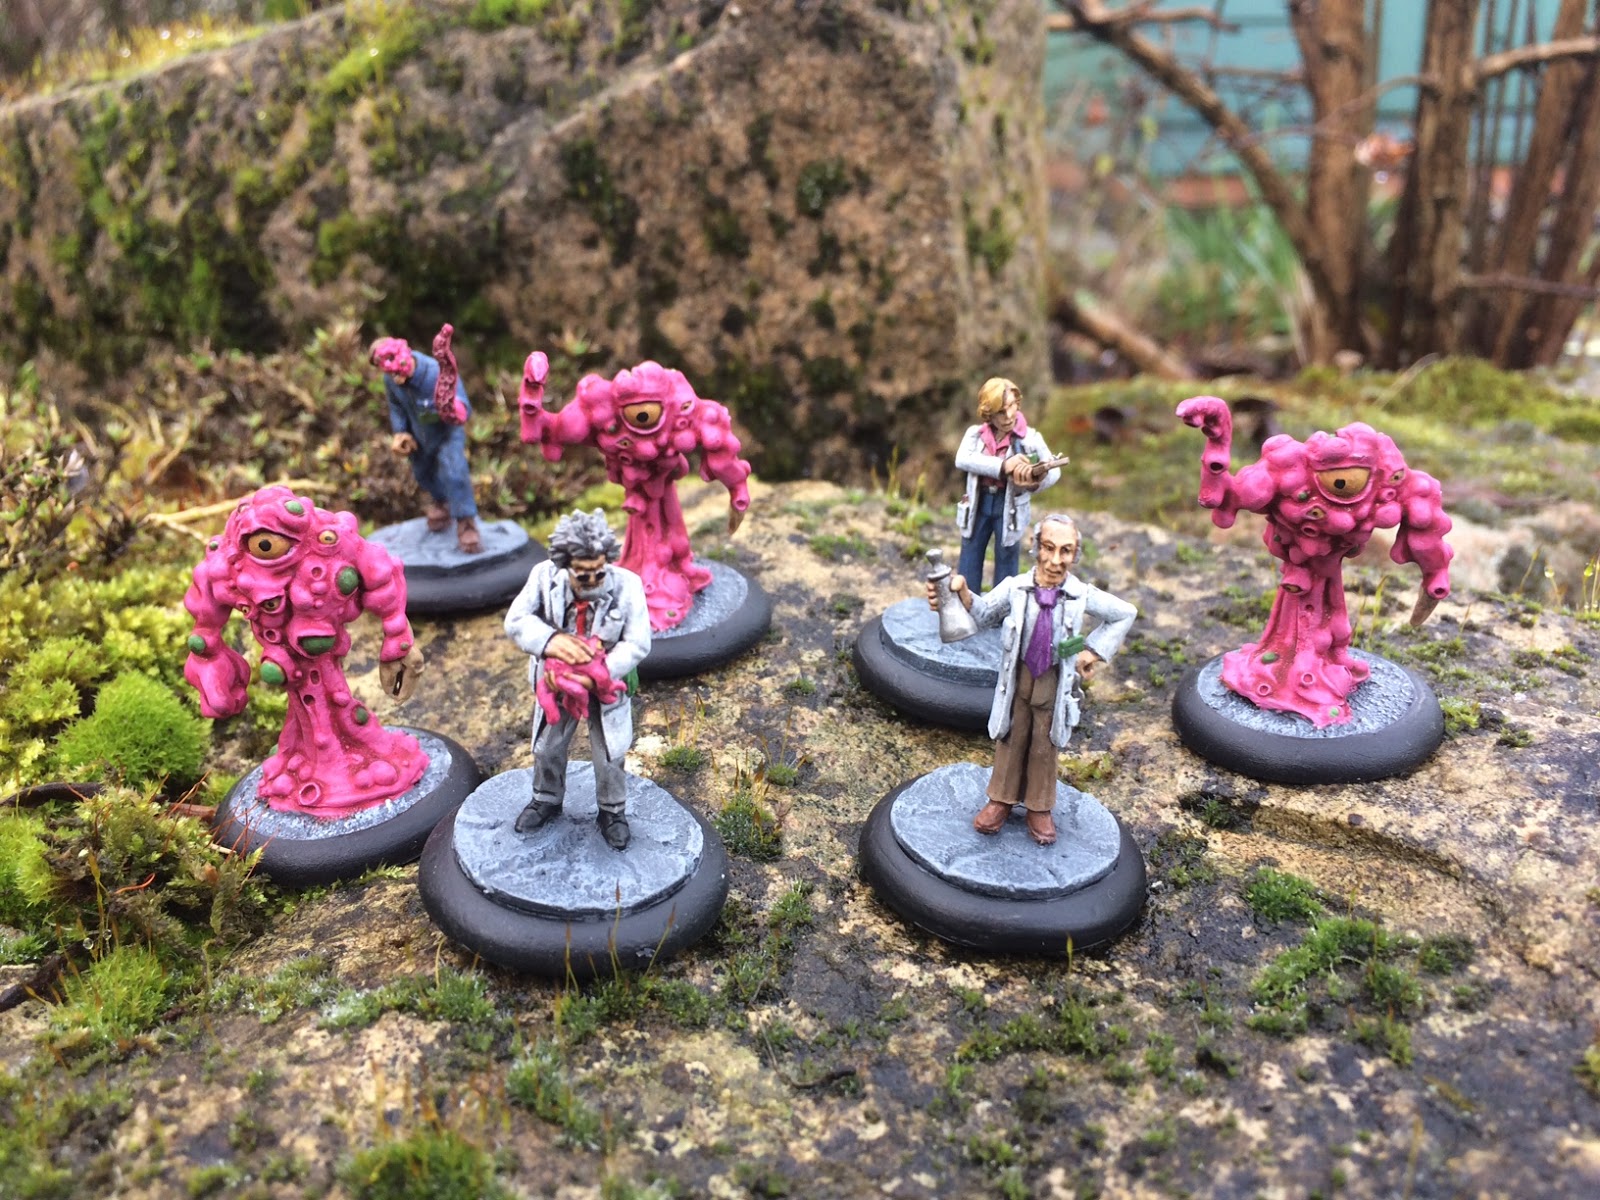
First up is another 7TV starter cast, Weird Science.


This is probably my favourite cast so far, simply because the colours are so vibrant. The pink was chosen as I foresee using them in TMNT games as scientists working with Krang mutagen, but it worked out much better than I hoped.


The three Spawn were loads of fun to do. Really clean casts, with bags of personality, despite not having faces. I imagine these as humans who've been exposed to the mutagen and metamorphosed into blobs. I love the eyes.

In game, these guys have the potential to split in two when killed, and so I might need to buy and paint some more. Damn!


The Scientists, with their white coats, proved harder to do to a level I was happy with, but I eventually got there. Again, Crooked Dice miniatures have loads of character and no necessary extraneous detail.

The two lab technicians, although primarily part of this cast, will easily find a place in Doctor Who themed games. Whilst the Mad Scientist, who is ostensibly holding a Krang, could just as likely be handling a Cthulhu-spawn, or other alien/demon lifeform.


The final part of the cast is an unfortunate janitor who has come into contact with mutagenic material and is now in the process of changing. This is one of two 'failed experiment' models in the starter set (they come with three head and four arm options), but the other one is destined to become a more recognisable TMNT character.


Speaking of TMNT, here's a repaint of an old model I put together. The model was originally put together from a couple of Heroclix miniatures and some stuff from my bits box to function as a proxy henchmen for the Batman Miniature Game when I first started playing. Since then, the expansion of my collection has made the use of proxies unnecessary, and so he's up for redeployment.

When I made him, I commented on the blog that he looked a little bit like Chuck Norris, which is fortunate, as in the newest TMNT cartoon series, the character of Chris Bradford (one of Shredder's henchmen) is also based on Chuck Norris. So, a new base and different coloured trousers (they were orange) sees me now able to field 'Rad Brad', who will be leading the Purple Dragons into battle fairly soon.


Another Heroclix repurposing saw me cutting the head off the Black Mask (now I have the KM model, I didn't need him) and replacing it with another head to make a generic hitman, gangster, pulp detective, businessman. I originally planned to use the head of a KM mobster, complete with trilby, but was disappointed that the details were so soft that they disappeared under a thin undercoat.

Anyway, although unspectacular, this chap will be versatile.


Whilst we're on the subject of Knight Models, I've painted Batfleck, who came with my Suicide Squad boxed set. He's a big model, and towers over some of the smaller sculpts in the range.

I've now done three different Batmen (Batmans?) - five if you count the Heroclix repaints I did - and I am starting to think that it's the character I have most trouble painting. I think it's the lack of details or bright colours, so there's nothing to draw the eye, and my wash/dry-brush style doesn't seem to suit Batman.

However, I'm definitely happier with this one that I have been with the last two, and so he'll do. I'm getting there. It's not like there's a shortage of Batman models in the range to keep improving on.


Finally is the model I'm most happy with: Punisher. The model is from Hasselfree Miniatures and I'd seen it painted as the Punisher before. He was incredibly simple to paint for the most part. I was really worried about the skull, but it's ended up looking like the sort of thing he might have painted himself rather than the artistic masterwork that often graces the Punisher's chest. However, the face is the bit I'm most happy with. Much of this is due to the sculpt, but I think he's ended up looking like John Bernthal in the Netflix Daredevil series. Even without the skull, he looks like the Punisher.

I'm pleased.