Showing posts with label Flames of War. Show all posts

Thursday, 10 April 2025

'Green' Army Men

I don't know why, but I seem to have been caught by a bug of painting up models left over from truly ancient projects.

The last time I touched any US models for Flames of War was 2013. In fact, for those in the UK reading this, a measure of how long I've had these models sitting around is that the vehicles were bought from the bring and buy at Sheffield Triples, last held in 2017.


My US Army force for Flames of War was always my back up army, for when Germans aren't appropriate.

Given that main opponents when we used to play a lot were Matt and his 1 for 1 recreation of the entire US military, and Pete's 'quantity is quality' Soviet armour, the need for me to field my Americans was always somewhat reduced.

This meant that my US Armoured Company was a bit underdeveloped, containing only bog standard Sherman tanks, a platoon golf zippy little Stuarts, a cobbled together Recce platoon and, later on, some Engineers to provide at least a little infantry support.


Therefore, after playing the game for a while, I identified two main problems, the first of which being that I couldn't hold objectives with tanks.

This caused me, at some point, to pick up a platoon of Armoured Riflemen to add a bit of saying power to the army.

I suspect I was intending to pick up some Plastic Soldier Company halftracks, which were very much all the rage before Battlefront went plastic, to put them in, and I may still do this if we ever play Flames of War again.


In the intervening years I have toyed with selling them on several times, but since Flames of War changed edition, there doesn't seem to be that much of a market for the old metal miniatures and so, as they weren't taking up too much space, I've kept hold of them.

I think I've decided to paint them now because I wanted to make a dent into my backlog and, as with the 6mm ACW miniatures, smaller scales are a good way to do this quickly.


However, after undercoating them with a green spray paint, and looking back at the miniatures I'd done previously, I was reminded of just how many different shades of green and brown I used on these guys.

I was also reminded of the most likely why I didn't bother painting them a decade ago.

In short, they were a faff.

They've come out quite dark because I'm matching them to my previous paint job which involved being drenched in Agrax Earthshade, which was very much my 'thing' at the time.

The other major problem my US Armoured Company had was that being equipped only with Shermans packing 75mm guns, I really had no answer to heavy armour beyond trying to swarm them.

The obviously response was to pick up some Romulan Laser Destroyers...erm, M10 Tank Destroyers, and when I spotted these in a bring and buy, I scooped them up, despite the fact that they needed a little TLC.

I gave them new barrels from my plastic sprues and used some tank commanders and infantry cut in half to crew them. The Greyhound's MG rail/ring was fashioned from the rim of a plastic shield, and he also got an infantryman as crew. Finally, I got round the lack of driver for the Jeep by having its crew stood beside it making a call.

I'm not sure if this is a game legal set up, at least it isn't in any of my army books, but at least they're painted.

All in all, they're perfectly fine tabletop quality. Will they ever get used? We'll see. However, I have achieved the goal of taking a chunk out of the backlog.

Acquired: -82
Painted: 121
Lead Mountain: 449

Thursday, 30 April 2015

Operation Unthinkable: Flames of War Germans

For you, ze var is over...


This is the final installment of my long running German Flames of War Army. I began this army about five years ago (maybe more) when I traded some stuff I didn't want, for eight painted Panthers. This led to a sharp learning curve where I learned quickly that Flames of War required a combined arms approach. As time went on I added infantry, artillery and smaller units one platoon at a time until I was able to field an infantry based force rather than one built around expensive and inflexible tanks.

The units I've finished off this month are the last gasp of completing this process.


First up are three Zvezda Opel Blitz trucks. These are cheap little models which I've given a simple paint job to because I can't image that they'll ever see much table time. They're a functional necessity more than models that I desperately wanted...hence why I've left them until last.


Next up, three Marder IIIM tank hunters from Forged in Battle. In truth, only the central model has been painted this month, but I've touched up and detailed the others. Marders are great for ambushing enemy armour as although being lightly armoured, they pack a hefty punch. Their low cost allows me to include more of the expensive and well-trained German infantry.


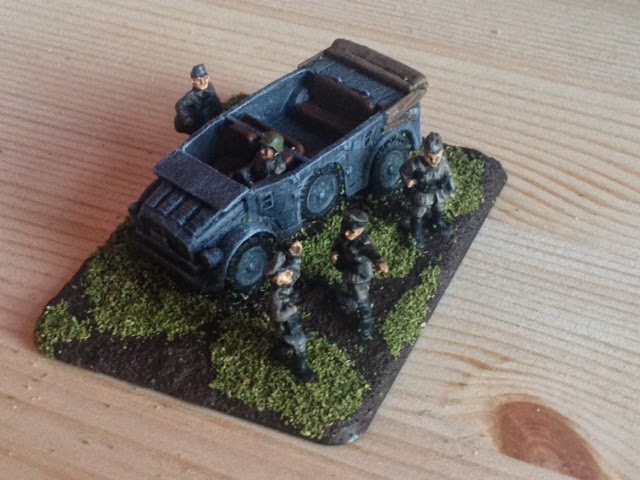
Finally is a little diorama I've made to use as an objective marker. This was made with bits and pieces I had left over and depicts officers debating tactics by a parked Field Car with it's engine running.

I like doing little dioramas like this, my other objective marker is a checkpoint, complete with red and white sentry box. They give a chance for a little bit of creativity in what is a pretty uniform (pun intended) army.


So that's another month done. I did give away a sniper team and a Goliath Demolition Carrier that I wasn't going to use to Matt and a tank commander to Pete, but I've still got a few bits and pieces, like gun barrels and ammo boxes that will go in the bits box.

Next month I won't be focusing on completing an old project, I'll be working on a new one. I've just bought a starter box for Dropzone Commander, so this month I'll be trying to get that painted in order to get playing soon.

Sunday, 30 November 2014

Firestorm: Lorraine - Thinking Like Hitler...

...no, not like that!

We finally returned to our long postponed Firestorm: Lorraine campaign for Flames of War, and as I was taking over direct control of the Germans, I thought that I could surprise Matt's Americans as they attempted to surround Metz by bringing a surprising amount of Reluctant Trained troops.

Yes, that's exactly what Hitler thought in the real campaign in 1944. It didn't work for him either.

My forces were roughly as follows:

Panzergrenadierkompanie (Blood, Guts & Glory)
HQ
RT Infantry Platoon (Panzerfausts)
RT Armoured Pioneer Platoon
RT Panthers x4
RT Marder IIIM x2
CC Infantry Platoon (Firestorm Troops)

Yes, I had no artillery or AA guns (largely because I don't own any), but I figured I'd be fine if Matt brought his tanks I'd stand a fighting chance as I was packing a comfortable amount of anti-tank fire. I was aware that if he decided to bring his Parachute Company with Air Support, I'd be struggling to kill enough of them fast enough.

His forces were (as I remember):

Parachute Company
HQ
FV Parachute Platoon
CV Artillery (of some sort)
CV M5A1 Stuart Light Tanks x5
CT M4A1 Sherman Tank x3, M4A1 Sherman 76mm Tank (Firestorm Troops)
Priority Air Support

Bugger!

The scenario that we were playing was Breakthrough, with me defending. Here's how we deployed:


I deployed two of my infantry platoons, and the pioneers in the woods to the north, with another platoon in the fields near the closest objective. The conscript unit were stationed in the village as a speed-bump. My Panthers (kampfgrupped into two units) and Marders were held in reserve.

Matt massed his troops as if he was completely unafraid of the template weapons I didn't have. His artillery were obviously at the back, with their spotter in the central woods, ready to rain down destruction on my emplacements. The Stuarts were neatly parked ready to rush towards the road and one of his parachute units was deployed dangerously close to my infantry; clearly gearing up for an assault.

I immediately noticed that I'd buggered up deployment. Not only were my Reluctant Trained infantry about to get eaten by some of the best infantry in the game, but I'd put the one unit without Panzerfausts in the village as the 'speed bump'. I was even more pessimistic about the outcome of this game than usual.

However, on the up side, it was cloudy so the USAF would be arriving immediately...well, at least until turn two.

Here's what happened:


A:The Stuarts sweep down to the road and push, largely unopposed, towards the nearest objective, pausing only long enough to spray the Conscript Infantry with enough lead to pin them into oblivion. 
B: The Paratroopers launch the expected assault sweeping through the opposing infantry.
B: The even survive a vicious counter-attack, but are so reduced in numbers that they're rendered largely ineffective for the remainder of the battle.
C: The swift US advance calls for rapid redeployment as the Pioneers and the remaining infantry unit move quickly to the objectives.
C: However, clearer skies mean that both units are bombarded by both Artillery and Air Strikes for the remainder of the battle.
D: German reserves finally arrive but are too little, too late and too inaccurate to relieve the pressure on the Infantry. Not a single Stuart falls to the Panthers.

E: US reserves arrive right on cue, with Shermans attacking the Pioneers, whilst the Paratroopers advance threateningly towards the remnants of the German infantry. The German commander realises the game is up and surrenders. At least he won't have to face the Fuhrer's wrath.
Ouch!

I'm not sure I've been battered like that in a long time. It was a perfect storm of a one-trick-pony army + bad deployment + awkward scenario + late reserves + poor shooting + capable opponent = butt-whipping.

I have always struggled against Matt's Americans; mainly because he has a lot of options that he knows how to use well, so I can never really get the drop on him. I still need to round out my German army as I'm forced down and all attack or all defence route by my only armour being so expensive. Curiously, I don't have the same problem playing against his Germans, but he'd freely admit that his Armoured Pioneer Company with Tigers and Flak 88's isn't exactly an optimal force.

Anyway, back to the campagin. Not only did the Americans win, but they destroy my Firestorm troops and have encircled Metz. I suspect that the hammer will fall there the next time Matt attacks. For me, I need to win initiative and attack somewhere that I'm sure I can win, in order to put the Americans on the back foot for a bit.


Oh, and I need to avoid playing like a numpty too!


Thursday, 22 May 2014

Tanks For The Memories

I've just started to take part in a Flames of War Tank Aces campaign run at a club I've never been to before. Several of the chaps from both of my previous clubs attend, so it was a fairly famiar environment.

I'm using U.S. 4th Armored Tanks in the campaign and my initial 500 point force features six Shermans. I've named my Tank Ace after Sergeant Blast, the commander of the Army Surplus Special in the Wacky Races.


I played three games on my first night.

Game 1 saw me take on five SS Panzer IVs. I rushed forward and mobbed two isolated tanks before mopping up the rest. Some fortunate dice rolling saw me make this look smarter than it was.

In game 2, again it was against Panzer IVs, but this time it was Hungarians. I couldn't get through their armour an was soundly beaten.


In game 3 I was up against just two Fearless Veteran Panthers. My opponent castles up well, but another rush attack through terrain saw me manage to exploit their flanks, although I did lose half my tanks.

All in all, this was a fun beginning playing against new people. Most of the players are new to Flames of War, and this format will serve as a good introduction to the game. I'll be looking forward to going back to the South Yorkshire Dice Devils for some more games.

Thursday, 2 January 2014

Building For The Future


Well, it's that time of year again that gives me a chance to look back on what I've achieved and look forward to what I intend to get done.

Let's review 2013 first:

Batman Miniatures Game - I started this in 2013 and I have to say that I'm pleased with how I've done. 19 Miniatures done along with three buildings, lampposts and terrain for my board. Here's the latest building from Sarissa Precision:


This was a Christmas present and an absulute doddle to put together compared with both the Dust Tactics building and the Warbases warehouse. Especially considering that it has more detail than either. There's still a bit of finishing to do, but Sarissa can probably expect more of my money.

Resolution 1 - continue to paint and build at a steady rate. I got Bane, two more Joker thugs and two more cops for Christmas and I've decided to use a few more Clix figures for my Penguin crew, so there's plenty to do. I also want to get more games in.

Flames of War - one campaign finished, another one halfway done and a bucket load of games played. My Americans gained an infantry platoon whilst my Germans got Nebelwerfers and PaK 36's.

Resolution 2 - Get the Lorraine Campaign finished and possibly play a big D-Day landing game on the 70th anniversary.

Zombies - Zomtober got me motivated to finally start this project and now have two dozen fresh shamblers, half a dozen civilians and a couple of survivors.

Resolution 3 - begin my solo All Thing Zombie Campaign. I've a couple of survivors to do before this can happen, but I'm very close.

Bolt Action - had a brief flurry with this, and Matt and I settled on these as our preferred rules for VBCW. I've half-painted a 500 point Russian force.

Resolution 4 - Finish the Russians and the two VBCW units that have sat unpainted all year.

Impetus - another passing fad that I need to return to. I obtained Sicilian Greek army from Bill and began painting, although I only did a few stands.

Resolution 5 - paint the Greeks.

Bloodbowl - I began the year finishing off my Halflings/Mushrooms team and competed in a league where I actually managed to win a game.

Resolution 6 - play in another league this year with a team that has a bit more chance of winning.

Star Trek: Attack Wing - one of three games that I've been lured into by Pete in one way or another, but I'm enjoying it and in my customary manner have developed campaign rules for.

Resolution 7 - Continue with the campaign and try to learn how to make the Dominion not suck.

The Club - our club, the Wargamers Free Company, came to an end due to the differing priorities and family commitments  of the members. Although disappointing at the time, it has led to Matt, Pete and I (along with Wes on board game nights) forming a free-floating mini club which is a blast as we are pretty much in tune in terms of gaming interests and attitudes.

Resolution 8 - try to get more games in with folk from the old club, which includes getting out to the South Yorkshire Dice Devils in Rotherham at some point.

Resolution 9 - Begin work on my War of 1812 US Napoleonics, not only to clear the back log, but to help give Matt some motivation with his British.

The Blog - despite a couple of pauses, I've managed to keep this going on a fairly regular basis and I'm particularly happy that I've started to get some semi-regular contributors on the comments. Joining in Zomtober was a big success and I hope this can continue in the future.

Resolution 10 - Keep the blog regular and be more active in the blogging community. I'm a bit of a lurker, but if I want people to comment on here, I've got to get out and do the same on other blogs.

All in all, 2013 was a successful year for me in gaming terms. I've not painted masses, but I'm painting for myself and achieving a higher standard than ever before. Most of my long delayed personal projects have got off the ground and I'm really enjoying all aspects if my hobby as much as I ever have.

Here's hoping 2014 is as successful.

Happy New Year blogosphere!


Sunday, 22 December 2013

Firestorm: Lorraine - No Plan Survives Contact With The Enemy

The last couple of weeks have been busy at work and home, leaving me little time for painting and most of my playing time has been taken up with a few games of Star Trek: Attack Wing (more on that in the coming weeks). With one thing and another, I've only just got round to sorting out the campaign map since our last game of Flames of War.

In brief, I was the Germans fighting Matt's Americans, who for once managed to actually gain the initiative and decided to attack Arrancourt across the Moselle. I decided to surprise him by taking an almost totally infantry force as a counter to his laser tanks. I wanted to give my Nebelwerfers a run out for the first time, and backed up by my PaK40's a borrowed Flak 88 and a shedload of Panzerfaust-toting infantry, my plan was to dig in and blow up the American Armour as it rumbled into view.

Matt dutifully picked an armoured list and all would have been well had we not rolled up the Counter Attack mission. Suddenly, I found my swarms of infantry penned into one quarter of the table needing to get out of their foxholes and engage in a footrace with Stuart tanks in an attempt to secure the undefended objective on my flank. What's more, I had no units suitable for being in reserve behind Matt's positions.

All in all I made a fairly good fist of a bad situation. I managed to repel an assault on my defended flank by two platoons of Shermans and a unit of infantry, and in the process, got myself into a position where just one more platoons destroyed would cause Matt to have t make tests. However, despite sending three platoons of infantry out to secure the other objective, only one and a half made it there. I did manage to secure the objective and kill a few tanks, but time was on Matt's side and a combined assault from Matt's armour finally broke my pioneers and won the game for him.

It was closer than I thought it would be, but I think I was always on to a loser. Matt, didn't rush or make any silly mistakes with vulnerable platoons and so didn't really ever give me a chance to destroy that final platoon, and by the end I was relying on either a very lucky artillery strike or a really unfortunate assault from Matt.


As you can see, this result saw the American open another hole in the German lines and push towards Strasbourg. There is now a gap in the US lines which a German general could exploit to cut off the US spearhead, however, the campaign appears to be tipping in the Americans favour.

Monday, 14 October 2013

Firestorm: Lorraine - The End of the Road

In a busy week for World War II, another battle was fought in our Firestorm campaign. Pete was looking to capitalise on Bill's success against me, whilst Matt sought to return the Third Army to winning ways.

Pete won the initiative and elected to attack deeper into American territory and potentially capture a vital location that could win him a hat full of points at the end of the campaign, thus forcing the Americans to halt their advance and turn back to recapture their staging area. The scenario rolled, appropriately enough, was Breakthrough.

HERMAN GOERING PANZERKOMPANIE (Confident Veteran)
HQ - Panzer III
Panzer Platoon - 2 Panzer III, 2 Panzer IV
Assault Gun Platoon - 2 Stug G
Schwere Panzer Platoon - Tiger
Panther Platoon - 3 RT Panther (Firestorm Troops)

With the addition of the Panthers, Pete created a Kampfgruppe to bring his platoon count to even numbers. He took three Panzer IV and joined them with the 2iC Panzer IV, leaving one platoon of two Panzer III, and one of two Panzer III and one Panzer IV which were joined by the CiC. Pete placed the Stugs and Tiger in reserve to come on behind the objectives later in the game.

4TH ARMOURED COMPANY (Confident Veteran)
HQ - 3 Sherman M4A1 inc. Creighton Abrams
Tank Platoon - 2 Sherman M4A1, 1 Sherman M4A3
Light Tank Platoon - 3 Stuart M5A1
Tank Destroyer Platoon - Security Section, 2 M10 Tank Destroyers
Rifle Platoon - Full Strength & Bazooka (Firestorm Troops)
Field Artillery Battery - 4 155mm Howitzer (Firestorm Troops)

Matt opted to begin the game with one Tank Platoon, the Rifles and the Artillery on the board. He was hoping to camp on the objectives with the infantry and use his big guns to hammer the Panzers as they crossed the battlefield.

DEPLOYMENT


Matt deployed his Rifles at the crossroads, intent on scurrying down the road to straddle the two objectives. The were supported in this by the two command tanks lurking behind the farmhouse in the top left corner. The Artillery and Tank platoon (along with Abrams) were in the opposite corner, utilising the woods to hide from...er, ambush the Germans.

Pete deployed all of his tanks, barring the platoon of two Panzer III's, as far towards the objectives as he could get, hoping to race across the board and get there before the Rifles had a chance to dig in. Special attention should be paid to Pete's historical deployment of his Panzer III's and Panzer IV's, a photo of which has been included for the purists...


TURN 1

Pete lost no time in making for the objectives as fast as he could. He took care to spread out as much as he could, aware that the Artillery would be looking to inflict some early casualties. Only the two Panzer III's took a different route, heading into the woods to threaten the Artillery and the Shermans. Pay close attention to where they are, as this will become important later...


Matt's first turn saw the second Sherman platoon arriving from reserve along the road by his Artillery park.

The Rifles left their foxholes and jogged down the road to take up positions behind the walls. You may notice the platoon grow later in the game when I noticed that Matt had only deployed 8 stands, not the 11 he was entitled to. Pete was pleased about this, obviously.


The Artillery, predictably, opened up on the clustered Panzers and nailed two of the Panzer IV's (one of which had bogged on a wall during its storm-trooper move. The Shermans bagged a third and even with a Herman Goering reroll on its morale, the remaining Panzer IV from the Kampfgruppe fled the field. One platoon down


TURN 2

Pete's second turn saw the Germans fan out even more, fearful of further bombardment. The Panthers hugged the table edge, hoping to use distance and the cornfield to mitigate the inevitable arrival of the M10's.


Shots were fired but the best the Panzers could manage was to bail an already bogged Sherman. Notice how those Panzer III's haven't really moved yet?


With the Germans moving stealthily, the Americans, lacking any reserves this turn, we're without viable targets. Shermans stalked the Panzers, whilst the Rifles made it to the objectives.


TURN 3

Pete spotted an opportunity for a dashing sweeping manoeuvre that could even the odds and the count of burning tanks.


Sadly, his gallant charge was hindered by two of the four tanks involved bogging on a stone wall, leaving only two to attack. They managed to knock out one Sherman, but it seemed like it wouldn't be enough.


The unmistakable whoosh of warp-drive engines could be heard as cloaked Romulan warships arrived from reserve. Pete's heart sank.


Meanwhile, Matt's more conventional laser-tanks (the now official name of 76mm Shermans in our games) finished off the gallant Panzers that had, perhaps recklessly, brought the fight to them.


TURN 4

The Germans countered the arrival of the M10's with reserves of their own. A pair of Stugs edged onto the board an immediately made their presence felt by destroying another Sherman, whilst one of the Panthers showed the power of their big gun by destroying the American 2iC.


However, in response, the American tanks moved to surround the troubled Germans. Stuart's came one from the rear and began pouring fire into the weak flanks of the Panthers.


Massed Shermans pounded the Stugs, but to no avail.


Whilst the M10's slipped through a wormhole into real space and bagged a Panther's bottom.


INTERLUDE

Remember those two Panzer III's? Have you noticed how I've not mentioned them since turn 2? Well that's because of this...


...which would pretty much continue until the end of the game...

TURN 6

The Stigs made the one of the Shermans pay for their platoon's inaccuracy.


An unbogged Panzer III managed to get the jump on an M10.


And the Tiger arrived from reserve to no real effect.


The Shermans moved closer.


Stuart's, amusingly, showed how poor Panther side armour really is, forcing a morale test which saw the remaining reluctant Panther flee the table.


And the remains of the mixed Panzer platoon were finished off. Only one platoon to destroy for an American win.


TURN 7

The Stugs and Tiger poured fire at any Shermans they could but despite managing to destroy a platoon, didn't really have enough effect to protect them from what was to come.


Shermans, Stuarts, an M10, Howitzers and a single Bazooka unloaded everything they had at the German tanks, knocking th out one-by-one. As the smoke cleared, the Herman forces had been shredded, the breakthrough had been halted and only two lonely Panzer III's still stood, inexplicably guarding a copse of trees.


After Matt's deadly first turn, Pete had always been up against it in this game. Breakthrough is hard enough with pure tank list at the best of times, but losing one of your strongest platoons on turn one and having a second trying to be one with nature for the entire game made victory nigh on impossible unless Matt did something really stupid, which he didn't. Pete was always going to lose a tank trading game.

To add injury to insult, the Firestorm Panthers were destroyed and removed from the game, bringing the German advance to a crashing halt. The Panzergrenadiers look somewhat vulnerable on the wrong side of the Moselle, protected only by the fact that other territories are more valuable.

After a brief period of worry, normal service has resumed for the Americans and their major concern now seems to be the fact that failing another initiative roll will see them unable to use all of their air sorties this game turn. It's a hard life.