Question 1: Do the baggage markers generate Saga dice? We played that they didn't, but the rules aren't clear on this...any help gratefully recieved.
To make matters worse, Matt also had a unit of 12 Levy Archers, so he would be in no rush to engage me and the scenario would force me to advance into the danger zone. What's more, having played the Anglo-Danes before, I could pretty much guarantee that Matt would permanently have the Intimidation skill loaded and so I'd effectively be playing with one less Saga dice.

The opposing forces were as follows:
Vikings: Warlord, 4 Berserkers, 6 Hirdmen, 6 Hirdmen, 8 Bondi, 8 Bondi, 3 Baggage Markers
Anglo-Danes: Warlord, 4 Huscarls, 4 Huscarls, 8 Ceorls, 8 Ceorls, 8 Ceorls, 12 Geburs
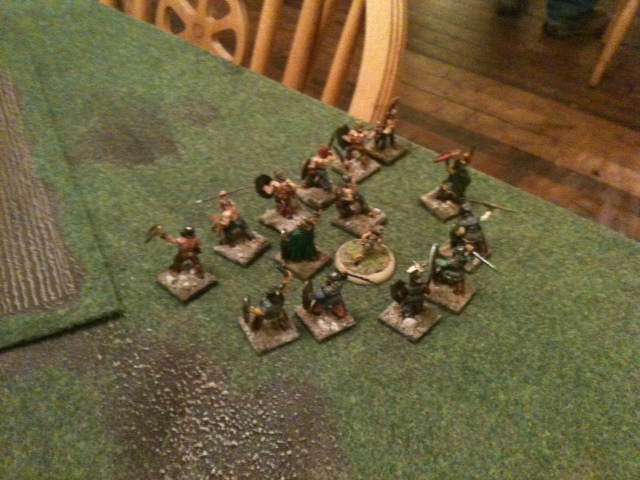
I chose to deploy in the more terrain heavy end of the table, as I was not keen on the idea of giving Matt lanes to block easily and I wanted to force him to spread out. I also massed towards one flank, hoping to be able to concentrate my forces on one end of the line. I deployed the Bondi in front of my elite troops to screen them from the archers.
Matt placed his Geburs in the centre on the hill for maximum coverage with his bows, and spread his Huscarls and Ceorls across the table to avoid leaving any easy points to hit. You'll notice that Matt colour codes his bases - red for Huscarls and the Warlord, blue for Ceorls, and green for Geburs.
I took first turn and immediately discovered a flaw in my plan. Not only did I have more units to get activated, but I also rolled a whole load of fours and fives, which meant that my Bondi (who were at the front) couldn't move, and so my whole warband was stuck! I had to generate fatigue on my Warlord to use 'With me!' to get things moving at all. Having revealed this flaw in my deployment, Matt took great pleasure in using Intimidation throughout the game to frustrate my advance, indeed it was about turn four before any of the units on my right actually managed to go anywhere.
 I pushed up in the centre under fire from the Geburs, losing several Bondi. I knew I had to clear the archers from the hill as otherwise they would exploit my slow progress and I would be severely whittled down before I reached the Anglo-Danish line. This looked like a job for the Berserkers, using the tried and tested method of move, move, Frigg to reach combat without fatigue I launched the frenzied nutters into the annoying peasants. Matt played defensively with his abilities (I think he might have used Shieldwall) and I was only ably to kill five Geburs for the loss of one Berserker. The Geburs were pushed back, but their shooting had only been reduced by two dice and the Berserkers were horribly exposed.
Matt took advantage and in the following turn rested the Geburs, then shot two more Berserkers. Finally he launched a unit at the final one and he was taken down and killed only a couple of Ceorls.
In an attempt to widen the breach I launched my Bondi at the wounded Ceorls. Using Heimdall to increase my attack dice the Ceorls were defeated but only three Bondi remained. I was feeding my units to Matt's line one at a time and he was polishing them off. I wasn't able to get any coordinated attacks moving due to his use of Intimidation and if this carried on, I'd soon not have enough units to force my way through. I was conscious that I was losing.
 Then something odd happened. Matt pulled all of his Huscarls and his Warlord over to his right. This took them away for the majority of my warband and presented me with an opportunity to press the opposite flank. To add to this, his Saga dice didn't give him the results he needed to load Intimidation and shoot with his Geburs, so he elected to shoot at my weakened Bondi unit. The shots all missed and I suddenly knew that this was my chance.
I used Loki to remove the remaining two Ceorls in the centre and then I sent my centre unit of Hirdmen crashing into one of the two remaining units on Matt's left. Judicious use of Ullr saw four Ceorls cut down and my entire force had shifted away from Matt's Huscarls and their dane-axes. Finally I moved the remnants of my centre unit of Bondi into a blocking position to slow any rush by Matt's elites.
Realising that he had only a unit and a half of Ceorls to stop all of my Hirdmen, Matt rushed his Warlord and Huscarls across to help, gaining fatigue on the way. The Anglo-Dane Warlord and a unit of Huscalrs made it into combat with one of my Hirdmen units and using Unforgiving and Stubbornness, killed four of them, losing only one Huscarl. However, the victorious but fatigued Huscarls then pushed on into the three Bondi. Although the Bondi were killed, fatigue and jammy dice saw all three Huscarls killed.
 The two Warlords not stared ominously at each other. Realising that the Anglo-Danish Warlord was fatigued and backed only by Levies, I decided that valour would prove the better part of discretion and obeyed my Warlord's Pride, shouted 'We Obey!' and charged in Side by Side with the baggage!
Question 2: Can the baggage be used in this aggressive way to attack? There's nothing in the rules that says not, but it feels a bit wrong. I wasn't going to, but Matt suggested it.
Question 3: As it's treated like a Hearthguard unit, can the baggage by used to absorb hits on the Warlord? We thought not, but again there's no obvious answer.
The gods smiled on me and the Anglo-Danish Warlord was cut down (apparently by a small child - the model we were using for baggage) and Matt now would be rolling only three Saga dice. However, I'd left my Warlord exposed to a counter attack by the remaining Huscarls, but they elected to charge the baggage (Matt was keeping the objective in mind) and killed it in short order. They then pushed on into my fatigued Warlord. I thought he was done for. However, a few more jammy dice rolls saw the Warlord cut the two of the Huscarls down whilst crying oaths to Odin on the hilltop.
 Focus now shifted to the flank where I still had two untouched units (Bondi and Hirdmen) ready to attack. I also had my blood-splattered Warlord and two tired Hirdmen, along with two baggage markers. Facing them, Matt had two Huscarls, seven Geburs and ten Ceorls. Although numerically pretty even, in terms of Saga dice it was five three to me, which was to prove critically important as Matt struggled to activate his units and support their attacks, whilst I was able to wear them down with repeated attacks on the weakest part of his line.
The small unit of Ceorls were killed first by a suicide charge from the weakened Hirdmen. The Ceorls were then slaughtered by the big unit of Hirdmen. The Bondi rushed up the hill to cut down the Geburs. The Huscarls made a heroic rush to clobber the last of my Hirdmen but were cut down in turn. At the end, a single Gebur was left, unable to activate and simply had to watch as I marched the baggage away.
 Overall it was a very long and hard fought battle. Initially I got my deployment and tactics completely wrong and was being soundly punished for it. However, when Matt stretched himself too thin was able to seize the initiative and get him to react to me. A couple of fortunate combats later and the game was firmly in my hands. What was amusing was that the combination of trying to move the baggage down the field and Matt's base rings meant that for much of the game I was thinking with my Bloodbowl head - this was definitely the most 'gamey' of the scenarios I've played so far, which isn't a bad thing.
It's becoming apparent that there are two elements which can be key in Saga. Firstly, allowing yourself to get too stretched out means that you can find yourself unable to react to enemy attacks without gaining damaging fatigue. Secondly, keeping a fresh reserve means that you've got usable troops later in the game.
In terms of using Viking against Anglo-Danes, here's what I've picked up:
- Don't use Berserkers against Levies, you're unlikely to kill them all and then the survivors will shoot the crap out of your armour 3 Berserkers - not a fair exchange.
- If you really want something to happen, leave extra dice in activation to counter the inevitable Intimidation.
- Huscarls, although scary with their dane-axes, are actually quite killable; even by Bondi.
- With no way of removing fatigue apart from resting and without the movement benefits of the Welsh and Normans, the Anglo-Danes can be slow to react. If you can stretch them out, the fatigue they gain regrouping can really help counter their defensive abilities.
That's it for now. Next week holds another Feast For Crows game. This time with four Viking warbands - so that should be over in about five minutes...
No comments:
Post a Comment