Saturday 25 November 2023

Rising Sunz

More Gorkamorka, and this time I've turned my attention to the Boyz.


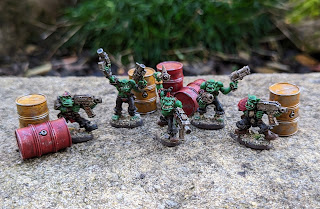
This bunch are the blister pack of metal Gorkamorka miniatures I added to my plastics from the starter set twenty-five years ago.

The base game came with two Trukks, two Wartrakks and twelve boys, which were easy to split between us. I supplemented my half of the set with the metal boyz, a spanner (sort of like a mekboy), a biker and a Wrecker Trukk.

Only the spanner has not come back into my possession, so you can expect to see the rest popping up over the next few weeks.


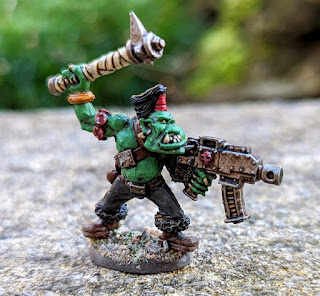
This rather impressive fellow will be serving as my Nob initially, at least until different armour, equipment or bionics require an updated model.

I've painted my Orks using the same method I used on the small army I painted earlier in the year. A base coat, which is drybrushed in Ushabti Bone before being washed with Agrax Earthshade and then highlighted (the drybrush helps to guide the highlighting).

I've gone with red accents to make them match my Wartrakk, and also potentially make them into a small Evil Sunz mob in games of 40k Second Edition.


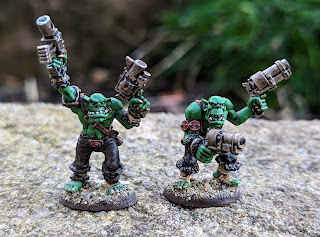
The definition on these old sculpts it really good and full of character, much more so than the plastics. However, the downside of metal sculpts of this period was the duplication of poses, as you can see with these two boys.

I've tried to use the way I've painted them to make them as different as possible whilst still maintaing a cohesive look.

In game these two will bring me slightly longer range shooting than is possible with the weapons available with the starting plastic gang. This will help when the Big Shootas on my vehicles inevitably run out of ammo the first time they fire.


Gorkamorka owes a lot of its design to Necromunda, and this includes the construction of gangs. In Necromunda young gang members are known as Juves, whereas in Gorkamorka these adolescent Orks are called Yoofs and are only able to carry pistols.

To create more variety, both of the models had one separate arm which allowed for a degree of posing. I can't remember if there were options for these separate arms.

You may notice that Gorkamorka models have teeny-tiny bases to allow more of them to fit inside the vehicles (which you to carry as many as you can cram in). I did initially put them on 20mm round bases for stability and to make them match my 40k army, but I struggled to get more than two in a Trukk without it looking silly, so I returned to the official bases.


Also, in attempt to make some quick headway into my massively expanding Lead Mountain, I did these eight barrels that cam with the original game.

They were done simply with a base colour, as wash of Agrax Earthshade and then stippling Lead Belcher with a torn piece of sponge to add the wear and tear. They will serve as terrain, cover and possibly objectives.

Despite this attempt to make inroads, I need to accept some more additions to my pile from the hoard.

I've added a whopping 45 monopose Empire state troops along with 25 Undead and Giant Bats, which will be featuring in an upcoming Warhammer Fantasy Battle project soon, and hopefully preventing me from buying Warhammer: The Old World. However, right now my numbers are getting ugly and there's more to come.

Oh well, at least I know what my New Year's Resolution will be.

Acquired: 198
Painted: 283
Lead Mountain: 536


Sunday 19 November 2023

WAAARGH-trakk

Here come the Orks again, perversely just after 'Orktober' is over.

Why?

Well, two reasons. Firstly, I was busy Zomtobering. Secondly, I didn't actually have any Orks to paint last month. 

However, things have changed...


As I'm sure you'll remember that I have acquired a metric ton of old miniatures from a friend, most of which I'll be selling on his behalf, but some (and it's a big 'some') which turned out to be my old miniatures I left with him when I moved out of London twenty years ago.

Amongst the heap were my original Gorkamorka gang from when the game was first released. Myself and a different friend split the box between us and then I splurged on a few additional purchases.

The only model in the gang with any paint on it was the Wartrakk, and although unfinished is a healthy reminder of how far my painting has come.


Therefore, with waves of nostalgia cascading over me, an Ork army already on the go in need of mobile fire support and a base coat (of sorts) already done, I set about finishing off a project that is over a quarter of a century old.


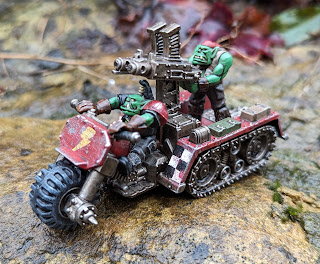
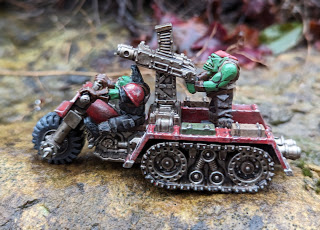
To keep thing simple and actually allow me to ignore stripping the model, I stuck with the original colour decisions, adding a layer of Mephiston Red over the chassis, Lead Belcher over the metalwork, and making some better decisions about the crew's clothing.

The entire model was drenched in Agrax Earthshade and then highlighted up where necessary; in much the same manner as I did the rest of my Ork horde earlier in the year.

I'm really quite happy with the result.


I do love the look of the Wartrakk.

Clearly based on the Kettenkrad light tractor, it harks back to the time when there was more than a little WW2 German elements in the 40k Ork range. The original metal model's driver was wearing a stahlhelm and the gunner had an officer's cap.

More politically aware times came along and these potentially problematic elements were phased out. I think the plastic Gorkamorka Wartrakk was the last of these elements to disappear into history (although I believe there still might be stats for it in the 'legends' category).


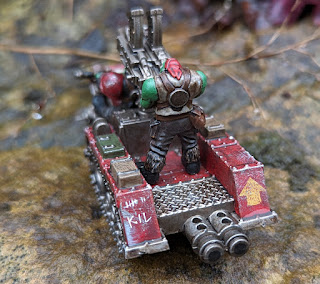
One thing I'm really enjoying about painting Orks is doing all the chipping and weathering. It's a really quick way to make it look like I've spent a lot more time on a model than I have.

The Wartrakk is an easy addition to my 2nd Edition army, adding a whole 50 points, mobility and some slightly heavier firepower. I'm not sure it's a game changer on its own, but it does mean I get to watch it blow up regularly.

Additionally, mentioning Gorkamorka has prompted Matt's nostalgia, and so we're both now busying ourselves in the Mek's workshop to get gangs ready.


Given the amount of miniatures I've now acquired, I felt the need to get an easy win in to, and so I've done this piece of scrap terrain which is also from the Gorkamorka game. 

Nothing fancy, just Leadbelcher drenched in Agrax, but it gives us something to crash into.

I need to start admitting how many miniatures I've acquired, but this will have to be in stages as I don't actually know the full extent yet.

So, just counting the Gorkamorka gang and vehicles, a Ratskin Gang for Necromunda and a load of barrels, that's another 38 miniatures to begin with...

...of which I've painted two.

Acquired: 128
Painted: 272
Lead Mountain: 457


Friday 17 November 2023

You Might Not Pass!

The journey through Moria has been a fraught one for the Fellowship in our Quest of the Ringbearer campaign, as they've had to fight their way through a seemingly endless horde of goblins and trolls (even if the actual scenario rules didn't require this).

Exhausted and with their resources depleted, they just need to cross the Bridge of Khazad Dum to get to the East Gate and be free of the grasping dark.

However, the goblins will not let them go without another fight and there is something else in hot pursuit.

This is the Bridge of Khazad-Dum scenario and to win the Fellowship, who are incredibly low on Might, Will and Fate, need to destroy the bridge (only Gandalf can do this) and escape Moria.

However, there are a whole host of Goblins in the way and at some point in the first six turns the Balrog will arrive to hunt them down.

Hopefully the Fellowship can get a good head start before it arrives...

Turn One

...oh bum!

The Fellowship makes haste directly for the bridge whilst the goblins close in from either side. Gandalf surrounds the group with a blinding light to protect them from arrow fire whilst Legolas dawdles in order to fire back at the encroaching horde, dropping one of them.

However, with a terrifying roar, a huge eruption of flames and a dice roll of a one, the Balrog bursts into the seem and immediately begins whipping it's fiery lash out at the lagging Legolas.

Turn Two

The Fellowship push on and take the opportunity to plough into the nearest goblins. With Gimli and Boromir slaying all who stand in their way.

Legolas doesn't stop to fire again as to do so would allows the Balrog, which lumbers forward, again flicking its whip towards the Fellowship with deadly intent.

Turn Three

The forces of Moria gain the initiative and move to lock the Fellowship in place, allowing the Balrog to get dangerously close.

In a desperate bid to break free, the Fellowship hack and slash at the goblins, with Boromir and Gimli doing most of the heavy lifting, as for some reason Aragon was struggling to work out which end of the sword to hit people with.

Turn Four

The Balrogs towering form finally catches up with Legolas and it's great flaming sword slashes out but somehow doesn't cut the elf down.

The rest of the Fellowship continue to battle through the goblins, trying to cut their way clear of their impending doom in the great shape of shadow and flame.

Realising that the tall man with the shield had strayed too far from the protection of the hateful light, the goblin archers turn their fire on him as their comrades back off.

Boromir falls as he's apparently quite vulnerable to concentrated archery.

Who knew?

Turn Five

In a desperately brave move to give his friends a chance to flee, Merry moves to block the Balrog's path.

The plucky little hobbit is swatted aside into the shadows, but the Fellowship manages to cut a way through more of the goblins thanks to the sacrifice of Merry.

Turn Six

The Balrog thunders forwards again but the Fellowship manage to keep the goblins between them and the fallen Maiar.

Gimli continued to be the only member of the party who can reliably kill goblins, but Aragorn still contributes by using his free point of might each turn to keep the Fellowship moving.

Turn Seven 

With the bridge in sight, hope is kindled and then snuffed out as the Balrog, still unable to get to grips with the Fellowship, moved to block the bridge.

Its whip coils out and wraps around Gandalf, dragging to the feet of the creature and the wise old wizard disappears amongst the burning darkness.

All hope of a heroic victory is lost.

Turns Eight to Ten

Although the heroes could no longer win the game, the battle would only end when one side met it's victory conditions. This meant either two more members of the Fellowship would need to fall or... 

...the Ringbearer...


Heroically trying to protect the Ringbearer, the Fellowship prepare to sell their lives dearly. Legolas falls beneath a squirming heap of goblins but somehow Gimli and the stalwart Samwise stand firm against the flaming terror not once...

...but twice!

However, with their numbers dwindling the Fellowship's ultimate defeat is imminent.

Inspired by the heroics of Gimli and Sam, Pippin charges forward to meet the beast.

This was pure heroism and not anything to do with protecting the more valuable members of the Fellowship for later in the campaign.

The rest of the Fellowship backing off was also definitely heroic.

Pippin falls and the battle is lost.

Aftermath

The battle was lost but the campaign was not done, there was the need to see what state the Fellowship would be in as the quest continued.

Gimli was hands down the bravest Companion, having killed eight Goblins and stood toe to toe with the Balrog for two rounds of combat. Sam perhaps ran him close with some crucial uses of his Might points and standing shoulder to shoulder at the end.

The Fool of a Took was Aragorn. Despite continuously contributing Might to the fight, he was unable to make his blade count and continually failed to come to his comrades' aid with abortive heroic combats. Although others contributed less, more was expected of Isildur's heir.


Despite losing the game, the Fellowship actually finished in better shape than when they started (apart from one notable exception). Nobody died in the recovery rolls and a decent amount of Wounds, Might and Fate were restored leaving the Fellowship considerably more likely to reach the next rest point of Lothlorien.

Alas, Gandalf the Grey was fated to fall here and will play no further role in the Quest of the Ringbearer campaign until he's rebooted as Gandalf the White in War in Rohan.

His one final duty was to help me come up with a spurious explanation for how the Fellowship get out of this mess.


The great black flaming shape loomed over the remaining members of the Fellowship. Aragorn prepared to sell his life dearly, Sam clutched his blade of Westernesse with two hands and Frodo felt to pull of the Ring at the back of his mind.

"Come on then!" yelled Gimli, the stout dwarf brandishing his notched axe, "I have a gift for ye from my cousin Balin!"

As the Balrog reared up to strike a sudden blinding gleam illuminated the entire chamber and the goblins ran screaming from the hateful light.

The battered and bowed figure of Gandalf leaned on his staff in the middle of the bridge, shining luminescence beaming from him momentarily stunning the Balrog and a brief opening was cleared to the bridge.

"Follow me, quickly," snapped Aragorn, a pain on his face indicating that somehow he thought all this to be his fault.

The group leapt for the gap, the ranger stooping as he ran to scoop up the crumpled form of Pippin, whilst Gimli ran to help the injured Legolas to his feet, Frodo and Sam scurrying behind.

From the depths of the chamber the limping form of Boromir emerged carrying a limp bundle that could only be Merry and joined the rush to bridge.

As they each passed Gandalf he gave them an exhausted an rueful smile, saving his broadest grin for Frodo.

"Now fly, you fools! And by that I don't mean ride on eagles, that's a silly idea spouted by people who don't understand the first thing about Gwahir, the defenses in Mordor, the distances involved or the effect the Ring would have on the eagles themselves. I'm clearly using a metaphor intended to encourage you all to leg it!"

With a chuckle Gandalf turned to face the approaching Balrog alone...

Sunday 12 November 2023

Elves of the Golden Wood

As our Quest of the Ringbearer campaign makes its way through Moria, the need for me to prepare for the arrival of the Fellowship at Lothlorien intensifies.

Enter the Galadhrim...

The next scenario after Moria sees Haldur and his Elves come to the aid of the Fellowship as they flee pursuing Goblins and Wargs. I believe it's based on a deleted scene from the movies.

As I owned no Wood Elves for MESBG I took to eBay to pick up some of the old metal models. Haldir and three of the Elves needed a Dettol (which works great on metal, less so on plastic) bath to strip the old pain job, whilst the other three Elves arrived clean.

Painting these models was relatively simple as I relied on contrast paints, washes and drybrushing which always seem to work much better on metal miniatures.

The robes are just two coats of Nuln Oil over a Grey Seer base with a drybrush if Administratum Grey.


Perhaps the trickiest bit of the painting was the gold filigree on the scabbard and quivers. It wasn't clear what the pattern was meant to be so I've not worried to much as from arm's length the suggestion that the filigree is there is enough.

When it came to basing I've added some white flowers to the bases as I have acquired some and it seemed appropriate for characters from Lothlorien. They probably should be yellow, but I didn't have that colour.


Haldir has a bit of an odd pose. Firstly, he doesn't have a bow and that's his whole thing in game (he's a low rent Legolas). Then he's holding his sword out at arm's length, almost as he's handing it to someone. It's not like it's even something he does in the film. Weird choices.

There is only scenario in which Haldir's Elves appear, meaning that they will only get a brief time in the spotlight. However, thanks to Peter Jackson inserting Elves into the Battle of Helm's Deep, I will end up with a playable Lothlorien force for regular games of MESBG 

I need to do some more Wargs before the Lothlorien scenario, and I will need them for events in Rohan too, so it might be a little while before Haldir and chums hit the table.

Acquired: 90*
Painted: 270
Lead Mountain: 421*

* I haven't finished sorting the huge chunk of miniatures that came into my possession last week and so these stats are still in flux and likely to increase...a lot!

Sunday 5 November 2023

Fallout of Favour

I haven't played Fallout: Wasteland Warfare for a while, not really since I almost finished painting the contents of the starter set. I suspect that the reason I didn't finish things off was due to me not playing.

Therefore, with only a couple of miniatures to paint, and seeing as I'm on a run of finishing things off, it seemed like an easy win to get this project wrapped up.

Why haven't I played it?

There's no real problem with the game, which I like, is interesting and different to other skirmish games, contains solo and co-op modes and has a pre-existing narrative campaigns.

It seems right up my street.

However, I think the major issue is I've never played the actual Fallout games and so unlike a lot of my side projects, there's no nostalgia hit to drive me. On top of this I've once again not managed to coax anybody else to buy into the game despite them having an interest and enjoying the test games.

Which leaves me with a motivation vacuum.

Until now.


The Zeta Alien is the last miniature from the rather excellent value starter set that I got for an offensively low price on Black Friday a couple of years ago.

He's technically a bonus miniature and as such doesn't feature in any of the intro games or match up well with the other contents of the box in terms of factions, which is the reason why he didn't get done.

When it came to painting I relied on contrast paints, Apothecary White and Fleshtearers Red.

The details on the model were shallow and so I used a white base to make the contrast more contrasty.

As there is currently only a single Zeta Alien miniature in the Fallout: Wasteland Warfare range my little green man looked a bit lonely.

Fortunately I've had this excellent miniature from Crooked Dice lying about for some time in need of a project to join.


Painting this was incredibly simple, more so than the official miniature. Partly this was because of the lack of extraneous bits on the model, but it was also because the metal sculpt is just much more defined.

They look similar enough to work together and begin to open up the possibility of fielding them as adversaries to the Lone Survivor in a scenario.

They also work in 7TV.

I should get a t-shirt with that phrase on.


Finally we have these two 'Phoenix Fizx' vending machines from TTCombat which are clearly more than an homage to the Nuka Cola machines that dot the post-apocalyptic landscape of Fallout.

For these IP-infringment-avoiding miniatures, I decided to use the colours of a certain rival brand of the inspiration for the red Nuka Cola machines.


The miniatures themselves are really nicely detailed and come with separate doors and a choice of removable backs. I've no idea why there's a number 3 taped to the machine, I assume it's a reference to the games.

I'm really pleased with how I've grimed these up to give a post-apocalyptic vibe. I started with bright colours, washed them in Agrax Earthshade (the flat areas have ended up streaky and dirty looking), then slapped some Typhus Corrosion technical paint around the base and in other recesses. Finally I used a sponge to add chipping across the model.

I've never really got on with the post-apocalypse look in painting terrain before, but I think the key is to start with bright colours and work it back to work and grubby so the stark contrast of how things once were comes through the model.

I'll be doing more of this.

So will I play more Fallout: Wasteland Warfare?

Possibly. 

The obstacle to expanding my collection is that the official miniatures from Modiphius are really quite expensive for a game I don't play regularly. Their proportions are also more true scale and so they don't fit massively well with proxies.

Nevertheless, even if I don't get more, there is plenty in the box to provide for any games I choose to play.

Acquired: 90*
Painted: 263
Lead Mountain: 428*

* So, a thing has happened. 

An old friend of mine (who got out of tabletop gaming some time ago) got in touch that he had some miniatures I might want to use. Being me, my ears pricked up at this kind offer and I went to visit to have a look.

OMFG!

There was loads! Two full WFB armies, numerous beginnings of armies, half a dozen metal Bloodbowl teams, Necromunda gangs and terrain, an almost complete (only the buildings missing) WFB 5th edition starter box, even some untouched paint sets.

Also in there was a bunch of stuff I'd left with him and another friend when I moved out of London - my Gorkamorka gang, Bloodbowl teams, Necromunda Ratskins, Space Hulk, numerous ancient bits and pieces.

He also had no idea of value, but not being a total arse, I informed him that this probably wasn't stuff he should just pass on and so I'm in the process of working out what I'm keeping (mainly the things that were originally mine) and selling the rest on his behalf, therefore my tallies are going to be in flux whilst I get things sorted.

However, I don't think I'll be conquering the Lead Mountain this year...

Thursday 2 November 2023

Incursion on Phargos Rex

Strike Master Ijax resentfully surveyed the slum quarter of Novia Quintus, the fifth city of Phargos Rex. He shouldn't be here. He should be coordinating the pursuit of the ragged collection of loyalist forces he'd trapped at Optera, but he'd been called back to Phargos Rex to deal with a new threat.

Cultists and insurgents were far from an unknown problem. Ever since the Ruinstorm, they'd been appearing all over the sector. Normally he'd let local forces put down the mob, but this one was different. An entire Militia regiment had disappeared and Ijax had decided to deploy the legion to send a message to the rebels and make a statement to the planetary governors that he could protect them, ensuring their loyalty.

He still had no clear intel on what he'd be facing and listened intently to the the vox traffic from the PDF units he had stationed ahead of his position. If the blood-curdling screams were any indication, they enemy, whatever they were, should be hitting his lines imminently.


For me, one of the real draws of the Horus Heresy is the opportunity to engage in a bit of narrative gaming, and so Pete and I have begun to set our games within the framework of a conflict called the Pale Stars Campaign.

Rather than explain the setting here, I'll just direct you to this handy article on the Lexicanium site, which should tell you everything you need to know.

Suffice to say that the campaign pits the Alpha Legion and the Blood Angels (our armies) against each other and includes appearances from other forces, including Daemons, Militia and Mechanicum (all of which we have or are working towards). What's more, there is very little detail about the actual conflict, which leaves things rather open for us.

 
Rather than having to work within a campaign system, were just going to use the Pale Stars as a backdrop of our campaign to provide a bit more of a narrative thrust.

In time this might involve choosing specific missions to reflect events or using the campaign system from the Siege of Cthonia book to determine the fate of a world, but for now we're keeping things simple.

In this game I was giving the new Daemons of the Ruinstorm PDF army list a run out against Pete's Alpha Legion, with the battle happening because a warp rift has opened on the defacto capital world of Phargos Rex, which also happens to be the seat of Alpha Legion power in the region.

The random scenario we rolled up was Onslaught, which seems appropriate as both sides are simply trying to slaughter the other.

Alpha Legion Strike Force


HQ
Praetor & 5 Cataphractii Terminators
Centurion

Elites
Lernaean Terminators Squad
Apothecarion Detachment
Contemptor Dreadnought Talon (X2)

Troops
4 Tactical Squads
Tactical Support Squad (Rotor Cannon)
Tactical Support Squad (Volkite Caliver)

Fast Attack
Sabre Tank Squadron (X2)
Headhunter Kill Team

Heavy Support
Leviathan Dreadnought
Heavy Support Squad (Heavy Bolter)
Heavy Support Squad (Missile Launcher)

Pete's army was infantry heavy and could put out a large amount of small arms fire, which should whittle down the smaller Daemons effectively, but might struggle with the bigger beasts.

Daemonic Incursion of Encroaching Ruin


HQ
Daemon Sovereign (Daemon Prince)
Daemon Heirarch (Blue Scribes)
Daemon Harbinger (Changeling)

Elites
6 Daemon Beasts (Flamers)
9 Daemon Beasts (Screamers)

Troops
10 Lesser Daemons (Pink Horrors)
14 Lesser Daemons (Blue Horrors)
5 Daemon Swarms (Brimstone Horrors)

Heavy Support
Daemon Behemoth (Flaming Chariot)

Lords of War
Arch-Daemon (Lord of Change)

For simplicity's sake, and to be fair to Pete, I tried my best to make each unit reflect the 40k unit as best I could. This would mean that Pete would be able to know roughly what each unit could do. It also gave me a chance to try out different rules and see what worked.

Deployment

The Search and Destroy deployment closed the gap between the forces, something my melee focused Daemons wanted to take advantage of, getting as close to the enemy as possible, whilst taking as much advantage of cover as I could due to Pete having first turn


Meanwhile the Alpha Legion stood off at mid-range, trying to balance their desire to keep the enemy at arm's length whilst also trying to work around Night Fighting being in effect.


Both armies warlord traits granted deployment shenanigans (which we alternated) which ultimately saw the Headhunters getting perilously close to their objective, whilst the Arch-Daemon and a unit of Lesser Daemons went back into reserve.

Alpha Legion Turn 1

Night Fighting being in effect meant that most of the traitor legionaries were not able to shoot, however the need to thin out the encroaching horde of Daemons saw the Dreadnoughts stomp forwards to get in range.


Meanwhile, the Sabre squadron raced around the flank and opened fire.


However, the combined fire of the few units in range was not able to make much of a dent, only managing to whittle down the smaller unit of Daemonic Beasts (the Flamers) to just two models.

Daemons Turn 1

The Deamons rushed out in all directions in order to make contact with the enemy and rip them limb from limb.

Not only do the Daemonic rules encourage this (they are stronger in the first two turns), but the Onslaught scenario rewards first turn kills with bonus victory points.

The Sovereign few directly towards the Sabres that had crept to far forwards, swinging its great blade in a sweeping arc that cut through both hulls in a single fluid movement.

The Behemoth raced in the direction of the Leviathan and was joined by a gargantuan figure striding out of a tear in realspace.

They crashed into the Dreadnought, tearing through its armour and leaving it struggling to stand on its ruined limbs.
The Headhunters suddenly found themselves swarmed by Daemons which darted towards them from all directions. A fogging of their minds prevented them from opening fire in response and they lived just long enough to regret getting so close.

Alpha Legion Turn 2

The first light of dawn broke to reveal a scene of devastation amongst the forward units, and the Alpha Legion set about pinning their fast moving enemy in place to buy time for their weight of fire to win out.


Bolters, Rotor Cannons, Missile Launchers and Lascannons lashed out, grazing the Sovereign and decimating the unit of  pink capering Daemons.

It was then time for the Terminators to move in.


The Lernaean Terminators moved to engage the Sovereign. Two of them fell to its fell blade but they held it in place, determined to prevent it wreaking havoc amongst their more lightly armed brethren.


Strike Master Ijax lead his honour guard forward to support the beleaguered Leviathan. Although they could not save the honoured ancient, they are least could set about avenging the fallen, and viscously hacked into the Behemoth.

Despite the successes of the Alpha Legion assault, the fall of the Leviathan left the Arch-Daemon free to attack where it pleased.

Daemons Turn 2

With a terrifying screech the Arch-Daemon took to the air and plunged deep into the Alpha Legion's lines, baring down on a Tactical Squad with murderous intent.


Another gibbering pack of Daemons tore it's way into reality and swarmed a Contemptor, seemingly intent on preventing it bringing it's guns to bear.


The venerable Leviathan was avenged when the Behemoth was brought down in a flurry of lightning claw blades, and to add to the traitors' relief, only one of the Lernaean Terminators fell to the Sovereign.


However the poor Tactical Squad was swept aside by the Arch-Daemon, which stride through the carnage looking for its next victims.


The Alpha Legion were thinning the enemy horde but we're losing men to the colossal threat of the Arch-Daemon, which they seemed unable to halt, whilst the fast moving creature that had torn apart the Headhunters now surged up in support.

Alpha Legion Turn 3

++For some unknown reason there was a hiatus in transmission of visual recordings at this point in the battle. This report has been compiled from the verbal accounts of this involved, many of whom reported hearing the phrase "Samus is here" repeated over their vox units.++

Small arms opened fire in the Arch-Daemon to very little effect as each wound seemed to heal up by itself.

The pink Daemons attacking the Contemptor were slaughtered by the assault if the Centurion and a squad of Tactical Marines.

A pack of blue Daemons was brought down by concentrated fire followed up by the bayonet charge of a Tactical Squad, although this cost almost half the unit.

Again the Lernaean Terminators managed to withstand the inaccurately swung blade of the Sovereign and prepared to sell their lives dearly when the gliding shapes of the Daemonic Beasts arrived.


Strike Master Ijax made directly for the robed figure that had been tearing holes in reality to disgorge more Daemons onto the battlefield.

Just like the Behemoth before it, the aberration was torn assumed by the Honour Guard's claws.

Daemons Turn 3

The remaining nightmare entities of the warp once again surged forwards, and although they seemed to be weaker than before, they were still able to inflict terrible damage upon their foes.


The Arch-Daemon ploughed into one of the Contemptor, hacking chunks out of it but not doing enough damage to bring it down.


The Marines that destroyed the blue Daemons were set upon, routed and run down by the swooping Hierarch.


The Sovereign finally cut down the brave Lernaean Terminators and surrounded by a pack of Beasts was now ready to rejoin the attack.

However, there was a sudden rippling of realspace, a blurring of existence flooded by a blinding flash of nothingness. When Strike Master Ijax's vision returned, the Daemonic creatures had all gone, leaving only carnage in their wake.

Final Result

We had to call the game early due to real world issues and at that point the Daemons were winning 2-0 thanks to the two units they had destroyed on the first turn.

We tried to count up what might happen, but with the destroyed units tally even it was hard to call what would happen, as I was running out of units to by killed or kill things with. We figured the honours would probably stay even on this point and it appeared that my Lord of War would now survive as there was very little left that could hurt it.

What would decide the battle was whether either of us could kill the other's warlord. Although concentrated small arms fire could bring down my sovereign, it was unlikely, and with his immaterial wings he could quite easily get the hell out of dodge if necessary. Again we reasoned that honours would stay even.

And so, unless there was a dramatic turn in Pete's favour we decided that it was a very closely fought Daemonic victory.

Aftermath

We both really enjoyed the game and the Daemons really bought a different feel to the game as they are so fast and savage. The larger Daemons felt like the powerhouses the should be whilst the smaller ones were reliant on swarming yo get anything done.

I'll be making some changes to my list based on this first battle (mainly taking out the useless ranged weapons) before giving them another run out.

In terms of the campaign, the Alpha Legion have had a pyrrhic victory, holding the line but losing valuable men and resources. The sudden appearance and disappearance of the threat means they won't be able to fully engage with the loyalists at large in the sector.

The breathing space this attack has bought has allowed the Blood Angels 121st Company to find safe haven at Fief 771/38/qz, informally known as Crow's World, a recruiting world for the Raven Guard which had been desperate to throw off the shackles of traitor rule. The Blood Angels have also been given access to hidden supply dumps and armouries which will better furnish them for the coming conflict.

I think this is how we'll run things, a battle or campaign will allow the victor to dictate an event that happens in the wider sector and so drive the narrative.

Additionally, the winner will select the next conflict (although I'll have to check this with Pete) and so I think we might try a Blood Angels assault on a traitor held planet using the so Onslaught campaign system from the Siege of Cthonia book - which will be a linked series of games.

I'd better get painting as I'm still not at 3000 points.