Thursday, 4 September 2014

"There's...too...many...of...them!"

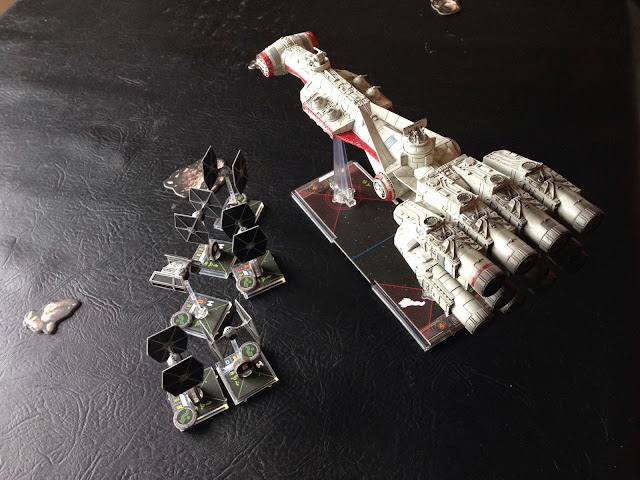
Following on from the first two games in the X-Wing campaign that Pete and I played a couple of months ago, we recently found time for scenario three.

Following my failure to prevent the escape of the damaged Rebel blockade runner, I assembled my forces for another strike on the traitorous enemies of the Emporer. 

My mission was to either destroy four satellites or damage part of the blockade runner. My force was as follows:
Marek Steele
4 Academy TIE Fighters
1 TIE Phantom
3 TIE Interceptors


Defending the blockade runner and the satellites were:
1 E-Wing
2 X-Wings
2 A-Wings


The squadrons flew directly towards each other firing wildly to little effect. I'd decide to focus on the satellites and flew straight past the rebel ships, keeping my eyes on the prize, foolishly allowing them to k-turn behind my ships.


On the right I managed to evade the X-Wings and swing round behind the blockade runner before eventually destroying the first satellite.


Meanwhile, on the left, concentrated fire from the A-Wings and E-Wing had quickly dismantled the Interceptors leaving only the Phantom to complete the mission.


The satellites were proving very resilient as the rebels could recharge the shield on the satellites each turn. Splitting fire between the satellites and the enemy ships meant that I was losing the battle.


Even the evasive TIE Phantom eventually succumbed to volume of fire leaving just Maarek and two TIEs to complete the mission.


When Maarek Steele was destroyed by a blast from the blockade runner, it was clear the mission was a failure and the remaining Impetials withdrew.

In short, I was battered!

I made a number of mistakes in this game which contributed to my defeat:
1) I should have aimed at destroying part of the blockade runner as it is a bigger and easier target than the satellites.
2) I should have attacked in two lines to respond to any rebels that got behind me, an error which cost me all three interceptors.
3) I should have engaged the rebel fighters earlier to thin their numbers.

After the opening couple of turns, Peye was able to dictate the game I I was desperately trying to evade his ships. He played well and I flew like...well...me!

Next time Rebel, next time...

Wednesday, 3 September 2014

The Seeds of Inspiration

I always find it difficult to get any painting done during the summer. Despite being a teacher and having an obscene amount of holiday, for some reason I'm never in the right frame of mind to get stuff done.

I never really help myself either due to being so flighty. I go through phases of deep obsession with topics during which I will paint related stuff, only to be distracted by a chance reference and then spring off into a different obsession.

However, this time, one of my random encounters has brought me round to painting Batman stuff again. I stumbled on an animated movie 'Assault on Arkham,' and it was pretty good. For once it was a batman film which had the villains as the central protagonists as the Suicide Squad, featuring Deadshot, Harley Quinn, Captain Boomerang (I kid you not) and others, are tasked with breaking in to Arkham Asylum. No sooner was the movie over than I was in a fully-fledged bat-fad.


Unfortunately, I had nothing to paint.

A quick visit to Firestorm Games website (can't recommend them enough) sorted an order for Poison Ivy and a couple of Two-Face's gang (I have a Clix to use for 'Face), and while I was waiting for them to be delivered, I started hacking and glueing some artificial flowers to make some mutated plants for Ivy.


I only had to wait two days for the order to arrive, and having made the plants I got on with painting Ivy. She's an excellent model but some of the detail is so fine that it's beyond my skill to really bring it out. However, I'm pleased with how she's turned out and the addition of the flower to the back of her base ties her in with the plants well.


As a final shot, here they are together.


Thursday, 31 July 2014

Starting Small

We've started yet another project...

A couple of weeks ago, Matt, Wes and I went to the Joy of Six wargames show in Sheffield. It was organised by Wargames Emporium and Bacchus Miniatures and was a show focused on 6mm gaming.

There were only a handful if traders, but there were lots of display games, seminars and people to chat to. I really liked this format of focused show and it persuaded us to take the plunge and have a go at a 6mm project.

A rather intense discussion of different periods led to us deciding on the American Civil War - mainly because we figured that the painting might be more straight-forward than some more ostentatiously outfitted conflicts.

I was particularly pleased with the decision as I've always had a keen interest in the Civil War. I did own the beginning of two 28mm armies, but sold them a few years ago due to storage issues. I personally think that as far as historical wargaming goes, the American Civil War provides limitless scope for re-fights, campaigns and one-off battles. What's more, most painted units can largely be used across the conflict without worrying too much about accuracy.

So, each of us bought a pack of infantry, Matt and I split a command pack and Wes bought a house. I opted for Eastern theatre Union (which gives me an excuse to be crap for a few years), Matt went for the Western theatre and Wes bought Rebs. The plan is to coerce Pete into joining the Confederacy. In the long run I'll probably paint up some confederates too.

I've painted my first brigade: four regiments and a command stand. Overall, I'm really happy with them.


The flags are from Warflags and resized to fit 6mm.

Wes has also begun his rebellion with some skirmishers. Given that he's only been painting miniatures for a couple if months, these are frankly excellent.


So that's the beginning of the project. We're not sure what we're working towards yet, but I'm going to copy Wes and do some skirmisher and sharpshooter bases for a bit of variation.

Tuesday, 24 June 2014

Russian Into Battle

We've taken to playing 500 point games of Bolt Action recently in order to all be able to get games in and to really get to grips with the rules.

Due to the small game size we've been playing without army special rules as we've found that they can be unbalancing in smaller games

This week my newly finished Russians went up against Matt's partisans that double as Volkssturm when fighting Allied forces.

My Soviets:
2nd Lt & 1 man (SMGs)
12 Regulars (rifles + LMG)
8 Veterans (rifles, 2 SMGs, tough fighters)
3 Tank Hunters (rifles, panzerfaust)
Anti-Tank Rifle team
Sniper Team
45mm Anti-Tank Gun

Matt's Partisans (this might be wrong)
Officer & 1 man (SMGs)
12 Regulars (rifles)
12 inexperienced  (mix of rifles and pistols)
6 Veterans (SMGs)
MMG team
Inexperienced Captured Puma


I began with my sniper in the big hotel on the left and the tank hunters lurking around the centre of the table. I brought on my anti tank teams in the centre to threaten the road and hopefully tame the Puma. Meanwhile my veterans went up the left whilst the regulars and officer went up the right.

One element of the game I was pleased with was my use of 'kill zones'. The threat of the sniper made Matt bring all of his infantry on the right, bunching them together, whilst the Puma used it's Recce move to avoid the first shot from the AT Gun and never came out from behind the house in the centre for the rest of the game. 

Meanwhile, Matt used his MMG to control the ground between and beyond the houses in the centre. This effectively divided my force later in the game.


In the picture above the advance of Matt's regulars caused my tank hunters to retreat to the ruin by the road, but were countered by a devastating charge from my veterans, which destroyed the partisans, but left the vets hemmed in by the MMG.

Meanwhile, despite a brief exchange of fire, the right side of the table was tensely poised. My regulars were stranded in the woods, but being on ambush meant the the first of the partisans to appear would get a face full of lead. The inexperienced unit were in the larger ruined house, with the veterans and officer behind it.

To break the stalemate I advanced the AT rifle into a vulnerable position in the ruin and the inexperienced unit duly took the bait and assaulted. Despite being successful, the casualties they took (along with some earlier in the game) meant that the inexperienced unit was somewhat weakened.

Then came the exchange. Matt got the run of the order dice but was let down by his rolling to wound as the partisan officer and veterans advanced to pour fire in to the wood, and the inexperienced unit assaulted from the ruin.

However, when the dust had settled, the Russians were still standing and began to pin the partisan veterans into oblivion. Matt fired his MMG into the maelstrom, which allowed my veterans to finally cross the road and add their weight to proceedings.


By this point the battle was won, but it's worth a brief note about my tank hunters. They'd lurked, hidden, retreated, advanced and finally found themselves within striking range of their target, the Puma. The only problem was that attacking it would expose them to both the Puma and the MMG if they missed.

But they had a panzerfaust and weren't afraid to use it. The tank hunters advanced into the open, fired and...missed. The Puma's MMG spat fire at point blank range, but also missed. The tank hunters prepared to assault but then noticed the MMG in the cornfield turning in their direction. I imagine that the expressions bore a startling similarity to those of Richard Attenborough and Gordon Jackson at the end of The Great Escape...

Overall, I was pleased with how the game went and generally things went according to plan. Matt was unlucky in the exchange of fire on the right. For the first time I made extensive use of the ambush order in a game and it served me well, controlling fields of fire and making my opponent consider their moves carefully.

Playing amongst the buildings was a cagey and brutal affair and my tough veterans were fearsome. I was pleased with the durability of my big unit of regulars, and I was particularly happy with the effect that my AT gun had even though it didn't fire. However, I'm not all that sure of the effectiveness of the tank hunters.

I'm now considering whether to change my set up for next week when I'll be up against Americans or Germans.

Saturday, 21 June 2014

The Quantity of Dubious Quality

I've been putting off this post for a few months. Since last year I've been working (on and off) on my Soviets for Bolt Action.


When Pete's mithering caused me to eventually relent and buy in to Bolt Action, I followed my natural instincts and looked for the cheapest option possible. I managed to pick up a box of plastic Russians, a T-34 and an Anti-Tank Gun for the princely sum of £30. Some glueing and swearing later I had three squads, an officer, a sniper and an Anti-Tank rifle team to go with the tank and gun.

I later discovered that my emphasis on rifles rather than SMGs, including LMGs, only having one AT Rifle and lacking artillery of any sort is apparently 'not optimal'. However, one of the pleasures of the Cheaphammer creed is that just like real commanders, you end up fighting with what you can get your hands on, not what the internet thinks is best.

I set out to be quick and dirty with the painting in order to get through the mass of resin, plastic and metal as quickly as possible and I painted a LMG squad, the officer, the sniper the AT rifle and the tank quite quickly. I was able to get games in using my BUF units from my VBCW force (which are made from WF plastic Russians) to make up the numbers.

Having a useable force combined with laziness and butterfly syndrome and I didn't pick up the paintbrush again until February when I got all systematic and ploughed through the rest of my infantry and the AT Gun. I'd also accidentally on purpose bought a pack of Artizan Designs Russians which added a second sniper and a few more SMGs to the force (the second sniper is allowed if you use the Battle of Kursk theatre selector).

The final step was to sort out the bases, and over this I procrastinated. However, a bout of illness kept me off work and largely immobile, and so I made use if the time and finally got them finished.

There are still a couple of things to finish off, but the army is pretty much battle ready.

First up, the command team. Obviously, there's a flag that still needs sorting, and is proving more problematic than you'd think. The chap in the trench coat currently serves as part of a sniper team, but I'm considering a little bit of a repaint and conversion to make him into a commissar.


LMG Squad 1. I've not sorted out a way of distinguishing squads on the tabletop yet, so currently I've put all the 'chargy' models in one unit...


...and all the 'waity' models in the other. LMG Squad 2.


Veteran Squad. These are really just the leftovers of what doesn't fit elsewhere. Smaller numbers, more SMGs and the Tough Fighters upgrade make them my assault unit.


Free Inexperienced Rifle Squad. I was looking for a way to add points to the army at my FLGS, but when I went in the only Soviet item they had was a blist pack of LMGs. However, my eye settled on the Copplestone Castings Back of Beyond range and the Bolshevik Partisans jumped out at me.

I'd wanted to do some partisans for a bit of variation, but I couldn't see myself ever wanting to field two inexperienced units in one force. However, I realised that these chaps (with a couple of Artizan partisans to make up the numbers) would work well as my free unit of cannon fodder, freeing up the other models I'd painted to add another 100 points to the army.


Sniper Teams. The two standing models are both due to serve double duty. The chap with the binoculars (the extra crewman from the AT gun) is currently being used as my Forward Artillery Observer (which is why the 'commissar' is in the sniper team). The standing sniper is also destined to spend some games as part of a Scout squad I've bought but not painted.


Anti-Tank Units. A 45mm Anti-Tank Gun, a PTRD Anti-Tank Rifle team, and Tank Hunter team complete with Panzerfaust and Molotov Cocktails.

The Tank Hunters were done on a whim to get more points together and because of their handy deployment rules. When I get my scouts done, these chaps might find themselves folded back into the Veteran squad.


Finally, my trusty T-34. I'm glad that this is the tank that came with my eBay purchase because it is the iconic Russian tank. It may not be the best in terms of the game, but it's the most appropriate support for a bog standard platoon somewhere in the Ukraine.

It's still in need of decals, a little bit of highlighting (maybe even weathering), and you might notice that I forgot to add the searchlight, but it's table-ready.


And so there we have it. I've just bought some Artizan SMGs and Scouts to begin the process of adding some choice to my army selection, but I have a workable 1000 point army, painted, based and (in my opinion) fairly historically appropriate for 1943.

This is the first 28mm army I've painted in quite some time. In terms if cost, it's come in at about £50, which isn't bad. I do think that there are cheaper armies out there, and I'm already tempted to do more than one of them.

Is it going to win tournaments? No, but I'm not planning on going to any. Can it match Pete's tank-happy Germans, Matt's mad-bomber Partisans or Wes' first-ever-army Americans? Well that remains to be seen...

Tuesday, 27 May 2014

"There'll be no escape for the Princess this time..."

Pete has recently bought the mahoosive Rebel Transport and even more mahoosiver Tantive IV for X-Wing, and as he wanted to play with them, I'd been moaning about not having played X-Wing for a while and we both had some free time, we decided to give the mini campaign that comes with the Tantive IV a go.

The first mission saw my squadron of TIE Fighters, led by 'Howlrunner', swarm the isolated blockade runner. Some very effective evasive flying from Black Squadron saw the Imperial ships weather the initial barrage from the bigger ship and then focus their fire to knock out the aft part of the Rebel ship.


Limping away from the battle, the Rebel ship put in for repairs, but was once again tracked down by Captain Jonus, Howlrunner and Black Squadron. This time however, the crippled ship was protected by three Rebel X-Wings from Red Squadron.


The Imperials lost some ships, including Howlrunner, to the Rebel fighters before Red Squadron turned to focus fire on Captain Jonus' TIE Bomber. Too few Imperial ships made it to their target and the blockade runner was able to escape.


The campaign continues...

I like the Tantive IV and, combined with the campaign scenarios, it adds a very different element to X-Wing. I'm not sure that I can justify the expense of buying one for myself, as I don't play lots of X-Wing and neither of the big ships are really suitable for standard pick up games. However, I am looking forward to completing the rest of the campaign.

Sunday, 25 May 2014

Resistance is NOT futile!

Just a short post to say that I've finally won a game of Attack Wing which didn't involve my opponents softening each other up first.

Admittedly, I wasn't using Dominion ships, I was fielding my new Borg Sphere for the first time against one of Pete's new Species 8472 Bioships. Also, Pete had over-stacked his ship with a couple of inappropriate upgrades to match my points value. But a win is a win and I'm taking it.


As for the Borg, I think they've been designed for bigger games as some of their abilities are really quite scary and I'm pretty sure that my fully loaded Borg Sphere could probably give a fleet including all six of my Dominion ships a run for their money. The lateral movement  of the Sphere is also very powerful.

Giddy with victory I then played a scenario game with my Dominion ships against Wes' Klingons in which I had to protect four orbital platforms against a fleet twice the size of mine. Four turns later, the game was over. Normal service had been resumed... :(