Sunday, 4 December 2022

The Manchurian Tank Debate

It has been a good long while since I last played Bolt Action, and so to take a break from 7TV and Lord of the Rings, Matt and I took a trip back to the far east to pit my Soviets against his Japanese.

However, this time we wouldn't be revisiting the Khalkyn Gol incident in 1939 with tiny tanks and inexperienced troops. No, we would venture into 1945 and the Soviet offensive in Manchuria and Mongolia in which they declared war on Japan as part of an allied pact to finish off the war in the east.

This offensive pitted the might of the Soviet war machine, which had ground its way across Europe with increasngly large armoured vehicles, against the remnants of the Japanese Empire, which hadn't.

Let's play Tank War!


We played fairly fast and loose with the Tank War rules and the Manchuria Theatre selectors as we were working within the confines of what our collections would allow. Matt doesn't have enough transports (or tanks) for a decent sized game and needed to include somethings not from the selector, and I mistook an SU-122 for an SU-85 in my list building and put something in my list that shouldn't be there.

Hopefully writing about this on a blog won't result in the Rules Police knocking on my door charging me with crimes against historical accuracy.


We randomly rolled a Point Defence scenario and decided that due to the lack of transport and the fact that this was a massive Soviet offensive that Matt would be the defender, trying to keep me off three objectives.

Matt's force looked something like this:

1 Type 1 Chi-He Medium Tank (Command)
1 Type 97 Chi-Ha Medium Tank
2 Type 97-Kai Shinhoto Chi-Ha Medium Tanks
3 IJA Infantry Squads (15 men + LMG)
4 Suicide Anti-Tank Teams
1 Flame Thrower Team
1 Medium Mortar Team
1 Sniper Team
1 Type 1 47mm AT Gun


Arrayed against this I had almost all of my Soviet vehicles on the table, some of them for the first time, and a dearth of infantry, which would present problems later.

1 IS-2 Heavy Tank (Command)
2 T-34/76 Medium Tanks
1 SU-122 Self-Propelled Gun
1 SU-76 Self-Propelled Gun (Free)
1 Katyusha Rocket Launcher
2 Tank Rider Squads (9 men)
1 Sniper Team
1 ZIS-3 Divisional Gun
1 Truck

The game should have begun with a preparatory bombardment, but didn't because I always roll a one. It happens so regularly that I'm not even disappointed anymore.

TURN 1


Deciding to split my forces (which always go well, historically speaking) I advanced an armoured spearhead onto the left flank, opening fire to little effect. Their goal was to push towards the Japanese line, kill everyone there and allow the Tank Riders on the T-34 to capture the objective.

On the right (see above) I put almost all of my artillery: the Katyusha, the ZIS-3 and the SU-76. Their goal was to soften up the defenders opposite ready for the second group of Tank Riders and their T-34 to come crashing in from the flank later in the game. Unfortunately, their firing drew a blank, but the sniper, who was deployed amongst them was able to drop one of the Japanese AT gun crew.

First blood to Mother Russia.

TURN 2

The defensive fire came in hot as a mortar shell smashed down onto the the ZIS-3 killing two of the crew and causing the rest to run. Although I still had plenty of firepower on this half, I was concerned that they would be very vulnerable to enemy tanks making any kind of counter attack, an although Japanese tanks aren't very heavily armoured, I wasn't sure that an inexperienced SU-76 would be able to stop them.


Japanese Chi-Ha tanks did begin to trundle on to the battlefield, but their shooting proved to be somewhat inaccurate, and the when the Soviet tanks countered, the light hull armour of the Chi-Has was no match for the IS-2 or T-34.


However, despite losing two tanks in quick succession, the Japanese had lost barely any infantry. If I was going to stand any chance of driving them off, I would need those big units to be softened up before the Tank Riders got there.


To make matters worse, Matt had rumbled that I wasn't going to push for the central objective and began to advance the infantry he had there towards my left. He also realised that simply firing at my T-34 would force the Tank Riders to dismount, severely slowing them down. 

TURN 3

With the Tank Riders dismounted and the Japanese infantry in the centre advancing, I decided to push the T-34 towards the middle to counter the threat. Whilst this was happening, the IS-2 span its turret and managed to thread the needle and detonate the Japanese command tank, severely reducing the threat of a push towards my artillery.


With their armoured wing in disarray, the Japanese infantry stepped up to meet the threat. In the centre they charged the T-34 and narrowly missed hurting the tanks due to the difficulty of hitting moving tanks. On my left the infantry advanced to the crest of a hill to pour fire into the dismounted Tank Riders, further focusing on slowing the advance, whilst suicide anti-tank teams snuck forwards.


TURN 4

At this point in the battle, things looked grim for me. One unit of Tank Riders was pinned down miles from its objective, whilst the other had failed to appear from reserve. The origami Japanese tanks had folded, the infantry was still rock solid and on the attack, support by guys with bombs on sticks.

However, it was at this point that the dice gods decided to simultaneously repay me for the failed bombardment roll, whilst cursing Matt for some heinous crime he had committed in a former lifetime. Given what was about to unfold, Matt had done something REALLY bad.


Firstly, his squad of 12 men armed with anti-tank grenades only managed a single hit (needing 4+) on the T-34 and were subsequently sprayed with point blank fire from the tank, cutting the unit in half.

The final Chi-Ha arrived, and having worked out my fairly obvious plan, set about driving full steam towards the artillery park. However, it didn't last long and my reserves arrived, with the T-34 taking out the Chi-Ha in short order.


To make matters worse, the Katyusha managed to score a hit on the Japanese infantry on my right and then the Tank Riders dismounted, their SMG fire ripped through the defenders, leaving just a single man defending the objective from the Soviet horde.

However, all was not lost. In a bid to make the unit flee, I had used an exception hit to remove the sergeant, leaving the LMG in place, which passed its morale test and began returning fire. The AT gun turned in place and took out the T-34, leaving the infantry unsupported, and the sniper repositioned to add fire and try to whittle down the Tank Riders.

On the right, my attack was further stalled by a well-placed mortar shell hitting the SU-122 and some of the infantry, further pinning them in place. My IS-2 focused its might on killing the suicide bombers wending their way towards it.

Finally, and ominously, the flamethrower Matt had been holding in reserve entered the field, took aim at the Tank Riders on my right and...missed. My chances of capturing the objective would all depend on who drew a dice out the box first.


TURN 5

Whatever Matt did in a former life must have been REALLY, REALLY bad. I got the first dice and my Tank Riders on the right executed the flamethrower team and advanced onto the objective. All they had to do was weather the storm from the scattered remnants of the Japanese left flank and I would be guaranteed at least a draw.


Matt saw that the fight against the T-34 in the centre wasn't crucial and would ultimately be unsuccessful thanks to the casualties he'd taken and so with drew to pour more fire onto the stranded Tank Riders on my left.

However, this left the T-34 free to move to intervene in the other flank and if I kept control of the objective I'd already captured, there was still an outside chance of me snatching a win. The final Japanese infantry unit, hunkered down behind a hill was a massive obstacle to this and the IS-2 was unable to make a significant impact on it.

Enter the Katyusha. It repositioned and unloaded at the tightly packed infantry. Two sixes were rolled, one for the unit itself, and one for the suicide bomber stood with them, allowing me to overlap templates. The impact was devastating and the remains of the unit fled, leaving the objective clear. 

He clearly did something REALLY, REALLY, REALLY bad.


TURN 6

The intervention of the T-34 ultimately secured the right hand objective for me. It killed off the crew of the AT gun, and combined with the Tank Riders going down for survivability, a sniper and a lone LMG were not going to clear them out.

To add injury to insult, the SU-76 finally managed to hit something and wiped out the sniper team with a point blank shot.
 

Now came the long shot, and sequencing was everything. I had to wait until the end of the turn to try to remount to Tank Riders as going to early would allow Matt to dismount them again simply by shooting at the SU-122. However, this exposed them to potential further pins from the few units Matt had left.

The IS-2 helped out by removing the threat of the mortar with its massed machine-gun fire and the remaining infantry unit misfired and failed to score any hits.

The orders test was passed and the Tank Riders remounted. The SU-122 also passed an orders test and advanced as far as it could go. All I needed was for there to be another turn...


...but there wasn't.

RESULT - DRAW

AFTERMATH

That was a really fun game although Matt suffered from incredibly bad luck in turns four and five in  both the sequence of orders dice being drawn and in the dice rolled on both sides.

My flank attack worked as planned, just, but I was far too slow advancing, meaning that I was too far away at the end of the game. I was also severely hindered by a lack of infantry units, meaning that I had no redundancy and Matt just had to stop one unit to prevent a loss. Were I to play this again, I'd put a squad of infantry in the truck, rather than use it to tow the ZIS-3.

Matt was intent on stopping me, and almost did, although it cost him all but about 10 men. We got a taste of the Manchurian campaign, such as it was, as the Japanese were unable to stem the tide of Soviet armour, although fought doggedly in defence.

I like this little played theatre of the World War II. The relatively open terrain makes for a very different game to slugging it out in across fields of France or through the densely packed cities of Eastern Europe. I've never played Bolt Action set in North Africa, but I'd imagine it has some of the same feeling to it.

Saturday, 3 December 2022

Deja Cthulhu

Is he going mad?

Has he stared too long into the abyss?

Dies he not know?

We've seen these before...


I can hear you.

No, I'm not caught in an eldritch cycle of madness incurred through brushing too close to knowledge of the elder gods. I am fully aware that it looks like I'm re-posting old images.

However, I'm not. I'm just duplicating things I've already done...which is much more sane. 


Why? Well, to put it simply, when I painted the first two of these McGuffins, they were part of a set I got as part of the pulp heroes and villains Kickstarter run by Crooked Dice.

What I forgot at the time was that I also received copies of the two most Call of Cthulhu-esque McGuffins as part of the Lurkers from the Deep feature pack Kickstarter.

I was looking for a quick win to add to my painting tally and there they were.


The icon of Cthulhu McGuffin was painted really quickly. Dark grey on the stone, light grey drybrush, black wash. Then a bright green on the icon hit with a coat of Hexwraith Flame technical paint.

It's actually probably more useful as general terrain now that I have two of them. They can make suitable gate posts or flank an eldritch altar.


Speaking of eldritch altars, the altar is probably less useful now it's duplicated unless I'm planning a scenario where two cult leaders give a joint reading, or the action is set in a beachfront library.

In terms of painting, it's more base coats, dry brushing and washing. Nothing fancy.


However, quick wins are quick wins, and I'm looking increasingly safe from a Christmas backlash on my numbers for the year.

Acquired: 116
Painted: 206

Monday, 28 November 2022

The Scarab Corps

So it seems as if I'm in a bit of a superhero phase. Long time readers of the blog will know that I go through peaks an troughs of interest in certain projects, and currently I'm back with superheroes.

Therefore, I've decided to turn my attention to the few remaining Pulp City miniatures I had lying around assembled and undercoated: the Scarab Corps.


The Scarab Corps are a team of chromatically themed heroes (somewhat akin to the Power Rangers) from Kitbash Games' Supers Unlimited Kickstarter from a couple of years ago. They are quite versatile in who they join with, as they are not only all Freelancers, but they enable a team to access leader cards without needing to have a Leader supreme present.

In terms of painting, I did these quickly with contrast paints. The single colour theme for each model and the chain/scale mail suits they are wearing responded well to the contrast treatment.


Blue Scarab was the first of the Scarabs to be designed, and was part of the initial Kickstarter campaign, with the others being added as a stretch goal add on later down the line. As such, she is the only level 2 supreme in the team, and her buxom nature belies the fact that she's actually a 'Tank' and by far the toughest of the bunch.

She was done with Talassar Blue over Grey Seer and served as an excellent test of this combination for some more Tzeentch Daemons I have in the pipeline.


Red Scarab is a Speeder who I suspect is designed for achieving objectives or tagging targets rather than getting into the rough and tumble of the main fight. He's possibly my least favourite of the bunch as the pose and facial expression combine to make him look like he's been caught doing something embarrassing.

Red Scarab was painted with Flesh Tearer's Red over Grey Seer.


Although I like the design of Indigo Scarab, I find him problematic. Not only is there that debate over how purple or blue the colour indigo is (seriously, why wasn't he Green Scarab?), there's also the fact that he's a Brawler with only 5 hit points. I'm not sure he's going to be brawling with anybody for very long.

Indigo Scarab wasn't painted with contrast paints, he was done with a couple of coats of Drakenhof Nightshade wash over Grey Seer.


White Scarab seems incredibly fragile. She only has four hit points. However, as a Support supreme with psychic abilities she's actually unlikely to be put too much in harm's way...although I do suspect that harm may go out of its way to find her.

She was done with Apothecary White over White Scar and so it actually more of a Pale Grey Scarab than this photo suggests.


Finally, there is the Black Scarab (a little bit too on the nose there...) who is the team's 'Powerhouse'. Although I'm no expert in Pulp City, the Powerhouses are normally the big, hulking models that are designed as line breakers and intended to smash stuff. Black Scarab seems a touch small and low level for this roll, so I'll have to see how he does.

Unsurprisingly, Black Scarab was done almost entirely with Black Templar over Grey Seer.


All in all I'm quite pleased with this crowd. Combined with the few heroes I've already painted (Doc Cosmos, Roughneck, Tox and Plasmatron) I can now field 13 levels of good guys to combat the rather terrifying array of villains that the Red Republik, Shadow Axis and A.R.C. can muster (yes, I know that the villainy of the A.R.C. is homo-sapien propaganda, but you get my drift).

I actually only have a single Pulp City miniature left to finish painting. I do have one coming from Kitbash's most recent Kickstarter last month, and I do have an inside track on something coming down the pipeline that I'm very excited about. Also, I took some steps towards arranging a game or two of Pulp City in the not too distant future.

Exciting times!

Acquired: 116
Painted: 209

Sunday, 27 November 2022

Freedom Force: Prehistoric Panic


One of my slowest growing and most niche projects is Freedom Force. The 2002 point-and-click superhero game remains one of the best and most engaging games I've ever played and brilliantly captured the feel of classic comic book adventure.

Having put together a small selection of the heroes and a smattering of villains, I was in a superhero mood and so decided to get them out of the table for a solo game based on one of the original scenarios: Prehistoric Panic.


I opted to use 7TV for the game for a few reasons. Firstly, I'd already spent some time a while back making profile cards for my Freedom Force models using the 7TV Casting Agency. Secondly, I would be able to use the free 7TV solo rules, written by yours truly, for the scenario and simply replace the zombies for dinosaurs.


Finally, I have a bee in my bonnet about the idea that 7TV can't be used for superhero gaming. My argument is that it's all about the setting. If your superheroes demonstrate the sort powers that could be shown on 70's and early 80's TV (think The Incredible Hulk or Linda Carter's Wonder Woman) then you're good to go. Hell, you can easily stretch to any fairly low budget effort from later than that (e.g. 2001's Mutant X), just doesn't expect to throw Doomsday against Thanos.

Freedom Force is right in this old school/low level/low budget ball park.


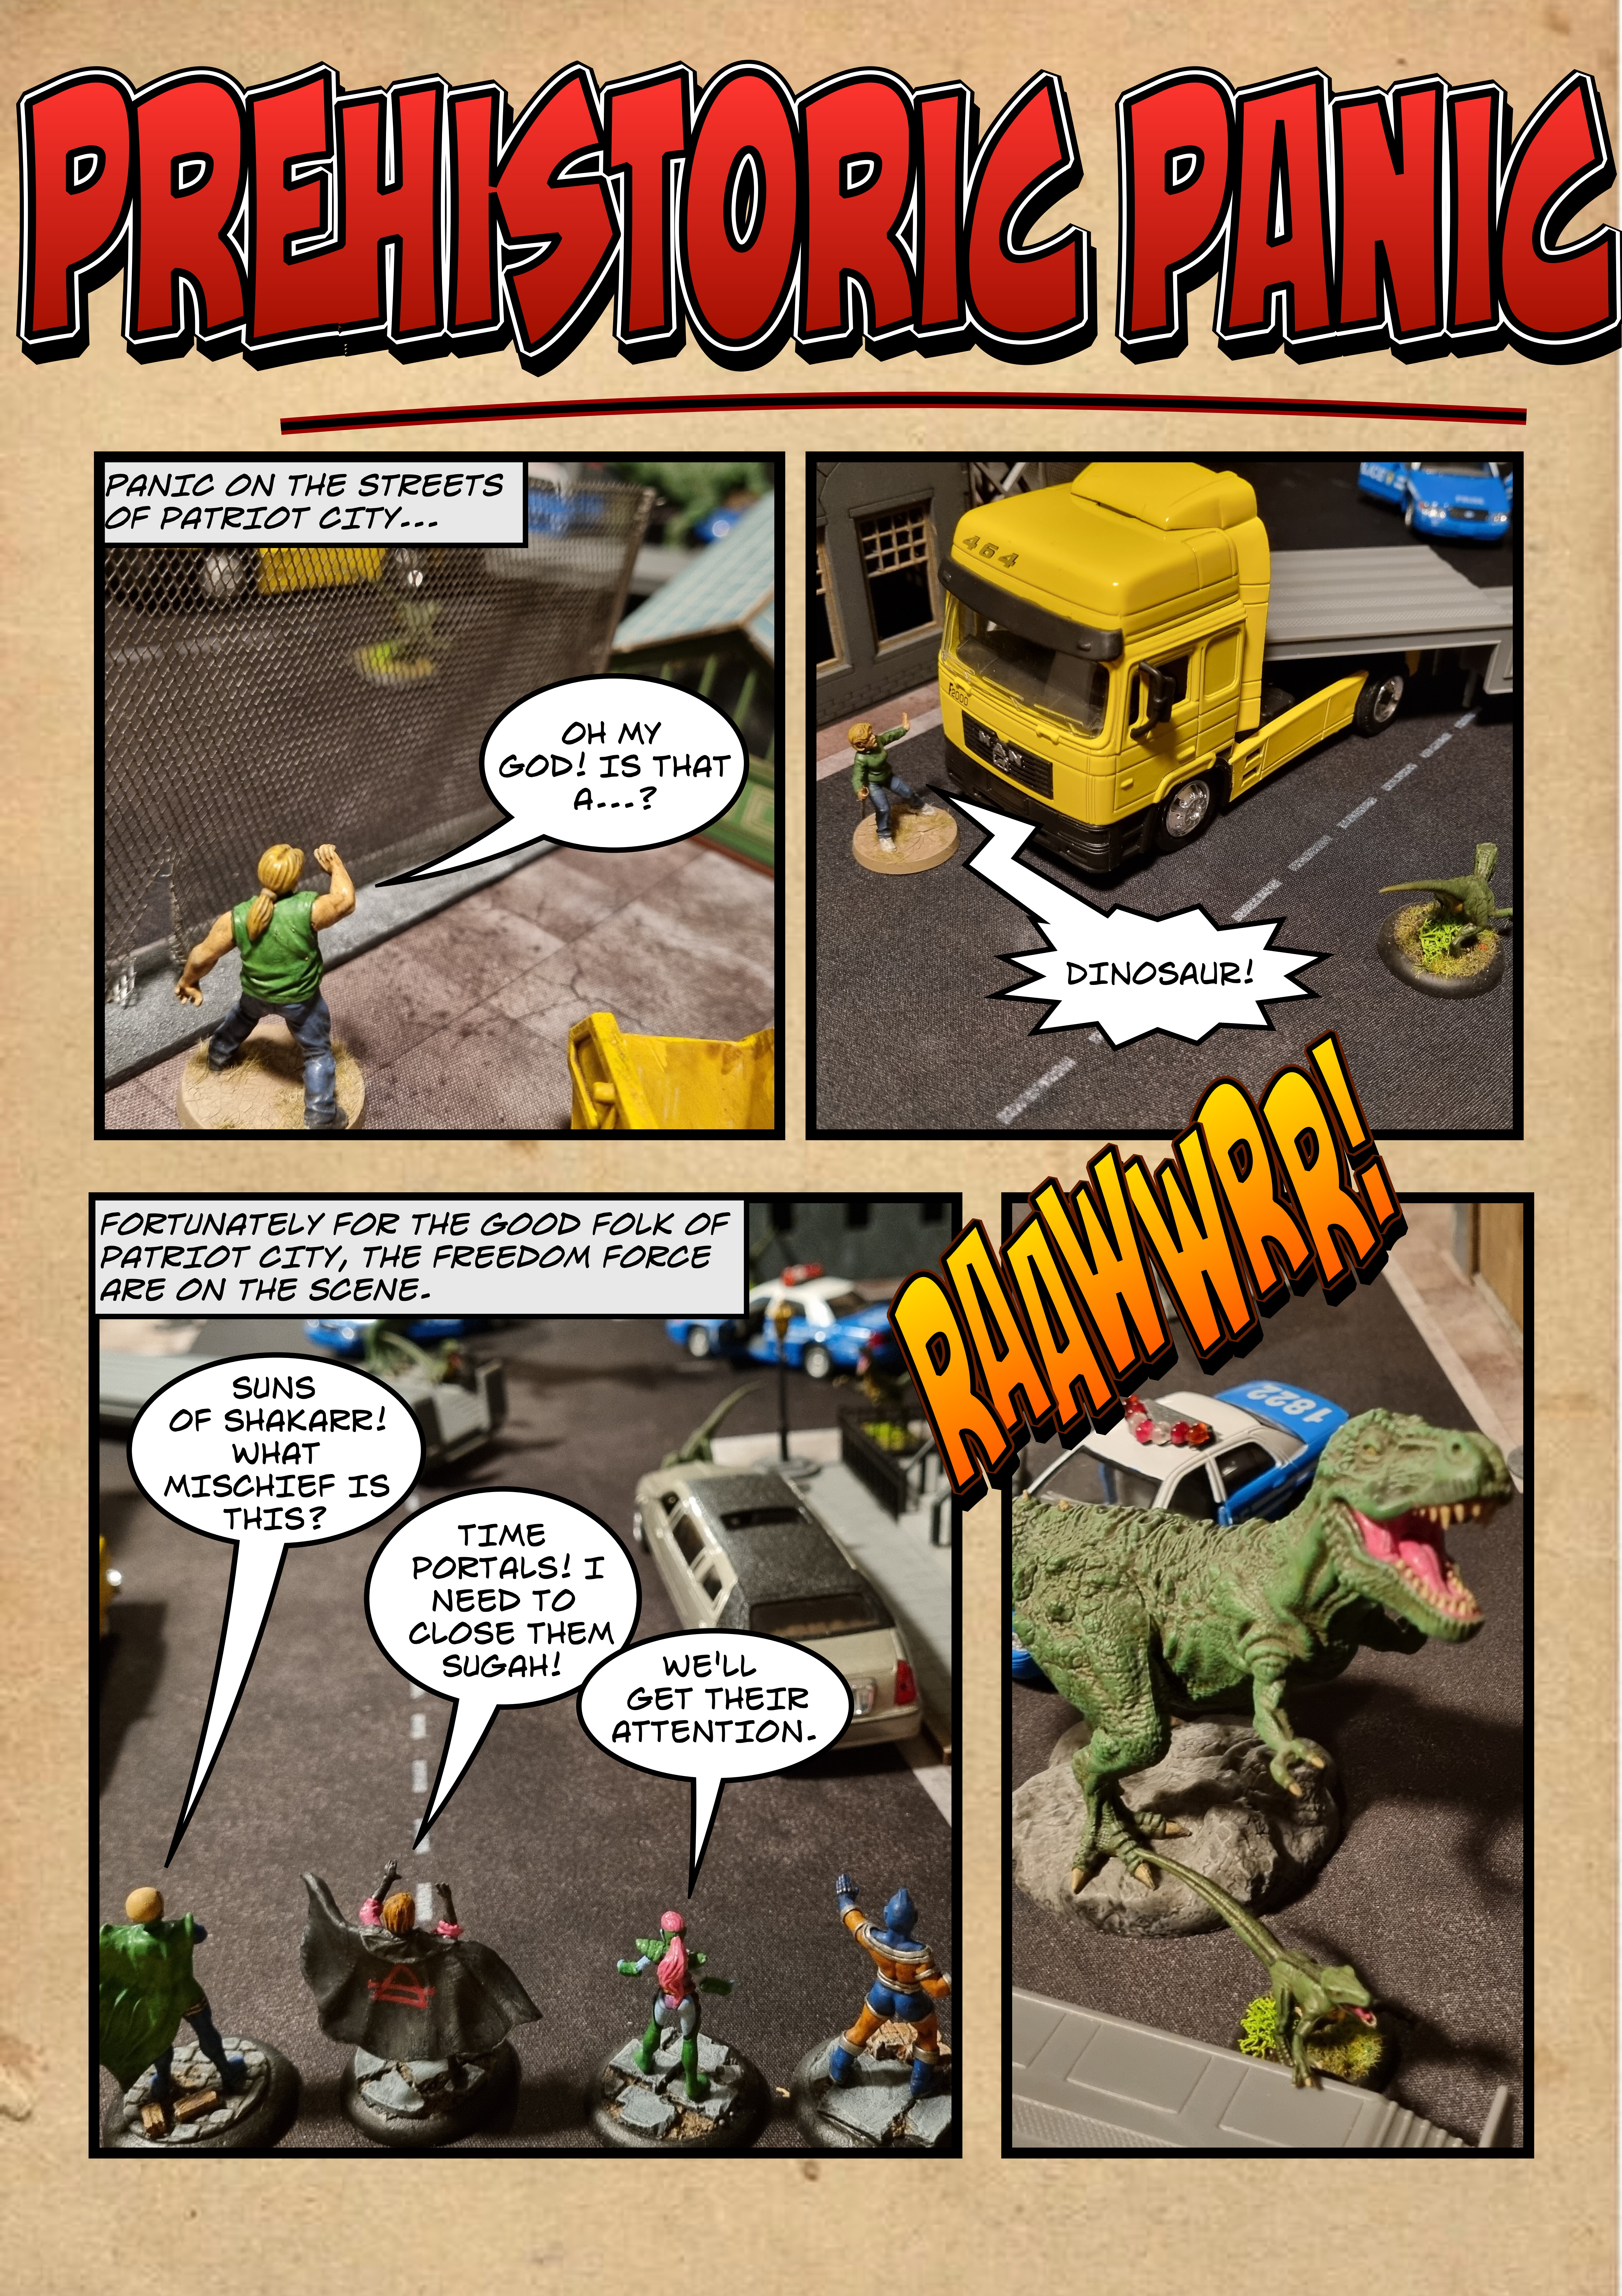
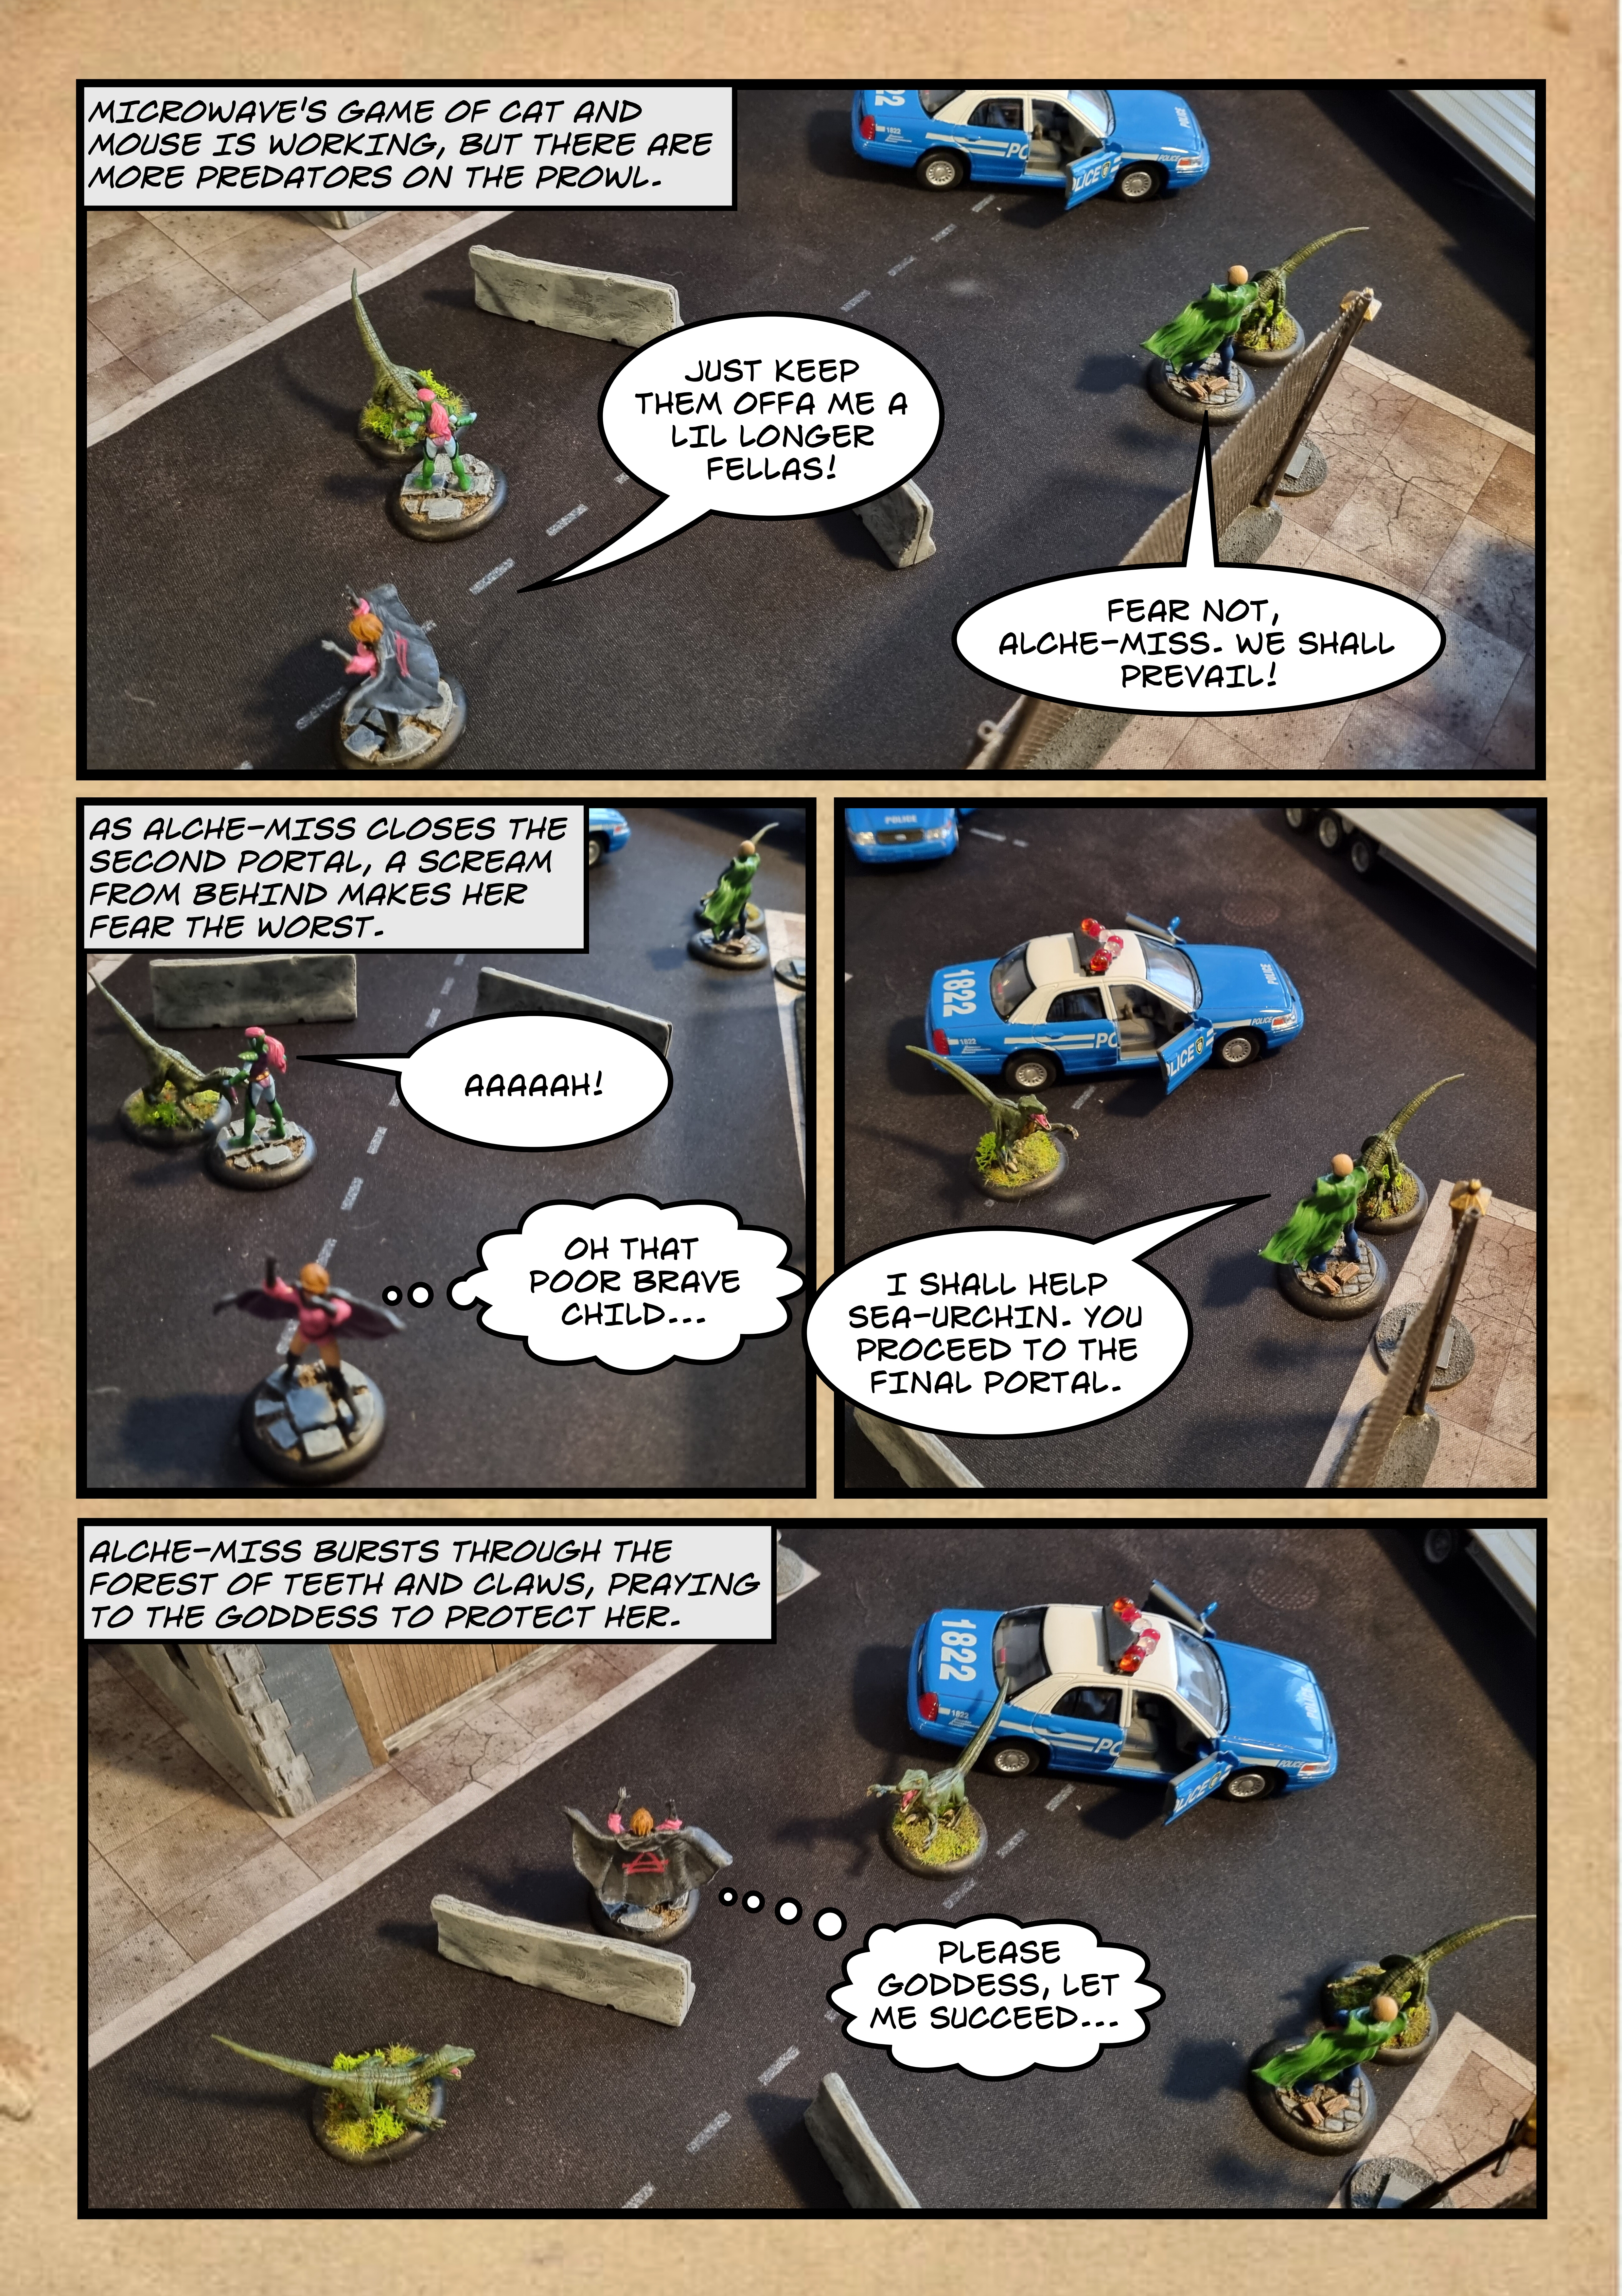
Prehistoric Panic sees the introduction of the mystical character Alche-Miss as she and her new allies , the Freedom Force, try to close a time-portal opened up by a mysterious villain. They team I sent out included Alche-Miss, Sea Urchin and Mentor (who are all available for this scenario in the game) and Microwave (who isn't), standing in for El Diablo, who I haven't managed to find a miniature for yet.

Below you can also see my card for Eve, who's not appearing in this episode.


I've pitched the Freedom Force (all custom profiles), alongside 6 Scared Bystanders from the free Scooby Doo programme guide against 6 Velociraptor and a T-Rex from 7TV Pulp. I'm using Pulp as the base set for the game as it totally suits the setting of Patriot City.

Finally, in a slight change to the scenario, I only have 3 spawn points for the dinosaurs, representing the portals, but to balance this, only Alche-Miss is able to close them by taking an action to perform a spirit test. The team deploy on one edge, the portals are in the centre of the other three edges, and the bystanders had to begin within 6" of one of the portals. The dinosaurs were randomly scattered about the board.

And now, time for action...


The scenario worked really well as it was touch and go whether the team were going to succeed. I was working on a 3x3 board and Alche-Miss had to really get moving to even stand a chance of getting there in the nine turns the solo rules give her. If I was to do this again, I might start the heroes further on the board, or bring the portals in from the edge, or just make them bigger.

In terms of the profiles, I think I've got them about right. Mentor and Sea Urchin sucked and Microwave nearly broke the game (his teleport and cloning abilities meant he could lead a bunch of the AI raptors away from the action with ease). To be fair to Mentor, his powers weren't really suited to these enemies (raptors have two health points and so are immune to his mind control), and Sea Urchin really needs Man-O-War to be worth taking (as in the game). The bystanders died horribly, but did prove useful as human shields...which is really heroic.

I'm going to have a look at my collection and see what appropriate opponents I can throw at them. I do have Pinstripe's gang, but I'm not sure the solo rules work that well with stars and units. I'm also looking at building up some henchmen to join with Nuclear Winter.


Saturday, 26 November 2022

Orsa The Fearless: Trollhold

Following the kidnapping of Skuld and the devastation of the Thing of the North, Orsa sets out to recruit the Svartalfar, the ancient allies of the northern tribes, to her cause of vengeance.

With her go her faithful pet, Karhu the black bear, and Wulf and his Cuhlan mercenary band.


***

Yes, we're returning to 7TV our Italian TV remake of the 1980s fictional cult classic fantasy movie, Orsa the Fearless, starring amazonian glamour model Alessandria di Napoli as the titular warrior maiden.

The second scenario of the feature pack, Trollhold, sees Orsa and her chums trying to rescue King Snorri of the Svartalfar from the clutches of the Marsh King.

***


Upon making contact with the Svartalfar, Orsa learns that they will only aid her if she rescues their king, Snorri, from the fearsome Jotun of the Trollhold Swamps.

If Snorri still lived he would doubtless be being kept in some dank pit or hole until his fate is decided.


King Snorri was lured into a trap by the grossly cunning Marsh King of the Jotun, who is constantly protected by his loyal brute of a bodyguard, Gudrun the Ettin.


What's more, the Trollhold Marshes are haunted by all sorts of aquatic monsters, including the legendary sharktopus, all teeth and tentacles.

Rescuing King Snorri will be no easy feat.


Nevertheless, Orsa, Wulf and Karhu plunge into the Trollhold Swamps, intent on searching every inch of it for the captured Snorri. Wulf sends his Cuhlan Mercenaries on a sweeping flanking manoeuvre to draw the attention of the Jotun whilst the search continues.

Before long, the travellers have drawn the attention of several hungry sharktopi, which begin slithering and squelching their way towards our heroes.


However, the beasts are no match for the cold steel of Orsa and Wulf, and Karhu proves to have a taste for seafood as the creatures are despatched quickly.


Meanwhile, the mercenaries find themselves assailed by the towering forms of the Jotun lumbering out of the mists. The sounds of battle ring out across the swamp, and Wulf believes his distraction is working.


He is disabused of this notion when the Marsh King, who is too cunning to fall for such a ruse, comes rushing towards them, his bellowing roar and thundering stride knocking both Wulf and Orsa from their feet, leaving them stunned and vulnerable.


Just as the Marsh King seems about to end Orsa's tale with his mighty club, Karhu erupts from the water, distracting him long enough for the prone Orsa to slide her blade in between his ribs, felling the monstrous monarch for good.


Despite having taken significant casualties, the mercenaries begin to get the upper hand on the thinning ranks of Jotun causing them to retreat. Is this another trap?


Small parties of mercenaries are seen prowling through the swamps, taking shots at the huge creatures as they disappear into the mist.


A weary Orsa tries to get to her feet , but is struck down again by the two-headed form of Gudrun, the Marsh King's bodyguard, trying to make up for his failure to protect his king.

It's at this point that Orsa mysteriously disappears from the narrative for some time. Several of her scenes were cut from the broadcast version of the series, more on this later, which gave the impression that Gudrun had slain her. This was not the case.


With Orsa apparently out of the fight, Wulf is also stricken by the fearsome Gudrun and struggles to retain his feet in the face of such an onslaught.


The mercenaries across the swamp are also seen being beset by dangers as the are picked off one by one by the denizens of the swamp.


Wulf distracts Gudrun and fights bravely to give Karhu time to search for Snorri (don't ask me how he was able to communicate with the bear, it probably works a bit like Lassie).


What happens next is the most confusing part of the final edit. Wulf appears to be overcome by Gudrun, who then unleashes the Ymir Mother and her brood from their lair. However, what was meant to happen was that Orsa would reappear, save Wulf's life, slay Gudrun and battle the Ymir. However, the scenes where the scantily clad Orsa was assailed by several pink, fleshy, tentacular appendages were considered far too suggestive, even for Italian TV, and were cut from the final version.

Continuity errors are apparently better that dealing with the censors.


Instead of this climactic fight scene, we cut away to Karhu searching for King Snorri.

Many fans still feel shot-changed to this day given that all the promotional material feature shots of Orsa battling the Ymir Mother.


The Ymir brood (who should have been driven away by Orsa) inexplicably now show up battling the last of the mercenaries.


The Ymir begin to fall to the blades of the mercenaries. Again, Orsa should have joined this fight, however, any and all shots featuring both Orsa and the Ymir were removed from the final cut, and so it appears that the mercenaries are doomed.

The editing decisions made in this episode made for a confusing mess of a TV show. Over the years numerous animators and artists have 're-imagined' what Orsa's battles with the Ymir might have looked like. Given the frankly indecent nature of some of these re-imaginings, the studio was probably right to remove the footage.

Anyway, the final scenes of the episode show Orsa, Wulf and Karhu rescuing Snorri with no clear explanation of how this happened. Snorri pledges the Svartalfar to helping Orsa in their final confrontation with Skadi.

***

In game terms, both Wulf and Orsa were defeated by the frankly indestructible Gudrun, and Snorri was never found. However, the battle was closer than it appeared as the loss of several sharktopi (polar bears in the scenario), the Marsh (Mountain) King and some Jotun meant that Matt was taking axed tests for most of the game until the Ymir were released. Annoyingly, he passed them all and then the heroes (i.e. me) went on to fail the first test they were required to take as the scattered soldiers and mercenaries had kept the cast above the axing point despite the failure of the stars.

The final score was 6-3, meaning that Orsa and Wulf will begin the final battle with the weakened status.

I'm not sure when we'll get to the final chapter as we only got through two of the scenarios on the day we played. Hopefully it will not be too long as I have several other feature packs to work my way through.