Wednesday, 3 August 2016

Bang! Bang! You're Dead!

Back to the BMG and I've painted Deadshot, and...erm...Deadshot!


First up: Deadshot.

This is the original version for the game based on the Arkham Origins console game. He comes equipped with wrist-cannons and night vision, which, when combined with his range of accuracy improving traits makes him one of the game's best killers, and one of the commonly used Free Agents. There's rarely a crew that this Deadshot doesn't add value to.

I have to say that this model is one of my favourite KM sculpts. A single piece cast and crisp detail with no flash made this a pleasure to put together and paint.

Next up: Deadshot.


This version of Deadshot is based on his appearance in the comics. Unlike the Origins version, he is primarily a sniper and his equipment and traits work towards this goal. His rifle can not only damage vehicles, but has the potential to do seven blood damage in a single shot and he can score extra VP's for taking down a named target. However, he does come with a couple of downsides: his rifle needs to be reloaded when it's fired, he can't move and shoot, and he has the Obsessive mental disorder, which means that he can only attack a single opponent until they are taken out of action. This makes him more static and less versatile than the Origins version, and so I will probably need a definite plan to get the most out of him.

Another nice model (if a little large), however the positioning of the rifle across his body did cause a bit of difficulty in painting. If I were to do this again I'd be tempted to paint the rifle before attaching it.

As well as giving me another couple of Free Agents to choose from, both Deadshots are eligible for selection in a Suicide Squad team, and with a new movie imminent, there's every chance there might be some more interesting sculpts and characters on the way.


Thursday, 28 July 2016

Ooh Rah!

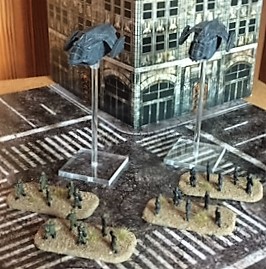
Enter the Marine Force Recon for my Dropzone Commander Resistance force.


These special ops units are only available to Allied Resistance armies, as they are the forward scouts of the UCM reconquest forces. They are better trained and better equipped than any of the UCM infantry (a point that I'm sure is irritating to Pete) and arrive on the battlefield in suped-up Raven-A light dropships.

These elite troops will provide my army with fast units who can retrieve objectives, search for intel or dish out some pain with equal measure, freeing up my Resistance Fighters to work together more and use their numbers to their advantage.


The Raven-A light dropships are currently the only light dropships available to my force. They were painted simply: spray grey, pick out silver and black details, wash black and drybrush to highlight. I now realise how Pete is able to get so much DZC stuff painted so quickly; UCM are a doddle to do.

These dropships have also given me a chance to test the colour scheme for another painting job I have coming up, but this is bigger, with wheels (minus the one it lost on the M6 motorway).


The infantry aren't official MFR models, but are plastic UCM Legionnaires I was given by Pete. They aren't the best models around (I can see why Pete didn't want to do more - besides the fact that Legionnaire suck), reminding me a little of the inhabitants of Trumpton, but free always enhances quality in my eyes.

In  fact, these are the closest I'm going to get to proxies in DZC as Hawk Wargames genuinely manufacture the cheapest 10mm sci-fi going, it's just not work proxying.


The second unit have been done in green for a number of reasons. Firstly, it allows me to distinguish between the units. Secondly, as I'll usually use only one of these pricey units, the others become available as additional UCM troops that can be gained through one of the Resistance command cards. Finally, painting them different colours prevents me from beginning to think that I have the beginnings of a UCM army and starting to build one.

Better safe than sorry.


In addition to all this I've painted a fire escape that can with the air-con unit I painted yesterday. It's TT Combat, and again very simple and functional. I've run out of textured spray paint and so the roof still needs doing, however, it's perfectly usable. The only issue I have now, is that I don't really have a building tall enough to justify a fire escape on the roof.

Wednesday, 27 July 2016

I'm The Best There Is At What I Do...

...and what I do isn't very expensive!

Getting back in the painting groove with the fifth member of my Avengers team for the Marvel Universe Miniatures Game: Wolverine!


Familiar to everyone and their sister, Wolverine, a.k.a. Logan, is the pint-sized, adamantium-clawed, regenerating mutant that features in all of the X-Men series of movies, even though his ageing process doesn't tally with any of the timings of the movie.

I've done him in has famous yellow spandex outfit, and I was really pleased with how I'd done, until I took these pictures and they revealed how rough the yellow is, and how much I've stuffed up in different places. Having said that, I won't be changing him, as he looks fine to the naked eye (or at least my naked eye).

This brings my Avengers up to 38 points, which annoyingly means that I can't fit them all in when I get round to repainting my Hulk, who adds a further 17 points. To be able to use all of the models I've painted, I'll have to get a few more models to offer alternate team builds.

I've also been painting some simple scenery.

An air-con unit from TT Combat. Easy to put together and easy to paint.


A skip from Fenris Games. I've left this one empty, but I'll be doing something a bit more interestin when I do the other one in order to cover up a little bit of miscasting.


Some jersey barriers from Reaper Bones. I bought these to try out the Bones range as I normally really like Reaper Miniatures, but found them somewhat lacking in detail and a bit warped. I won't be investing heavily in more Bones figures, but at £2.50 for two, I'm not complaining. They'll do.


 All of the above provide simple items for my heroes to chuck at people in the Marvel game. They'll also provide more cover in BMG and 7TV.

Monday, 18 July 2016

Black Powder - The Battle of Wilson's Creek


Models were painted, scenery was placed, it was time for battle to be joined. Matt and I would be marshalling the proud blue bellies of the Union in our attempt to win Missouri to our cause against those vile, traitorous, secessionists of the Confederacy, Pete and Wes.

The battle we would be fighting was the Battle of Wilson's Creek, 1861, the first major engagement in the western theatre of the American Civil War. Brigadier Nathaniel Lyon had chased Sterling Price's Missouri State Guard to the southwestern corner of the state, where the Missouri rebels had been joined by Benjamin McCulloch's troops from Arkansas. Despite being outnumbered, the aggressive Lyon saw his opportunity to drive all significant Confederate forces out of the state.

Confederate Forces (Benjamin McCulloch)
1st Brigade - 1 Large Infantry Regiment (Rifled Muskets), 2 Infantry Regiments (Rifled Muskets)
2nd Brigade - 3 Infantry Regiments (Rifled Muskets), Smoothbore Artillery Battery
3rd Brigade - 6 Infantry Regiments (Smoothbore Muskets), Smoothbore Artillery Battery
4th Brigade - 3 Infantry Regiments (Smoothbore Muskets), Smoothbore Artillery Battery
5th Brigade - 3 Infantry Regiments (Smoothbore Muskets)
Cavalry Brigade - 2 Cavalry Regiments

Union Forces (Nathaniel Lyon)
1st Brigade - 3 Infantry Regiments (Rifled Muskets), Smoothbore Artillery Battery
2nd Brigade - 3 Infantry Regiments (Rifled Muskets), Smoothbore Artillery Battery
3rd Brigade - 6 Infantry Regiments (Rifled Muskets)
4th Brigade - 4 Infantry Regiments (Rifled Muskets), Cavalry Troop, Smoothbore Artillery Battery

Our forces arrayed for battle.
Despite the scenario giving us the option to have one brigade attack the enemy in the rear, Matt and I opted to concentrate our outnumbered forces, and hope that Pete and Wes were worried enough about the rear attack to deploy troops to deal with the threat, preventing them (initially, at least) from overwhelming us. I was commanding the 1st and 2nd Brigades, which we placed on the flanks to be held back  in case of sweeping flanking movements (one of which we knew would come from the cavalry which were off table). Matt's 3rd and 4th Brigades were massed in the centre, although this was a bit too cramped to bring them all into play, and things got a bit confused over the first couple of turns.

Worryingly, for me at least, Wes and Pete decided to mass on the flanks too. Pete was controlling the 1st, 2nd and 4th Brigades, as well as the Cavalry, and had placed his two better brigades (more resilient and armed with rifled muskets) facing my 2nd Brigade, and we all knew that the Confederate Cavalry would be showing up on that flank at some point too. Meeanwhile, Wes had placed his massive 3rd Brigade on the opposite flank. Only the 4th Brigade was in the centre, whilst the under-strength 5th Brigade was held in reserve as defence against a rear attack.

To an extent, our plan had worked. At least one brigade had been held back, and the rest we scattered and had to negotiate the stream before they could get to us. What's more, we not only out-ranged the Confederates, but we also had better artillery to greet them as they attacked. Until either the cavalry showed up, or the 5th Brigade was able to get into line, the numbers were also pretty much even.

It was time to put our theory to the test.


A series of failed orders tests see the Union stay where they are.


The Confederates advance in force.

The artillery of the 1st and 4th Brigades fail to get across the stream.

The 3rd Brigade also leave their artillery behind.


Rifled muskets get into range.

Confederate regiments are disordered by sporadic fire.

The entire line is disrupted.

Sporadic return fire causes one Union regiment to retire 'whipped'.


Close range negates the Union advantage and tests the flank, which holds.


Another regiment from the centre is whipped, leaving it vulnerable.
The 3rd Brigade redeploys to protect the 4th.


2nd Brigade take the brunt of almost half the Confederate army.


Combined artillery and musket fire takes it's toll.

The largest Confederate brigade retires, and the flank is secure.


2nd Brigade begins to crumble.

Despite a valiant defence, the 2nd Brigade can't hold.


The stubborn 4th Brigade is finally pushed back.


The Confederate forces sweep around the flank.

The battered 4th Brigade cannot cope and collapses.

That was close!

We were within a whisker of breaking the Confederate 5th Brigade as both armies raced to envelop each other's flanks. If we'd held for another turn, we might have done enough to drive off the enemy. Black Powder is a funny game in that both sides experienced shooting failing to have the expected impact, whilst battered regiments just wouldn't break.

Personally, I think I did the right thing putting my toughest regiments on the flanks of my brigades and both were instrumental in my little brigades holding for as long as they did. Matt and I definitely benefited from Wes and Pete having trouble getting their artillery into action quickly, and we were able to disorder their lines consistently with our own artillery. We probably didn't make as good use of the hill as we could have, and we probably should have worked harder to bring more of our units into the battle earlier. We were also a bit too cautious, and I should have tried to charge to drive off the cavalry, as shooting had not effect on the dismounted skirmishers.

Wes and Pete were very aggressive, as befitted having the advantage of numbers, but putting the 3rd Brigade at point blank range from my artillery, enabled me to do damage quickly to counteract their numbers advantage. Massing on the flanks ultimately won them the game, and was a sound strategy.

Overall, I think we did well, and came closer to beating the Confederates than our historical counterparts. At some point, it might be nice to play a game where we have the same size force as Pete and Wes, although that shouldn't be a problem as we move through the Civil War - number were usually the Confederacy's problem.

Next week, Pete and Matt are going one on one with each other in the scenario from the main rulebook, Daybreak at Hangman's Creek. I'm going as 'umpire', mainly to iron out the rules mistakes we made in this game. We're also working towards the Bartlett's Farm scenario, which requires me to paint another four stands of infantry.

Saturday, 16 July 2016

A Small Update

Things have been quiet on the Cheaphammer front for several reasons. Firstly, I've been rather busy, at work and at weekends, and have therefore had reduced time available. Secondly, there's been a sudden glut of TV shows that I watch become available on Amazon, and so I've been getting up to speed with events in Starling City and Central City, which has also eaten into my time. Finally, since the Batman tournament, I've been focused on getting ready for our post Joy of Six battle tomorrow.


A couple of years ago we went to the 'Joy of Six' show (a wargames show centred on 6mm wargaming) in Sheffield, and decided to all build armies for the American Civil War. We all got a few stands painted, played a demo game using the Black Powder rules and promised to do more. Some time later, things all got a bit uncivil when Pete and Wes had a secret paintathon to build their armies quickly so they could overrun Matt and I. Needless to say, despite their overwhelming number, they still almost managed to lose the game.

Now, ACW Black Powder is back on the agenda, and we've arranged to fight a historical scenario from 'Glory Hallelujah!' the Black Powder ACW expansion after going to the Joy of Six again tomorrow and so I needed to get a few more stands painted.

Two Batteries of Artillery

Two Regiments of Infantry (along with Skirmishers)

A Brigade Commander
This now gives me enough to field two of the Union brigades in tomorrow's battle, with Matt supplying the other (slightly larger) two.

The battle we'll be fighting is the Battle of Wilson's Creek, which was fought in 1861 and was one of the first major engagements in the western theatre of the war. In the battle, a smaller Union force tried to counter the Confederate numerical superiority with a pincer movement, using one brigade to attack the Confederates in the rear.


It didn't work.

Tomorrow Matt and I will be trying to complete the task that cost Brigadier General Nathaniel Lyon his life.

Let's just look at the task in front of us:

  1. We are outnumbered; the Confederates have six brigades to our four
  2. We are out-classed; the Confederates have a higher proportion of better quality troops
  3. We can be out-manoeuvred; the Confederates have useable cavalry, we don't
Our only slight advantages are that we have slightly better artillery (although the same amount) and all of our infantry are armed with rifled muskets rather than smoothbores, giving us a tiny edge in range. This will benefit us if the Confederates decide to sit back and wait for us to attack them.

We do have the option of following history and sending Sigel's brigade behind the Confederate lines, which should give them something to think about. However, we'll also have to watch our flank, as the Confederates have the option of doing something similar with their cavalry brigade.

All in all, things look a bit grim.

On the up side, we're outnumbered with history against us. We're not under any pressure, as Lyon clearly attacked when he shouldn't have and so our tactical situation is tricky. Our opponents, Pete and Wes, have no excuses to hide behind if the tide turns against them.

Let battle commence.