Saturday, 16 December 2023

Changing Rooms

Filling my very kind Secret Santa gift, I've decided to spruce up the interiors of my wrecked buildings with a few items of suitable furniture.

Neither Laurence Llewellyn-Bowen nor MDF were involved.


All of the pieces I've done are from Mantic Terrain Crates (I think), and so they understandably pair well with the Mars Attacks ruins that are also from Mantic, adding a bit more depth, tragedy and interest to the tabletop.

I do like Terrain Crate scenery except for two things. It's a bit pricey, and longer-thinner sections tend to warp. However, as all these pieces are fairly sturdy and they were essentially free, I'm in a happy place.


The dresser and the drawers were done with Wyldwood contrast paint over Grey Seer, drybrushed with Ushabti Bone, washed with Agrax Earthshade (after the plates were done) and then drybrushed again to give them a dusty look.


Similarly, the sofa set was done in The Fang, with metal springs picked out in Leadbelcher and stuffing painted with Ushabti Bone. Once again, Agrax Earthshade and a final drybrushing finished them off.


The toilet and sink were simply done with White Scar, made dirty with Agrax Earthshade and drybrushed again to bring up the white.

I'm not sure about the basing choice as they kind of get lost, but it totally matches a lot of my other post-apocalyptic terrain, so it's fine.

The walls were done to match the Mars Attacks terrain as much as possible. The bricks done with Ratskin Flesh, the timber done with Wyldwood, the plaster with Ushabti Bone and the rubble with Baneblade Brown. As ever, Agrax Earthshade and a drybrush finished things off.

I'm really pleased with this little set and it will work for all sorts of post-apocalyptic games, including The Walking Dead and  Fallout (although Matt tells me there's not enough skeletons for that), and also wrecked buildings in more modern games. The wooden furniture and walls will fit with older period such as WW2 and even into the Victorian era.

And yes, I'm still very aware I haven't finished counting up my new/old acquisitions.

Acquired: 212
Painted: 299
Lead Mountain: 532

Wednesday, 13 December 2023

Lurkers from the Deep: Issue 4

The US Navy offered long range fire support to the forces engaged in the Battle of Marshport, but the storm raging all around them blinded them to the fact that the warship was drifting dangerous close to the jagged coastline.

Seeing the danger from the shore, Murdoch's Marauders, a small force of US Rangers, were dispatched up the headland to signal the ship of the peril it was in.

Finding an old sewage pump house overlooking the sea, Captain Murdoch opted to blow it up to signal the warship.

However, eldritch forces were converging on them, alerted by unknown means to Murdoch's plan, intent on preventing the Rangers from denying their master his prize.


Turning Tides is the fourth scenario in the Lurkers from the Deep feature pack for 7TV and sees a group of US Rangers trying to ferry fuel to increase the size of an explosion, whilst a range of Lovecraftian horrors try to stop them.

As usual, Matt woul be commanding the forces of law and order, Murdoch's Marauders:

Captain Murdoch - Star
Rugged Veteran - Co-Star
US Ranger Sergeant - Extra
6 US Rangers - Extras
US Ranger Sniper - Extra
Army Medic (Doctor) - Extra


Again I would summon the devotees of Kutulu to do my bidding:

Eldritch Horror - Star
6 Fishfolk Devils - Extras
4 Triggermen - Extras
2 Protoplasmic Horrors - Extras

The Protoplasmic Horrors will not feature in the action below as they are so slow moving I decided to simply use them as a plot point battery and not bother trying shift them.


The aim of the battle was simple. Matt had to move barrels from the shed to the pumping station and I had to stop him. At some point during the finale, the bomb would go off and we would both score points based on how many barrels of fuel had been added.

We made the decision that we would play to the end of the countdown deck rather than to the explosion as it meant that the explosion might actually effect proceedings by injuring models.


What initially seemed to be a bit of a turkey shoot for the Rangers took a nasty turn when they lost their Sergeant early in the fight. This meant Matt was unable to use the Rangers as a unit and was restricted in what he could achieve.

Also, the random weather table negatively affected Matt by preventing him shooting on the first turn slowing him down two turns in a row after he picked up the barrels. This meant that my forces were able to reach him without take too much damage.

I really liked the arrival of the Eldritch Horror late in the game (Matt was less keen) as it really captured some of the essence of Lovecraft's tales with situations going from bad to worse to "oh my god it's a giant formless horror with gribbly bits and it's eating my soul!" My favourite moment was dominating the Rugged Veteran and making him jump in the sea for the fun of it.

The final score was 4-1 to the forces of Kutulu, which means I'll go into the final battle with an extra Fishfolk Devil in my cast, aiding my attempt to complete an unholy ritual without interruption.


Saturday, 9 December 2023

Of Runtz & Riderz

My second Ork odyssey comes to a conclusion with the completion of the final vehicle for my Gorkamorka gang along with a very old Ork indeed


The Biker was originally bought to be the leader of my gang until I read the rules properly and found that you needed an extra Spanner for every three bikes, meaning that unless you go big on bikes, an Ork biker is a luxury to be added later in the campaign.


I really liked the model at the time and I still do. It's clear that the Gorkamorka range pointed the direction that design of 40k Orks would move in over the years. Away from the brightly coloured clowns of 2nd edition to the brutal killers bedecked in rivetted armour of the current incarnation.


I'm trying to bridge the gap between these two aesthetics, keeping the bright colours, but rendering as chipped and worn.

I've not chipped the painting on the Evil Sunz logo as I think that would be the bit the Ork owner would take care of to ensure the favour of Mork so that the red paint makes it go faster.


Painting wise there's nothing different here from the last couple of posts. Over reliance on Agrax Earthshade and chipping with a sponge covers a multitude of sins and I'm really happy as a result.


That completes my Gorkamorka gang for now. I've certainly got plenty to be going on with and more than enough for the early stages of a campaign when we get round to it.

I still have another Trukk and the chassis of a Rebel Grot Big Lugga, but without crew for either I'm in no rush to work on them.


In the meantime, here's a really old school 2nd Edition Runtherd. You can see that difference in design through the facial expressions and pirate aesthetic.

This model is by far the oldest 40k Ork I own and turned back up in the recent haul got from a friend. I think I originally bought him to be a coach model for an Orc Bloodbowl team.


If returned to black and yellow from the red I've been using as a spot colour on the Gorkamorka stuff as the main force of my army are Bad Moons.

This chap will be taking control of the Gretchin mob in my 2nd Edition army, freeing up a Nob to rejoin the boss's mob.

Probably the best thing about including a Runtherd in my army is that along with the Mek, he allows me to include the frankly hilarious Shokk Attack Gun in my force, meaning I will now have to track one down.


Despite getting the Biker and Runtherd painted, my numbers have taken another hit this week as I was kindly given a 3d printed artist, which I intend to use in Carnevale as one of the Gifted.


Additionally, my 7TV Secret Santa gift arrived (I didn't realise what it was until it was open) and turned out to be a massive collection of scenic bits and bobs, most of which are from Mantic Terrain Crates, I think.

Pleasingly, lots of this is very generic, working for a range of periods in which someone's house has been wrecked.

And yes, that is the Stay Puft Marshmallow Man.

This awesome generosity means that the Mountain is getting even higher.

Acquired: 212
Painted: 291
Lead Mountain: 540

Sunday, 3 December 2023

Pimp Our Ride

I'm picking up pace with getting through my Gorkamorka gang and have managed to finish off another vehicle and the rest of the infantry I have.

Enter the Wrecking Crew!


Trukks are important in Gorkamorka as they allow you to transport your Boyz into battle more effectively than bikes and buggies and trakks.

The rules in Gorkamorka allow you to transport as many models as you can sensibly load on the vehicle (hence the small bases) which makes for a far more satisfactory visual aesthetic for transporting troops than in most games and the Orks are packed in tightly.


At the moment, this Trukk can carry about five Boyz, alongside the driver and gunner, thanks to the extra gubbinz on board, although I suspect I could squeeze another one in if necessary.

I say this because starting mobz in Gorkamorka can usually only afford a single Trukk if they don't want to be perilously short on numbers, which means I will need to bear in mind that my initial gang probably has a capped size of 7 or 8 when we eventually start playing.


The Trukk itself is 'Wrecker Trukk' which I bought separately from the main game to add to the Trukk and Trakk I got from my half of the starter box.

It is essentially a basic plastic Trukk sprue with additional metal bits, including the wrecking ball, a ram, several glyph plates, an ammo box, a skull on a spike, a racked blunderbuss and an alternate torso for the driver. All of which add a bit of character and individuality to the Trukk.

If I'd thought about it more at the time, I'd have spread the metal bits out across my other vehicles to pimp out more of them. The ammo box might have looked better on the Wartrakk for example.


Despite the metal driver torso, the driver and gunner were a bit of a pig to paint. Their awkward poses,, poor detail on the gunner's body and head and the frankly shockingly bad assembly I'd done on fitting their arms to their bodies mean that I don't particularly want to look too closely at them.

Fortunately, once place within the vehicle a lot of their shortcomings disappear. I've left them loose so I can remove them as necessary in games.

I didn't do this with the crew of the Wartrakk because they are less likely to dismount, the rider was harder to get out cleanly and I didn't think about it until I'd stuck them in.


The process of painting is largely the same as I used for the Wartrakk. Black undercoat, sprayed silver, red bits and other gubbinz picked out, then a liberal wash in Agrax Earthshade before sponge chipping the red and going over other elements to highlight them.

I'm really happy with this approach and I'll be maintaining it for any future Ork vehicles I paint. The won't always be red, but most will be as red ones go faster.

The five Boyz I've painted are the plastic models from the starter set. They're not the best models in the world, but they are serviceable. There is enough variation in the arms and heads to make them look different enough from each other, and I've added to this by cobbling together the arm throwing a stikkbomb from a spare biker arm, and one of the blades is actually from a zombie sprue.

I now definitely have enough models to start playing and only actually have a biker left to paint for Gorkamorka. Playing games is now waiting on Matt digging out his stuff and painting it.

No pressure Matt.

Really, it's fine.

Take your time...
In other news I've sent off my annual 7TV Secret Santa parcel and will eagerly await what comes in return. I've not done any more counting of the models I'm keeping from the hoard as I've been a bit busy, however, I will get this done before the end of the year.

Acquired: 195
Painted: 289
Lead Mountain: 525

Saturday, 25 November 2023

Rising Sunz

More Gorkamorka, and this time I've turned my attention to the Boyz.


This bunch are the blister pack of metal Gorkamorka miniatures I added to my plastics from the starter set twenty-five years ago.

The base game came with two Trukks, two Wartrakks and twelve boys, which were easy to split between us. I supplemented my half of the set with the metal boyz, a spanner (sort of like a mekboy), a biker and a Wrecker Trukk.

Only the spanner has not come back into my possession, so you can expect to see the rest popping up over the next few weeks.


This rather impressive fellow will be serving as my Nob initially, at least until different armour, equipment or bionics require an updated model.

I've painted my Orks using the same method I used on the small army I painted earlier in the year. A base coat, which is drybrushed in Ushabti Bone before being washed with Agrax Earthshade and then highlighted (the drybrush helps to guide the highlighting).

I've gone with red accents to make them match my Wartrakk, and also potentially make them into a small Evil Sunz mob in games of 40k Second Edition.


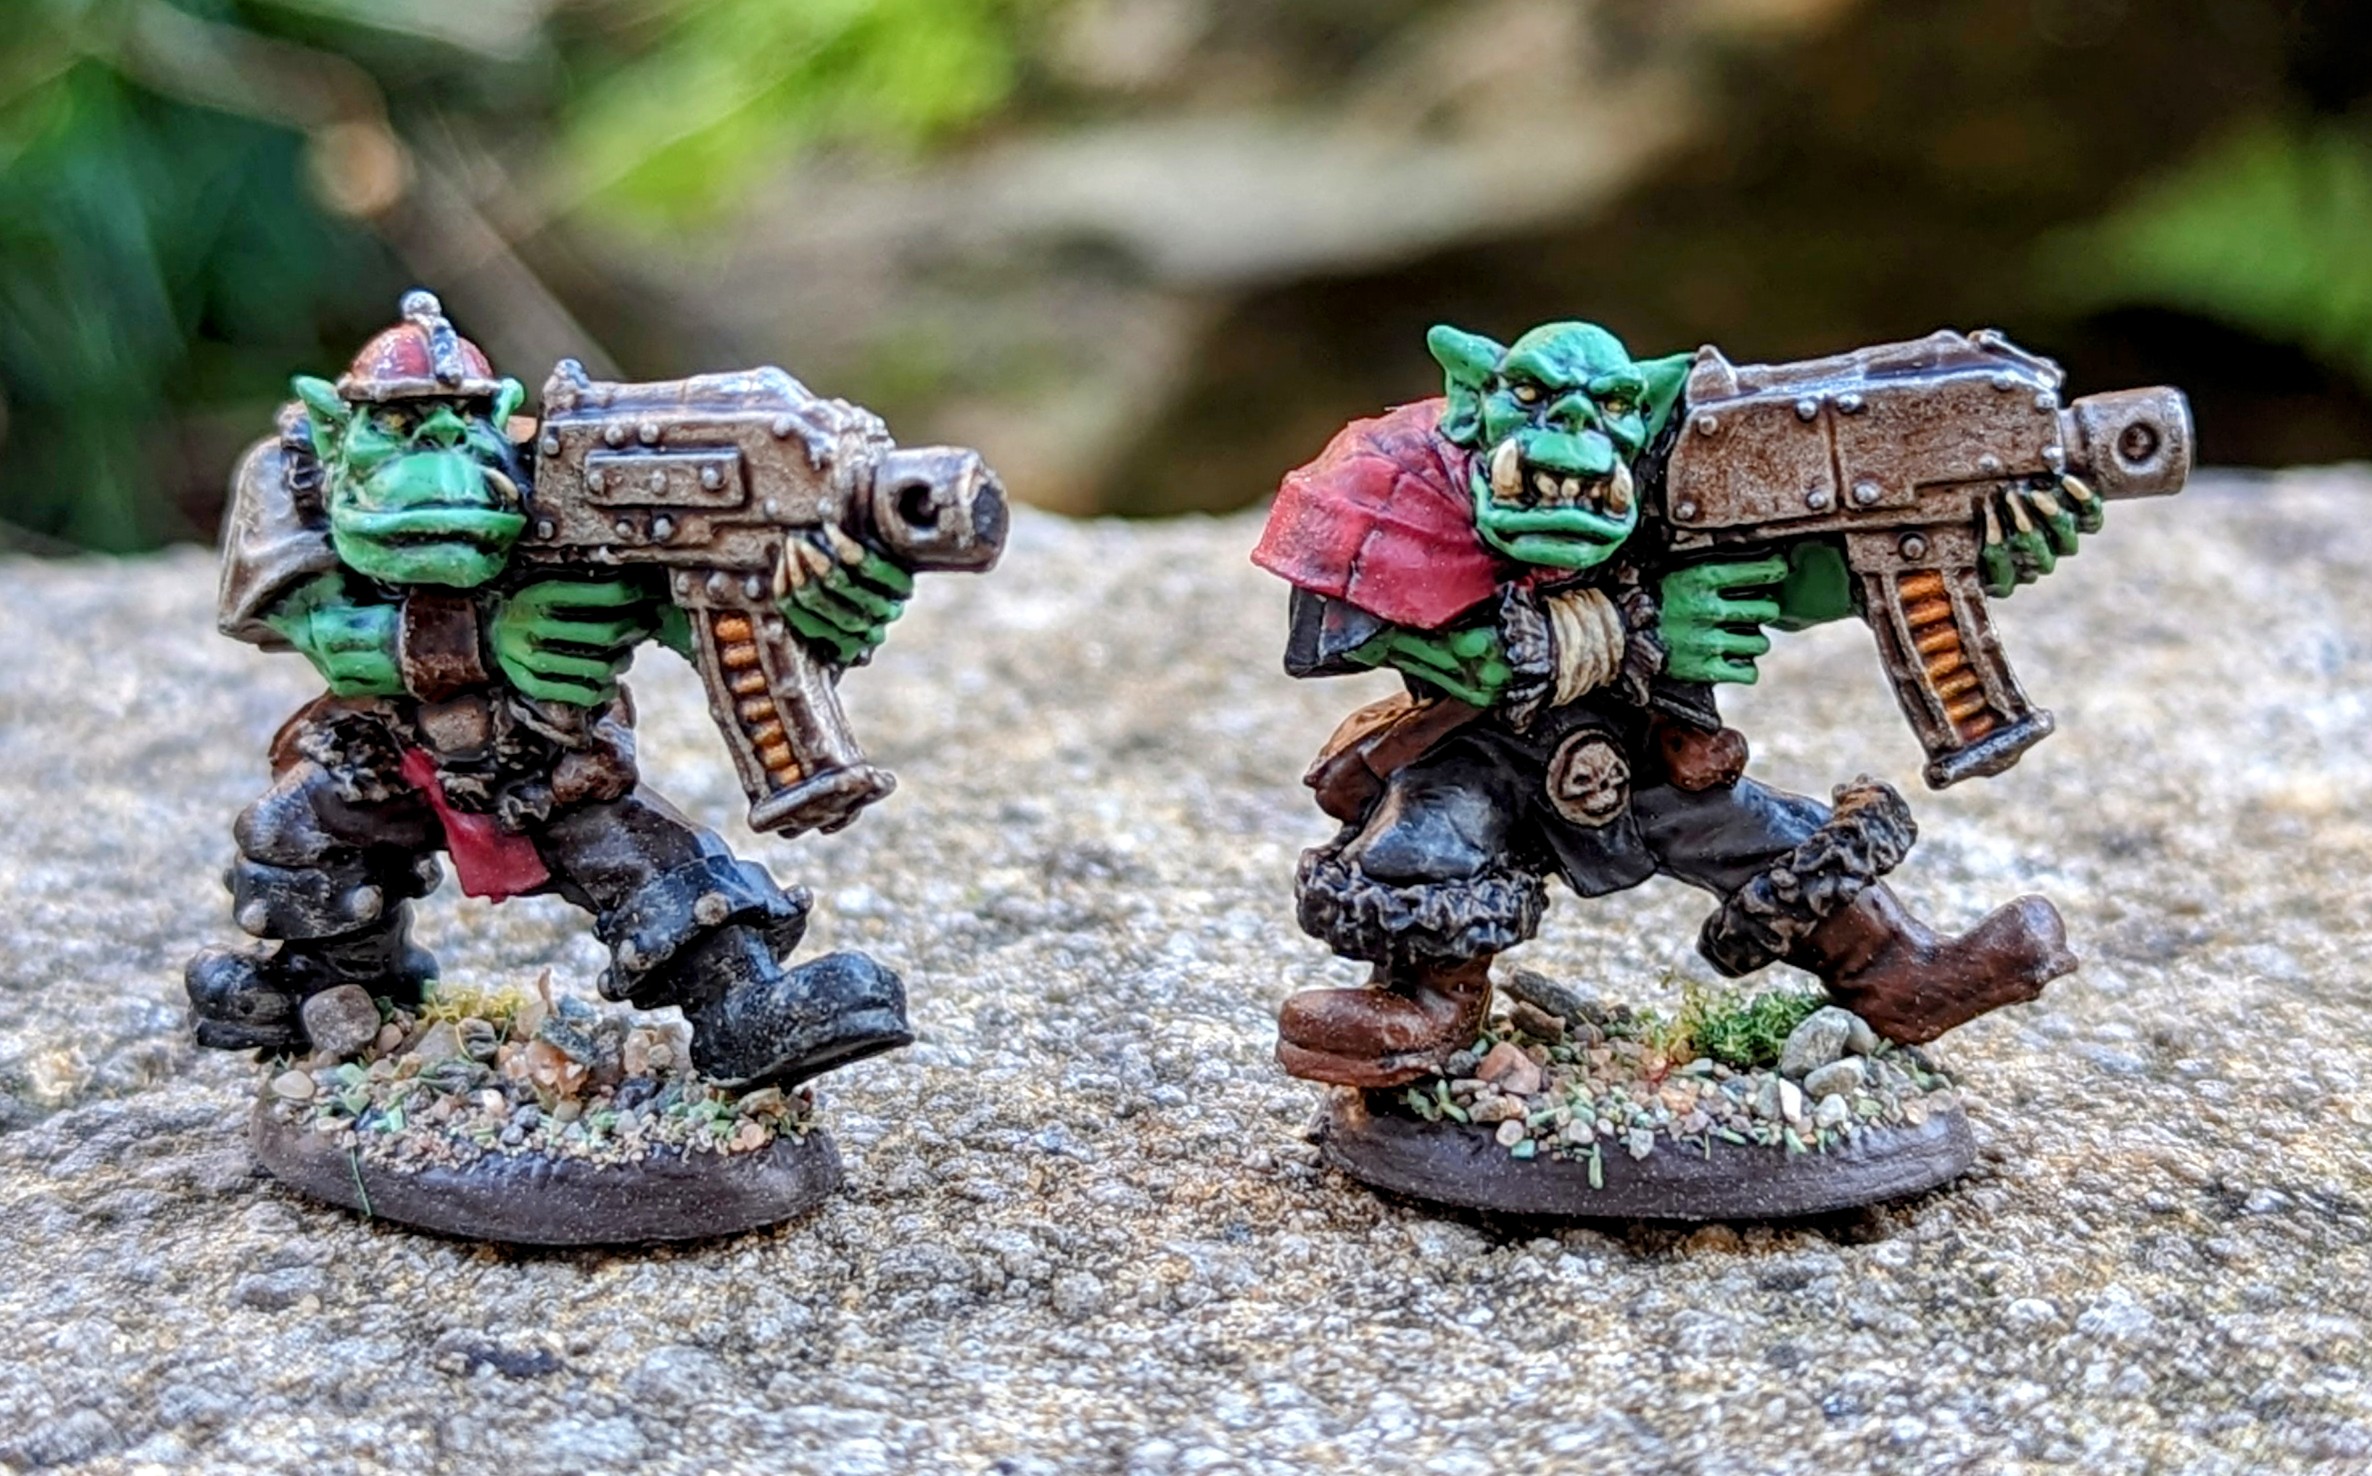
The definition on these old sculpts it really good and full of character, much more so than the plastics. However, the downside of metal sculpts of this period was the duplication of poses, as you can see with these two boys.

I've tried to use the way I've painted them to make them as different as possible whilst still maintaing a cohesive look.

In game these two will bring me slightly longer range shooting than is possible with the weapons available with the starting plastic gang. This will help when the Big Shootas on my vehicles inevitably run out of ammo the first time they fire.


Gorkamorka owes a lot of its design to Necromunda, and this includes the construction of gangs. In Necromunda young gang members are known as Juves, whereas in Gorkamorka these adolescent Orks are called Yoofs and are only able to carry pistols.

To create more variety, both of the models had one separate arm which allowed for a degree of posing. I can't remember if there were options for these separate arms.

You may notice that Gorkamorka models have teeny-tiny bases to allow more of them to fit inside the vehicles (which you to carry as many as you can cram in). I did initially put them on 20mm round bases for stability and to make them match my 40k army, but I struggled to get more than two in a Trukk without it looking silly, so I returned to the official bases.


Also, in attempt to make some quick headway into my massively expanding Lead Mountain, I did these eight barrels that cam with the original game.

They were done simply with a base colour, as wash of Agrax Earthshade and then stippling Lead Belcher with a torn piece of sponge to add the wear and tear. They will serve as terrain, cover and possibly objectives.

Despite this attempt to make inroads, I need to accept some more additions to my pile from the hoard.

I've added a whopping 45 monopose Empire state troops along with 25 Undead and Giant Bats, which will be featuring in an upcoming Warhammer Fantasy Battle project soon, and hopefully preventing me from buying Warhammer: The Old World. However, right now my numbers are getting ugly and there's more to come.

Oh well, at least I know what my New Year's Resolution will be.

Acquired: 198
Painted: 283
Lead Mountain: 536


Sunday, 19 November 2023

WAAARGH-trakk

Here come the Orks again, perversely just after 'Orktober' is over.

Why?

Well, two reasons. Firstly, I was busy Zomtobering. Secondly, I didn't actually have any Orks to paint last month. 

However, things have changed...


As I'm sure you'll remember that I have acquired a metric ton of old miniatures from a friend, most of which I'll be selling on his behalf, but some (and it's a big 'some') which turned out to be my old miniatures I left with him when I moved out of London twenty years ago.

Amongst the heap were my original Gorkamorka gang from when the game was first released. Myself and a different friend split the box between us and then I splurged on a few additional purchases.

The only model in the gang with any paint on it was the Wartrakk, and although unfinished is a healthy reminder of how far my painting has come.


Therefore, with waves of nostalgia cascading over me, an Ork army already on the go in need of mobile fire support and a base coat (of sorts) already done, I set about finishing off a project that is over a quarter of a century old.


To keep thing simple and actually allow me to ignore stripping the model, I stuck with the original colour decisions, adding a layer of Mephiston Red over the chassis, Lead Belcher over the metalwork, and making some better decisions about the crew's clothing.

The entire model was drenched in Agrax Earthshade and then highlighted up where necessary; in much the same manner as I did the rest of my Ork horde earlier in the year.

I'm really quite happy with the result.


I do love the look of the Wartrakk.

Clearly based on the Kettenkrad light tractor, it harks back to the time when there was more than a little WW2 German elements in the 40k Ork range. The original metal model's driver was wearing a stahlhelm and the gunner had an officer's cap.

More politically aware times came along and these potentially problematic elements were phased out. I think the plastic Gorkamorka Wartrakk was the last of these elements to disappear into history (although I believe there still might be stats for it in the 'legends' category).


One thing I'm really enjoying about painting Orks is doing all the chipping and weathering. It's a really quick way to make it look like I've spent a lot more time on a model than I have.

The Wartrakk is an easy addition to my 2nd Edition army, adding a whole 50 points, mobility and some slightly heavier firepower. I'm not sure it's a game changer on its own, but it does mean I get to watch it blow up regularly.

Additionally, mentioning Gorkamorka has prompted Matt's nostalgia, and so we're both now busying ourselves in the Mek's workshop to get gangs ready.


Given the amount of miniatures I've now acquired, I felt the need to get an easy win in to, and so I've done this piece of scrap terrain which is also from the Gorkamorka game. 

Nothing fancy, just Leadbelcher drenched in Agrax, but it gives us something to crash into.

I need to start admitting how many miniatures I've acquired, but this will have to be in stages as I don't actually know the full extent yet.

So, just counting the Gorkamorka gang and vehicles, a Ratskin Gang for Necromunda and a load of barrels, that's another 38 miniatures to begin with...

...of which I've painted two.

Acquired: 128
Painted: 272
Lead Mountain: 457


Friday, 17 November 2023

You Might Not Pass!

The journey through Moria has been a fraught one for the Fellowship in our Quest of the Ringbearer campaign, as they've had to fight their way through a seemingly endless horde of goblins and trolls (even if the actual scenario rules didn't require this).

Exhausted and with their resources depleted, they just need to cross the Bridge of Khazad Dum to get to the East Gate and be free of the grasping dark.

However, the goblins will not let them go without another fight and there is something else in hot pursuit.

This is the Bridge of Khazad-Dum scenario and to win the Fellowship, who are incredibly low on Might, Will and Fate, need to destroy the bridge (only Gandalf can do this) and escape Moria.

However, there are a whole host of Goblins in the way and at some point in the first six turns the Balrog will arrive to hunt them down.

Hopefully the Fellowship can get a good head start before it arrives...

Turn One

...oh bum!

The Fellowship makes haste directly for the bridge whilst the goblins close in from either side. Gandalf surrounds the group with a blinding light to protect them from arrow fire whilst Legolas dawdles in order to fire back at the encroaching horde, dropping one of them.

However, with a terrifying roar, a huge eruption of flames and a dice roll of a one, the Balrog bursts into the seem and immediately begins whipping it's fiery lash out at the lagging Legolas.

Turn Two

The Fellowship push on and take the opportunity to plough into the nearest goblins. With Gimli and Boromir slaying all who stand in their way.

Legolas doesn't stop to fire again as to do so would allows the Balrog, which lumbers forward, again flicking its whip towards the Fellowship with deadly intent.

Turn Three

The forces of Moria gain the initiative and move to lock the Fellowship in place, allowing the Balrog to get dangerously close.

In a desperate bid to break free, the Fellowship hack and slash at the goblins, with Boromir and Gimli doing most of the heavy lifting, as for some reason Aragon was struggling to work out which end of the sword to hit people with.

Turn Four

The Balrogs towering form finally catches up with Legolas and it's great flaming sword slashes out but somehow doesn't cut the elf down.

The rest of the Fellowship continue to battle through the goblins, trying to cut their way clear of their impending doom in the great shape of shadow and flame.

Realising that the tall man with the shield had strayed too far from the protection of the hateful light, the goblin archers turn their fire on him as their comrades back off.

Boromir falls as he's apparently quite vulnerable to concentrated archery.

Who knew?

Turn Five

In a desperately brave move to give his friends a chance to flee, Merry moves to block the Balrog's path.

The plucky little hobbit is swatted aside into the shadows, but the Fellowship manages to cut a way through more of the goblins thanks to the sacrifice of Merry.

Turn Six

The Balrog thunders forwards again but the Fellowship manage to keep the goblins between them and the fallen Maiar.

Gimli continued to be the only member of the party who can reliably kill goblins, but Aragorn still contributes by using his free point of might each turn to keep the Fellowship moving.

Turn Seven 

With the bridge in sight, hope is kindled and then snuffed out as the Balrog, still unable to get to grips with the Fellowship, moved to block the bridge.

Its whip coils out and wraps around Gandalf, dragging to the feet of the creature and the wise old wizard disappears amongst the burning darkness.

All hope of a heroic victory is lost.

Turns Eight to Ten

Although the heroes could no longer win the game, the battle would only end when one side met it's victory conditions. This meant either two more members of the Fellowship would need to fall or... 

...the Ringbearer...


Heroically trying to protect the Ringbearer, the Fellowship prepare to sell their lives dearly. Legolas falls beneath a squirming heap of goblins but somehow Gimli and the stalwart Samwise stand firm against the flaming terror not once...

...but twice!

However, with their numbers dwindling the Fellowship's ultimate defeat is imminent.

Inspired by the heroics of Gimli and Sam, Pippin charges forward to meet the beast.

This was pure heroism and not anything to do with protecting the more valuable members of the Fellowship for later in the campaign.

The rest of the Fellowship backing off was also definitely heroic.

Pippin falls and the battle is lost.

Aftermath

The battle was lost but the campaign was not done, there was the need to see what state the Fellowship would be in as the quest continued.

Gimli was hands down the bravest Companion, having killed eight Goblins and stood toe to toe with the Balrog for two rounds of combat. Sam perhaps ran him close with some crucial uses of his Might points and standing shoulder to shoulder at the end.

The Fool of a Took was Aragorn. Despite continuously contributing Might to the fight, he was unable to make his blade count and continually failed to come to his comrades' aid with abortive heroic combats. Although others contributed less, more was expected of Isildur's heir.


Despite losing the game, the Fellowship actually finished in better shape than when they started (apart from one notable exception). Nobody died in the recovery rolls and a decent amount of Wounds, Might and Fate were restored leaving the Fellowship considerably more likely to reach the next rest point of Lothlorien.

Alas, Gandalf the Grey was fated to fall here and will play no further role in the Quest of the Ringbearer campaign until he's rebooted as Gandalf the White in War in Rohan.

His one final duty was to help me come up with a spurious explanation for how the Fellowship get out of this mess.


The great black flaming shape loomed over the remaining members of the Fellowship. Aragorn prepared to sell his life dearly, Sam clutched his blade of Westernesse with two hands and Frodo felt to pull of the Ring at the back of his mind.

"Come on then!" yelled Gimli, the stout dwarf brandishing his notched axe, "I have a gift for ye from my cousin Balin!"

As the Balrog reared up to strike a sudden blinding gleam illuminated the entire chamber and the goblins ran screaming from the hateful light.

The battered and bowed figure of Gandalf leaned on his staff in the middle of the bridge, shining luminescence beaming from him momentarily stunning the Balrog and a brief opening was cleared to the bridge.

"Follow me, quickly," snapped Aragorn, a pain on his face indicating that somehow he thought all this to be his fault.

The group leapt for the gap, the ranger stooping as he ran to scoop up the crumpled form of Pippin, whilst Gimli ran to help the injured Legolas to his feet, Frodo and Sam scurrying behind.

From the depths of the chamber the limping form of Boromir emerged carrying a limp bundle that could only be Merry and joined the rush to bridge.

As they each passed Gandalf he gave them an exhausted an rueful smile, saving his broadest grin for Frodo.

"Now fly, you fools! And by that I don't mean ride on eagles, that's a silly idea spouted by people who don't understand the first thing about Gwahir, the defenses in Mordor, the distances involved or the effect the Ring would have on the eagles themselves. I'm clearly using a metaphor intended to encourage you all to leg it!"

With a chuckle Gandalf turned to face the approaching Balrog alone...